Release 8.1.5
A67774-01
Library |
Product |
Contents |
Index |
| Oracle8i Migration Release 8.1.5 A67774-01 |
|
![]()
![]()
This chapter guides you through the process of migrating an Oracle7 database to Oracle8i using the Oracle Data Migration Assistant. This chapter covers the following topics:
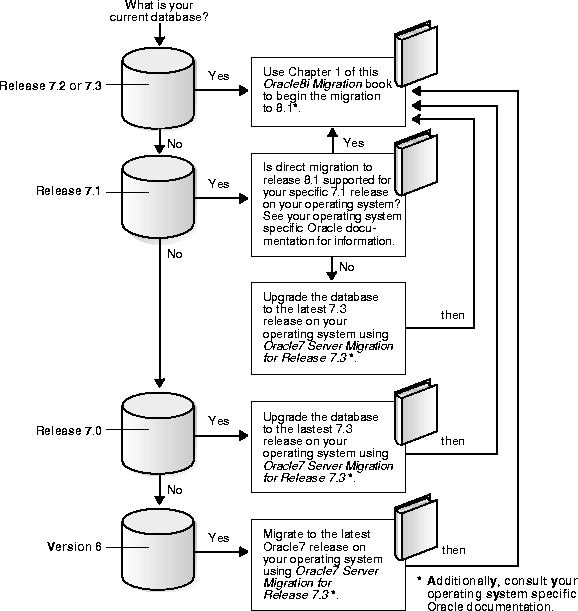
Figure 4-1 is a roadmap that specifies the documentation you should use to migrate your database to release 8.1 based on your current release of Oracle.
This section contains important considerations for using the Oracle Data Migration Assistant.
A version 6 database must be migrated to at least Oracle7 before it can be migrated to Oracle8i. Also, the Oracle Data Migration Assistant cannot migrate some Oracle7 releases. See your operating-system specific Oracle documentation for information about the earliest release that is supported by the Oracle Data Migration Assistant on your operating system.
For example, on some operating systems, the Oracle Data Migration Assistant can migrate only release 7.1.4 and later databases, and cannot migrate a release lower than release 7.1.4 (such as release 7.0 or release 7.1.3). If your database release number is lower than the release supported by the Oracle Data Migration Assistant on your operating system, upgrade or migrate the database to the required release.
Downgrading is the process of transforming an existing Oracle database into a previous version or release. The Oracle Data Migration Assistant cannot transform an Oracle8i database back to Oracle7. In some situations, you can use another facility to downgrade, such as using Export/Import, restoring from backups, and possibly using other functions.
The following sections discuss system considerations and requirements for using the Oracle Data Migration Assistant.
Oracle8i binaries may require as much as three times the disk space required by Oracle7 binaries. This requirement may cause you to run out of disk space during migration. However, the Oracle Data Migration Assistant requires relatively little temporary space. It needs only enough extra room in the SYSTEM tablespace to hold the new Oracle8i data dictionary simultaneously with the existing Oracle7 data dictionary.
The space required to hold an Oracle data dictionary depends on how many objects are in the database. Typically, a new Oracle8i data dictionary requires double the space that its Oracle7 source data dictionary required. If necessary, add space to the SYSTEM tablespace. The Oracle Data Migration Assistant will not complete the migration unless sufficient space is allocated in the SYSTEM tablespace.
If you need to add more space to the SYSTEM tablespace, issue a command similar to the following, substituting the appropriate directory path and name for the new datafile and the amount of space you need to add:
ALTER TABLESPACE system
   ADD DATAFILE '/home/user1/mountpoint/oradata/db1/system02.dbf'
   SIZE 50M;
Control files are considerably larger in Oracle8i than in Oracle7. For example, Oracle7 control files in the hundreds of kilobytes may expand into tens of megabytes in Oracle8i. The larger size in Oracle8i results from the storage of more information in the control file, such as backup and tablespace records. This size increase could be important if a control file is on a raw device or if its available disk space is restricted.
The value of DB_BLOCK_SIZE (a parameter in the initsid.ora file) in the Oracle7 database and in the migrated Oracle8i database must be the same. Oracle8i requires a minimum block size of 2048 bytes (2KB). Above this amount, integer multiples of your operating system's physical block size are acceptable. However, multiples of 2KB, especially powers of 2--that is, 2KB, 4KB, 8KB, 16KB--provide for the most robust operation.
Make sure the Oracle8i block size setting meets the following criteria:
You can migrate an Oracle7 replication environment to Oracle8i. Oracle7 sites can co-exist and run successfully with version 8 sites within the replication environment. However, take special care to accommodate the various replication features implemented on each system.
|
See Also:
Oracle8i Replication, Appendix B, "Migration and Compatibility", for detailed instructions about migrating systems using replication features. |
The Oracle Data Migration Assistant cannot migrate a database to a computer system that has a different operating system. For example, it cannot migrate a database from Oracle7 on Solaris to Oracle8i on Windows NT. However, you normally can use Export/Import to migrate a database to a different operating system.
|
Note: Starting with release 8.1, a change in word-size is supported during the migration process. A change in word size involves switching between 32-bit and 64-bit architecture within the same operating system. See "Changing Word-Size" for more information. |
It is not possible to change the character set during migration using the Oracle Data Migration Assistant; that is, the Oracle7 source database and the migrated Oracle8i database must have the same character set. All character data in the Oracle8i database is assumed to be in the character set specified in the CREATE DATABASE command that created the database.
However, you can change the character set by performing a full Export/Import. Or, you can use the ALTER DATABASE [NATIONAL] CHARACTER SET statement to change the character set, but only if the new character set is a true superset of the existing character set.
|
See Also:
The Oracle8i National Language Support Guide for information about National Language Support (NLS), instructions for specifying a character set, and for a full list of character sets that can be used with the ALTER DATABASE [NATIONAL] CHARACTER SET statement. |
Complete the following steps before you migrate your Oracle7 database to Oracle8i:
"Start with an Oracle7 Database Supported by the Oracle Data Migration Assistant" for more information.
See Also:
If you are not sure whether the Procedural Option is installed, you can check by starting Server Manager. The following is an example of the messages you will see when Server Manager starts:
Oracle Server Manager Release 2.3.3.0.0 - Production

Copyright (c) Oracle Corporation 1994, 1995. All rights reserved.

Oracle7 Server Release 7.3.4.0.0 - Production
With the distributed, replication, and Spatial Data options
PL/SQL Release 2.3.4.0.0 - Production
The messages you see may be slightly different, based on the options you have installed and their release numbers. If you see "PL/SQL" in the messages, as in the last line in the preceding example, then the Procedural Option is installed. Otherwise, it is not installed.
To determine whether any datafiles require recovery, issue the following SQL statement:
SELECT * FROM v$recover_file;
You should see a "0 rows selected" message, which indicates that all datafiles are either online or offline normal. If any datafiles are listed, you must restore the datafiles before you migrate the database. You can use the V$DATAFILE dynamic performance view to find the datafile name based on the datafile number. You will encounter an error during migration if any datafiles require media recovery.
Tablespaces that are not taken offline cleanly must be dropped or brought online before migration. Otherwise, these tablespaces will not be available under Oracle8i after the migration. Typically, tablespaces that are taken offline by using an ALTER TABLESPACE OFFLINE IMMEDIATE or ALTER TABLESPACE OFFLINE TEMPORARY command require media recovery.
After migration, tablespaces that are offline when you open the Oracle8i database remain in Oracle7 database file format. The offline tablespaces can be brought online at any time after migration, and the file headers are converted to Oracle8i format at that time. In addition, if you want to avoid large restores in the event of a failure, you can make all tablespaces except SYSTEM and ROLLBACK offline normal; then, you can restore only the datafiles for SYSTEM and ROLLBACK if you need to run another migration.
To check for a user with the name OUTLN, issue the following SQL statement:
SELECT USERNAME FROM dba_users WHERE USERNAME = 'OUTLN';
If you do not have a user named OUTLN, zero rows are selected.
To check for a role with the name OUTLN, issue the following SQL statement:
SELECT ROLE FROM dba_roles WHERE ROLE = 'OUTLN';
If you do not have a role named OUTLN, zero rows are selected.
To check for a user named MIGRATE, issue the following SQL statement:
SELECT USERNAME FROM dba_users WHERE USERNAME = 'MIGRATE';
If you do not have a user named MIGRATE, zero rows are selected.
To check for a role named MIGRATE, issue the following SQL statement:
SELECT ROLE FROM dba_roles WHERE ROLE = 'MIGRATE';
If you do not have a role named MIGRATE, zero rows are selected.
To check the OPTIMAL setting for the SYSTEM rollback segment, issue the following SQL statement:
SELECT a.usn, a.name, b.optsize
    FROM v$rollname a, v$rollstat b
    WHERE a.usn = b.usn AND name='SYSTEM';
Your output should be similar to the following:
USN        NAME                           OPTSIZE
---------- ------------------------------ ----------
         0 SYSTEM
1 row selected.
If there is a value in the OPTSIZE column, issue the following SQL statement to set optimal to NULL:
ALTER ROLLBACK SEGMENT SYSTEM STORAGE (OPTIMAL NULL);
You can reset OPTIMAL when migration is complete.
The following is an example of the ALTER ROLLBACK SEGMENT statement:
ALTER ROLLBACK SEGMENT system
   STORAGE (MAXEXTENTS 121);
You may need more space in the SYSTEM rollback segment to complete the migration successfully. If there is not enough space in your SYSTEM rollback segment, you may encounter an error when you run the Oracle Data Migration Assistant.
To check the free space in your SYSTEM tablespace, issue the following SQL statement:
SELECT sum(bytes) FROM dba_free_space
   WHERE tablespace_name='SYSTEM';
This statement displays the number of free bytes in the system tablespace.
|
See Also:
"Space Requirements" and "Assess System Requirements vs. Resources Available" for more information. |
initsid.ora file for use with Oracle8i. The initsid.ora file may still reside in the Oracle7 environment; the Oracle Data Migration Assistant will copy it to the Oracle8i environment when it is run.
Specifically, complete the following steps:
initsid.ora file. After migrating your database, you can remove the comments to use this parameter normally.
"The DB_DOMAIN Parameter" for more information about setting this initialization parameter.
See Also:
initsid.ora file contains an IFILE (include file) entry, edit the file specified in the IFILE entry in the same way that you edited the initsid.ora file in sub-steps a to d.
Make sure you save the initsid.ora file and the file specified in the IFILE entry, if one exists, after making these adjustments.
Complete the following steps to install the release 8.1 software and migrate the database:
If you need help at any screen or want to consult more documentation about the Oracle Universal Installer, click the Help button to open the online help.
If you chose Custom, respond to the screens that enable you to specify your custom installation settings until you reach the "Upgrading or Migrating an Existing Database" screen.
Make sure you install all of the options you installed with the Oracle7 database, assuming you do not want to discontinue use of a particular option. For example, if you installed Advanced Replication in Oracle7, you should install it in Oracle8i.
When installation is complete, one or more assistants may be started. When the Oracle Data Migration Assistant is started, you are ready to proceed with the migration.

If you need help at any screen or want to consult more documentation about the Oracle Data Migration Assistant, click the Help button to open the online help.
initsid.ora file specified is the complete path to the initsid.ora file of the Oracle7 database that you are migrating.
If you chose Custom, respond to the screens that enable you to specify your custom migration settings until you reach the "Confirm Backup" screen.
The Oracle Data Migration Assistant begins to perform the migration, and a status bar shows its progress.
listener.ora file automatically, or click the No button if you do not want the assistant to modify the listener.ora file.
Certain modifications are required to the listener.ora file for your database to work properly with Oracle Enterprise Manager. If you plan to use Oracle Enterprise Manager, you should click the Yes button to automatically modify the listener.ora file. However, if you do not plan to use Oracle Enterprise Manager, click the No button.
If you click the Yes button, the Oracle Data Migration Assistant modifies the listener.ora file in the following way:
listener.ora in one of the following ways:
A simple case: Suppose the old listener.ora has the following SID_DESC entry:
...
   (SID_DESC =
      (SID_NAME = ORCL)
   )
...
If the database name is SAL, the domain name is COM, and the Oracle home is /oracle/product/8.1, the assistant adds the following entry:
...
   (SID_DESC =
       (GLOBAL_DBNAME = sal.com)
          (ORACLE_HOME = /oracle/product/8.1)
          (SID_NAME = SAL)
    )
...
A more complicated case: Suppose the old listener.ora has the following SID_DESC entry:
...
   (SID_DESC =
       (GLOBAL_DBNAME = an_entry)
       (SID_NAME = ORCL)
    )
...
If an_entry does not match the GLOBAL_DBNAME of the migrated database, and if the database name is SAL, the domain name is COM, and the Oracle home is /oracle/product/8.1, the assistant adds the following entry:
...
   (SID_DESC =
       (GLOBAL_DBNAME = sal.com)
          (ORACLE_HOME = /oracle/product/8.1)
          (SID_NAME = SAL)
    )
...
This entry is the same as the entry in the simple case, but the assistant also adds the entry an_entry to the SERVICE_NAMES parameter. Therefore, the assistant changes the SERVICE_NAMES parameter to the following:
SERVICE_NAMES = sal.com, an_entry
listener.ora file. The assistant does not perform this action on UNIX operating systems.
If you installed Oracle8i without specifying that you are migrating an existing database, you can run the Oracle Data Migration Assistant independently after the Oracle8i installation is complete.
Complete the following steps to run the Oracle Data Migration Assistant independently:
On UNIX, enter the following command at a system prompt:
odma
On Windows NT, select:
Start > Programs > Oracle - ORACLE_HOME_NAME > Migration Utilities > Oracle
Data Migration Assistant
When you start the Oracle Data Migration Assistant, its welcome screen appears (see Figure 4-2).
Step 8 to Step 15 in "Install the Release 8.1 Oracle Software and Migrate the Database" for more information.
See Also:
Complete the following steps after you have successfully run the Oracle Data Migration Assistant:
SVRMGR> CONNECT INTERNAL;
SVRMGR> STARTUP RESTRICT
You may need to use the PFILE option to specify the location of your initsid.ora file.
SVRMGR> SPOOL catoutma.log
If you want to see the output on your screen of the scripts you will run, you also can issue a SET ECHO ON statement:
SVRMGR> SET ECHO ON
catrep.sql:
SVRMGR> @catrep.sql
r0703040.sql:
SVRMGR> @r0703040.sql
This r0703040.sql script performs a post-catrep.sql Advanced Replication related upgrade.
If you encounter any problems when you run these scripts, or any of the scripts in the remaining steps, correct the causes of the problems and rerun the scripts. You can rerun any of the scripts described in this chapter as many times as necessary.
utlrp.sql (optional):
SVRMGR> @utlrp.sql
The utlrp.sql script recompiles all existing PL/SQL modules that were previously in an INVALID state, such as packages, procedures, types, etc. These actions are optional; however, they ensure that the cost of recompilation is incurred during installation rather than in the future.
Oracle Corporation highly recommends performing this optional step.
SVRMGR> SPOOL OFF
Then, check the spool file and verify that the packages and procedures compiled successfully. You named the spool file in Step 4; the suggested name was catoutma.log.
You should look for errors that alert you to insufficient space, and for errors that alert you that a script failed to run. If you see these types of errors, your migration may not be completely successful. However, you typically can ignore errors about the failure to alter or drop an object that does not exist.
If you specified SET ECHO ON, you may want to SET ECHO OFF now:
SVRMGR> SET ECHO OFF
SVRMGR> SHUTDOWN IMMEDIATE
Executing this clean shutdown flushes all caches, clears buffers, and performs other DBMS housekeeping activities. These measures are an important final step to ensure the integrity and consistency of the newly migrated Oracle8i database.
initsid.ora file for Oracle8i.
Alter any parameter whose syntax has changed in version 8; refer to Appendix B, "Changes to Initialization Parameters" for lists of new, renamed, and obsolete parameters.
Also, learn about the new parameters listed in Appendix B, "Changes to Initialization Parameters" and decide which ones you want to use for your migrated database.
In addition, the Oracle Data Migration Assistant sets the COMPATIBLE initialization parameter to 8.0.5. See Chapter 8, "Compatibility and Interoperability" for information about resetting the COMPATIBLE initialization parameter.
Errors may be caused by the following actions or omissions:
Appendix A, "Troubleshooting Migration Problems" and Oracle8i Error Messages for information about errors during migration and about corrective action for each error.
See Also:
If you took a backup of your Oracle7 database before you ran the Oracle Data Migration Assistant, the easiest way to abandon a migration is to restore that backup. However, if you do not have a backup, or if you took the backup after running the assistant, you must complete the procedure described in this section to abandon the migration.
You can run the Oracle Data Migration Assistant multiple times and still return to the Oracle7 database. However, running the Oracle Data Migration Assistant automatically eliminates the Oracle7 database catalog views. Therefore, to return to the Oracle7 database after running the Oracle Data Migration Assistant, you must run the Oracle7 catalog.sql script to restore the Oracle7 database catalog views.
To abandon the migration, you generally must restore the Oracle7 database by completing the following steps in the Oracle7 environment:
SVRMGR> DROP USER MIGRATE CASCADE
catalog.sql and catproc.sql:
SVRMGR> @catalog.sql
SVRMGR> @catproc.sql
catsvrmg.sql:
SVRMGR> @catsvrmg.sql
catrep.sql:
SVRMGR> @catrep.sql