Release 8.1.5
A67439-01
Library |
Product |
Contents |
Index |
| Oracle8i Parallel Server Setup and Configuration Guide Release 8.1.5 A67439-01 |
|
This chapter describes the configuration tasks to create an operating Oracle Parallel Server.
Specific topics discussed are:
The type of installation you chose determines the type of configuration to perform:
If you chose not to create a database during a Custom install, you can use the Oracle Database Configuration Assistant after installation to create an Oracle Parallel Server database.
Step 1: Create and Identify Raw Partitions
The Oracle Database Configuration Assistant assumes the raw devices were created and names. It will verify raw devices exist prior to database creation. If the raw devices were not set up, the Oracle Database Configuration Assistant will fail to create the database.
If the raw devices have not been created, perform these tasks:
| On UNIX: | On Windows NT: |
|---|---|
|
On each node:
See the Oracle8i Parallel Server Getting Started for Windows NT for further information about these steps. |
To create a database using the Oracle Database Configuration Assistant:
-On Windows NT, choose Start > Programs > Oracle for Windows NT - [HOME_NAME] > Oracle Database Configuration Assistant.
-On UNIX, run dbassist from $ORACLE_HOME\bin.
The Oracle Database Configuration Assistant welcome page appears:
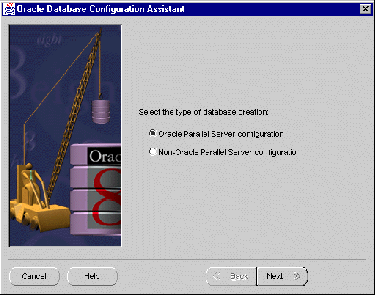
The following page appears:
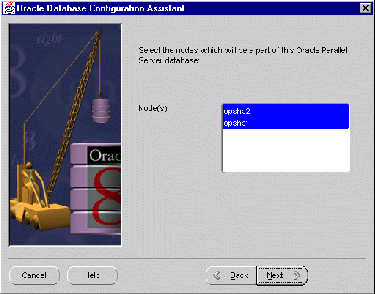
The error message below may appear if there is a problem with the clusterware:

On UNIX, this message indicates that the Oracle Database Configuration Assistant is unable to detect the lists of nodes in the cluster. See your Operating System Dependent vendor documentation for further information.
On Windows NT, this messages indicates that Cluster Manager (CM) is installed but:
To resolve this error message:
NET USE \\host_name\C$
where host_name is the host name defined in the DefinedNodes registry value for CM.
A successful connection results in "The command completed successfully."
Oracle Corporation recommends using the same user name and password on each node in a cluster or use a domain user name. If you use a domain user name, log on under a domain with username and password which has administrative privileges on each node.
The following page appears:
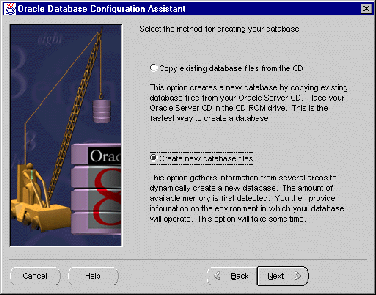
When you get to the page that requests the global database name and SID prefix:
Using Database Creation Assistant results in the creation of the following files:
See "Understanding the Initialization Files" for further information about these files.
|
Note: If the Oracle Database Creation Assistant fails to create the database, see "Cleaning Up the Registry After an Oracle Database Configuration Assistant Failure on Windows NT". |
To start the Oracle Parallel Server database in parallel mode:
lsnrctllsnrctl> start[listener_name]
where listener_name is the name of the listener defined in the LISTENER.ORA file. It is not necessary to identify the listener if you are using the default listener, named LISTENER.
LSNRCTL will display a status message indicating that the listener has started successfully. Check that all expected services for that listener are listed in the services summary in the status message.
sql> CONNECT internal/password
sql> STARTUP;
The first instance to start up in shared mode determines the values of the global constant parameters for the other instances. The control file records the values of the GC_* parameters when the first instance starts up.
When another instance attempts to start up in shared mode, the Oracle Server compares the values of the global constant parameters in its parameter file with those already in use and issues a message if any values are incompatible. The instance cannot mount the database unless it has the correct values for its global constant parameters.
sql> CONNECT internal/password
sql> STARTUP;
To verify instances are running:
sql> CONNECT internal/password
sql> SELECT * from v$active_instances;
The following output is returned:
INST_NUMBER  INST_NAME
-----------  ---------
           1 node1:ops1
           2 node2:ops2
           3 node3:ops3
. .
.
sql> CONNECT scott/tiger
sql> SELECT * from emp;
The employee table displays:
    EMPNO ENAME      JOB             MGR HIREDATE        SAL      COMM    DEPTNO
--------- ---------- --------- --------- --------- --------- --------- ---------
     7369 SMITH      CLERK          7902 17-DEC-80       800                  20
     7499 ALLEN      SALESMAN       7698 20-FEB-81      1600       300        30
     7521 WARD       SALESMAN       7698 22-FEB-81      1250       500        30
     7566 JONES      MANAGER        7839 02-APR-81      2975                  20
     7654 MARTIN     SALESMAN       7698 28-SEP-81      1250      1400        30
     7698 BLAKE      MANAGER        7839 01-MAY-81      2850                  30
     7782 CLARK      MANAGER        7839 09-JUN-81      2450                  10
     7788 SCOTT      ANALYST        7566 19-APR-87      3000                  20
     7839 KING       PRESIDENT           17-NOV-81      5000                  10
     7844 TURNER     SALESMAN       7698 08-SEP-81      1500         0        30
     7876 ADAMS      CLERK          7788 23-MAY-87      1100                  20
     7900 JAMES      CLERK          7698 03-DEC-81       950                  30
     7902 FORD       ANALYST        7566 03-DEC-81      3000                  20
     7934 MILLER     CLERK          7782 23-JAN-82      1300                  10
14 rows selected.
A user identifies an Oracle Parallel Server instance, its database service and the location of the database on the network through a net service name. When an end user connects to an instance, the service is identified by the net service name. The nodes and clients must be configured with net service names.
Services coordinate their sessions with the help of a listener. The listener receives connection requests on behalf of a client application. Listener are configured to "listen on" an address for a database service. See the Net8 Administrator's Guide for further information about net service names and the listener.
Each node must have the following configuration files in $ORACLE_HOME/network/admin on UNIX or ORACLE_HOME\network\admin on Windows NT:
The steps to perform to configure the network include:
Listener configuration should not be necessary, as it is taken care of as a part of the installation process, as described in:
If configuration is still necessary, follow the instructions in "Configuring LISTENER.ORA".
During a Typical installation, the Net8 Configuration Assistant creates a default LISTENER.ORA file for a listener named LISTENER that listens on the following protocol addresses:
Additionally, the Oracle Database Configuration Assistant configures information about the database, including the global database name and SID in the LISTENER.ORA. Typically, static configuration of this information is not necessary in a release 8.1 configuration, because instances register this information with the listener upon startup. However, this information is necessary for Oracle Intelligent Agent to work properly.
A sample LISTENER.ORA is shown below:
listener = (description_list = # IPC listenening endpoint for external procedures' connections (description = (address_list = (address = (protocol = ipc)(key = extproc0)) ) ) # TCP/IP listenening endpoint for java option connections (description = (protocol_stack = (presentation = giop) (session = raw) ) (address_list = (address = (protocol = tcp)(host = opshp1-pc)(port = 2481)) ) # TCP/IP listenening endpoint for database connections (description = (address_list = (address = (protocol = tcp)(host = opshp1-pc)(port = 1521)) ) ) )sid_list_listener = (sid_list = (sid_desc = (sid_name = plsextproc) (oracle_home = c:\orahome) (program = extproc) ) # Information about database needed for Oracle Intelligent Agent (sid_desc = (global_dbname = op.us.oracle.com) (oracle_home = c:\orahome\ops) (sid_name = op1) ) )
During a Custom installation, a LISTENER.ORA file should had been created for a listener named by you for a protocol address you configured, as described in "Custom Installation".
Additionally, the Oracle Database Configuration Assistant configures information about the database, including the global database name and SID in LISTENER.ORA. Typically, static configuration of this information is not necessary in a release 8.1 configuration, because instances register this information with the listener upon startup. However, this information is necessary for Oracle Enterprise Manager version 2 to work properly.
If the LISTENER.ORA is not configured for some reason, use the Net8 Assistant to perform the following procedure on each node:
lsnrctllsnrctl> stop [listener_name]
listener_name is the name of the listener defined in the LISTENER.ORA file. It is not necessary to identify the listener if for the default listener, named LISTENER.
-On UNIX, run the shell script netasst at $ORACLE_HOME/bin.
-On Windows NT, choose Start > Programs > Oracle - HOME_NAME > Network Administration > Net8 Assistant.
If you do not choose the registered port of 1521, you must configure the LOCAL_LISTENER parameter in the INITDB_NAME.ORA file and resolve it with a net service name entry in the TNSNAMES.ORA file. For further information about configuring non-default port numbers in LISTENER.ORA, see Chapter 6, "Configuring Naming Methods and the Listener" in the Net8 Administrator's Guide.
Note:
lsnrctllsnrctl> startlistener_name
listener_name is the name of the listener defined in the LISTENER.ORA file. It is not necessary to identify the listener if for the default listener, named LISTENER.
Note:On UNIX platforms, to use a single LISTENER.ORA file that lists all listeners on all nodes, the listeners must have distinct names. This can be accomplished by setting the
lsnr_listener_nameparameter in the DB_NAME.CONF file, located in$ORACLE_HOME/ops:lsnr_listener_name = "listener_%m"
The LISTENER.ORA file can then be distributed to all the nodes. For further information about the DB_NAME.CONF file, see "Parameter Descriptions".
A net service name is mapped to a network address contained in a connect descriptor in a TNSNAMES.ORA file. A connect descriptor contains the location of the listener through a protocol address and the service name of the service to which to connect. Clients use this net service name when making a connection with an application.
This section discusses the following:
A net service name must be created for each Oracle Parallel Server instance.
To configure a TNSNAMES.ORA file for an Oracle Parallel Server, use the Net8 Assistant:
-On UNIX, run the shell script netasst at $ORACLE_HOME/bin.
-On Windows NT, choose Start > Programs > Oracle - HOME_NAME > Network Administration > Net8 Assistant.
For clarity, the name should reflect the SID of instance on the node, such as OP1, OP2, and so on.

If you want to be explicit, the net service name may be qualified with the domain.
The service name is typically the global database name, a name comprised of the database name and domain, entered during installation. An example service name is OP.US.ORACLE.COM, where OP is the database name and US.ORACLE.COM is the domain.
The net service name is added to the Net Service Names folder:
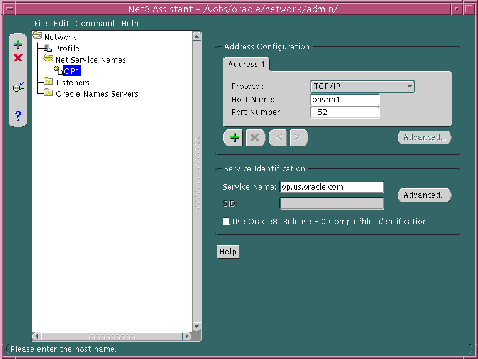
The instance name should match the net service name or SID of the instance on the node, such as OP1, OP2, and so on.
A sample TNSNAMES.ORA file is shown below:
op1 =
  (description =
   (address =
       (protocol = tcp)
       (host = opshp1)
       (port = 1521))
   (connect_data =
       (service_name = op.us.oracle.com)
       (instance_name = op1))
op2 =
  (description =
    (address =
       (protocol = tcp)
       (host = opshp2)
       (port = 1521))
    (connect_data =
       (service_name = op.us.oracle.com)
       (instance_name = op2))
Oracle Corporation recommends creating a net service name for the Oracle Parallel Server database. Optionally, this net service name can also be created so that it randomly selects instances with client load balancing.
|
Note: Besides client load balancing, this net service name can also be set up for connect-time failover and transparent application failover. Configuring both types of failover requires additional configuration to LISTENER.ORA and TNSNAMES.ORA, as described in "Configuring Net8 with Failover". |
Client load balancing (LOAD_BALANCE = ON) instructs Net8 to balance the load over the list of listener addresses by picking one at random. Client load balancing is turned ON by default for multiple connect descriptors (DESCRIPTION_LIST).
To create a net service name for the database and enable client load balancing:
Addresses created in this manner will be tried by the node in the order presented. To randomly have the node choose between the multiple address during a connection:
The TNSNAMES.ORA file is re-created.
The Net8 Assistant application exits.
Shown below is a 8.1 release TNSNAMES.ORA file with net service names of OP, OP1 and OP2. OP allows the node to connect to the database service OP and try one address at random. OP1 and OP2 allow the node to connect to a specific Oracle Parallel Server instance.
op = (description= (load_balance=on)(address=(protocol = tcp) (host = opshp1) (port = 1521))(address=(protocol = tcp) (host = opshp2) (port = 1521)) (connect_data= (service_name=op.us.oracle.com))) op1 = (description = (address = (protocol = tcp) (host = opshp1) (port = 1521)) (connect_data = (service_name = op.us.oracle.com) (instance_name = op1)) op2 = (description = (address = (protocol = tcp) (host = opshp2) (port = 1521)) (connect_data = (service_name = op.us.oracle.com) (instance_name = op2))
If you plan to use Oracle Enterprise Manager and OPS is installed on a Windows NT cluster, additional net service names must be added to the TNSNAMES.ORA file.
When Oracle Enterprise Manager performs a startup of instances running on UNIX nodes, a command is passed to a process on the node to perform a local connection.
On Windows NT, a remote connection is performed from the one of the nodes to the other nodes using entries in the TNSNAMES.ORA file. This remote connection cannot accept the SERVICE_NAME and INSTANCE_NAME parameters in the TNSNAMES.ORA if the database is down. This occurs because this information about the database is not registered with the listener unless the database is up.
The workaround to this problem is to specify additional net service names that use SID rather than SERVICE_NAME and INSTANCE_NAME. If you plan to use Oracle Enterprise Manager and Oracle Parallel Server is installed on Windows NT nodes, you must perform the following:
SID_startup
When Oracle Enterprise Manager performs a startup of an instance, it will expect this name.
SID_startup net service names follow in sequence after the other net service names. Oracle Enterprise Manager uses net service names to determine the name of the instance. If the SID_startup entries are at the top of the list, instances will be named SID_startup rather than SID. This discrepancy between what is discovered and the actual instance names will prevent you from starting or stopping instances.
To configure the additional net service names on Windows NT nodes:
The name should be SID_startup, such as OP1_startup:
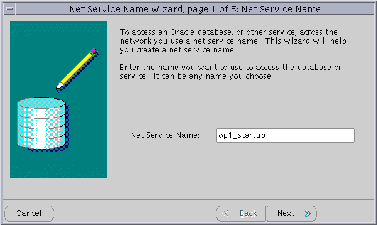
The net service name is added to the Net8 Service Names folders.
A sample TNSNAMES.ORA file is shown below:
op = (description= (load_balance=on)(address=(protocol = tcp) (host = opshp1) (port = 1521))(address=(protocol = tcp) (host = opshp2) (port = 1521)) (connect_data= (service_name=op.us.oracle.com))) op1 = (description = (address = (protocol = tcp) (host = opshp1) (port = 1521)) (connect_data = (service_name = op.us.oracle.com) (instance_name = op1)) op2 = (description = (address = (protocol = tcp) (host = opshp2) (port = 1521)) (connect_data = (service_name = op.us.oracle.com) (instance_name = op2)) op1_startup = (description = (address = (protocol = tcp) (host = opshp1) (port = 1521)) (connect_data = (sid = op1)) op2_startup = (description = (address = (protocol = tcp) (host = opshp2) (port = 1521)) (connect_data = (sid = op2))
Configure local naming as the first method specified in the NAMES_DIRECTORY_PATH parameter in the SQLNET.ORA file. This parameter specifies the order of naming methods Net8 will use to reconcile services.
To specify local naming as the first naming method:
The SQLNET.ORA file should contain an entry that lists TNSNAMES first in the NAMES.DIRECTORY_PATH parameter:
names.directory_path = (tnsnames, onames, hostname)
Clients should be configured with a TNSNAMES.ORA and SQLNET.ORA files, as described in
If the client is running Oracle Enterprise Manager or Oracle Performance Manager, see Chapter 5, "Installing and Configuring Oracle Parallel Server Management" for further information about configuring Net8 for these applications.
You can enable the following types of failover:
Connect-time failover instructs Net8 to fail over to a different listener if the first listener fails when set to ON. The number of addresses in the list determines how many addresses are tried. When set to OFF, instructs Net8 to try one address.
Failover is turned ON by default for multiple address lists (ADDRESS_LIST), connect descriptors (DESCRIPTION), and multiple connect descriptors (DESCRIPTION_LIST).
Transparent application failover instructs Net8 to fail over to a different listener if the first listener fails during runtime. Depending upon the configuration, session or any SELECT statements which were in progress are automatically failed over. This parameter must be embedded under CONNECT_DATA.
See the Net8 Administrator's Guide for further conceptual information about connect-time failover and Oracle8i Tuning for further conceptual information about transparent application failover.
Establishing both kinds of failover requires that you:
Implementing failover does not allow use of static service configuration parameters in the LISTENER.ORA file, such as:
sid_list_listener =
    (sid_desc =
      (global_dbname = op.us.oracle.com)
      (oracle_home = c:\orahome\ops)
      (sid_name = op1)
    )
  )
However, this information is the default implementation and is required by the Oracle Intelligent Agent for Oracle Enterprise Manager.
In order to implement failover, an additional listener must be specified on each node in the LISTENER.ORA file without service registration information. Perform the following steps:
Step 2: Add Entry for New Listener in LISTENER.ORA
Stop the listener. At the command line, enter:
lsnrctllsnrctl> stop [listener_name]
listener_name is the name of the listener defined in the LISTENER.ORA file. It is not necessary to identify the listener if you are using the default listener, named LISTENER.
Add an entry for a new listener to the LISTENER.ORA file that listens on TCP/IP protocol with the same port number as the first listener, which is typically listening on port 1521. This information must be added manually, as the Net8 Assistant does not permit using the same port number for another listener.
Do not add an service information with the SID_LIST_listener_name parameter.
|
Note: If you do not use the registered port of 1521, you must configure the LOCAL_LISTENER parameter in the INITDB_NAME.ORA file and resolve it with a net service name entry in the TNSNAMES.ORA. For further information about configuring non-default port numbers in LISTENER.ORA, see Chapter 6, "Configuring Naming Methods and the Listener" in the Net8 Administrator's Guide. |
For example, a second listener named LISTENER1 has been added to the LISTENER.ORA file below:
# listening endpoints for a listener named LISTENER1
listener1 =
  # TCP/IP listenening endpoint for database connections
  (description =
    (address = (protocol = tcp)(host = opshp1)(port = 1521))
    )
  )
listener =
  (description =
    (address = (protocol = tcp)(host = opshp1)(port = 1521))
    )
  )
# Static information about services for a listener named LISTENER
sid_list_listener =
  (sid_list =
    # Database information needed for Oracle Intelligent Agent
    (sid_desc =
      (global_dbname = op.us.oracle.com)
      (oracle_home = c:\orahome\ops)
      (sid_name = op1)
    )
  )
Start only the newly configured listener. At the command line, enter:
lsnrctllsnrctl> startlistener_name
listener_name is the name of the new listener defined in the LISTENER.ORA file (LISTENER1).
Failover is configured in the TNSNAMES.ORA file:
To configure connect-time failover for a client:
The Address List Options dialog box appears:
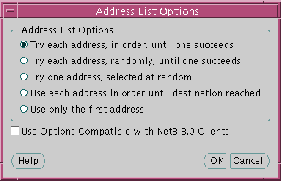
The TNSNAMES.ORA file is re-created.
The Net8 Assistant application exits.
Shown below is a 8.1 release TNSNAMES.ORA file with net service names of OP, OP1 and OP2. OP allows the node to connect to the database service OP and try each address at random until one succeeds. OP1 and OP2 allow the node to connect to a specific Oracle Parallel Server instance.
op = (description= (load_balance=on) (failover=on)(address=(protocol = tcp) (host = opshp1) (port = 1521))(address=(protocol = tcp) (host = opshp2) (port = 1521)) (connect_data= (service_name=op.us.oracle.com))) op1 = (description = (address = (protocol = tcp) (host = opshp1) (port = 1521)) (connect_data = (service_name = op.us.oracle.com) (instance_name = op1)) op2 = (description = (address = (protocol = tcp) (host = opshp2) (port = 1521)) (connect_data = (service_name = op.us.oracle.com) (instance_name = op2))
Transparent application failover involves manual configuration that includes specification of a primary node with a typical ADDRESS parameter and a backup node, failover type and failover method with a FAILOVER_MODE parameter.
FAILOVER_MODE can be implemented with connect-time failover with multiple addresses. In the example below, Net8 will try to make a connection to the one of the listener address (OPSHP1 or OPSHP2) at random. If, after the connection, the node should go down, Net8 will fail over to the other node, reserving any SELECT statements in progress.
op = (description= (load_balance=on) (failover=on)(address=(protocol = tcp) (host = opshp1) (port = 1521))(address=(protocol = tcp) (host = opshp2) (port = 1521)) (connect_data= (service_name=op.us.oracle.com) (failover_mode = (type = select)) ) )
A specific address can be specified to initially make a connection. Additionally, a backup node can specified in the FAILOVER_MODE parameter in case of a failure. In the example below, there is no connect-time failover. Net8 will try only OPSHP1. If, after the connection, OPSHP1 should go down, Net8 will fail over to OPSHP2, reserving any SELECT statements in progress.
op = (description=(address=(protocol = tcp) (host = opshp1) (port = 1521)) (connect_data= (service_name=op.us.oracle.com) (failover_mode = (backup = opshp2) (type = select) (method = basic) ))
)
FAILOVER_MODE parameters are described below:
To ensure the files are configured correctly:
sql> CONNECT internal/password@net_service_name
A "Connected" message should be returned to the screen.
If there is an error in connecting, you must troubleshoot your installation. Typically, there is a problem with the IP address, host name, service name, or instance name.
sql> UPDATE empset sal = sal + 1000 where ename = 'miller';sql> commit;
sql> SELECT * from emp;
MILLER's salary should now be $2,300, indicating all the instances can see the database.