Release 8.1.5
A67791-01
Library |
Product |
Contents |
Index |
| Oracle8i Replication Release 8.1.5 A67791-01 |
|
![]()
![]()
Chapter 4 introduces Deployment Templates and describes how to use them to easily and efficiently distribute snapshot environments. Topics covered in this chapter are:
Be sure that you have read Chapter 3, "Snapshot Concepts & Architecture" before you create a deployment template. Understanding how snapshots are created and work will better prepare you to build deployment templates.
Note:
Oracle Deployment Templates provide the enterprise DBA with the tools to efficiently deploy and administer a widely distributed snapshot environment. Before learning about the concepts, architecture, or use of deployment templates, examine the challenges of a mass deployment environment.
The need to have accurate information at any time and at any place continues to grow rapidly. At the same time, information usage is becoming decentralized and often disconnected, requiring the information to be distributed to the active points-of-usage.
Consider the mobile sales force. Potentially hundreds, if not thousands, of professionals need accurate information about their customers on a laptop in a manner that causes the salesperson very little inconvenience. The challenge, therefore, is for the database administrator to rollout the data and the database infrastructure (tables, indexes, constraints, triggers, etc.) to all sites in an efficient and timely manner.
Traditionally, the DBA has been required to develop a deployment method of their own. This usually means that the DBA was responsible for developing a very complex script to create the snapshot environment at the remote snapshot site. In addition to building the script, the DBA was often forced to figure out a method for parameter substitution to allow custom data sets at the snapshot site. Once the DBA completed engineering the script, deploying the script required manual packaging and implementation, both of which often required extensive troubleshooting.
The problems encountered in the above scenario have spawned technologies and resources dedicated to the art of efficient mass deployment.
Mass deployment is the term used to describe the process of distributing database infrastructure, data, and front-end applications to a large number of users. For the purposes of Oracle replication, the discussion of mass deployment will be limited to the delivery of data and data infrastructure.
Mass deployment tools and technologies should aid the database administrator in delivering the data and database infrastructure to the target users such that:
Mass deployment has many applications, such as distributing information to mobile sales forces, field technicians, retail stores, remote inventory collection sites, etc. Such environments use snapshots to build the database infrastructure at the remote site, largely because of their support for data subsetting, disconnected replication, and their lower resource requirements (ideal for laptops users).
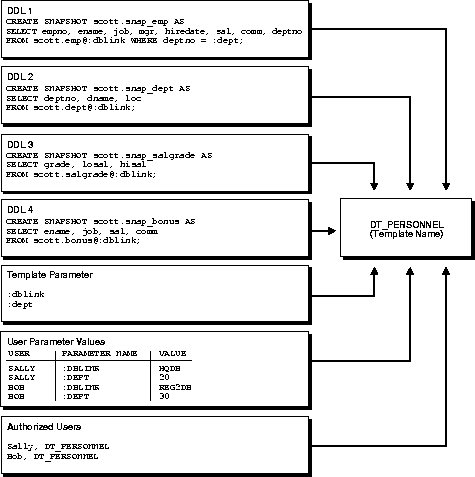
Oracle offers deployment templates to allow the database administrator to package a snapshot environment for easy, custom, and secure deployment. A deployment template can be as simple as containing a single snapshot with a fixed data set, or as complex as hundreds of snapshots with a dynamic data set based on one or more variables. The goal is to define the environment once and create as many instances of the deployment template as necessary. Deployment templates feature:
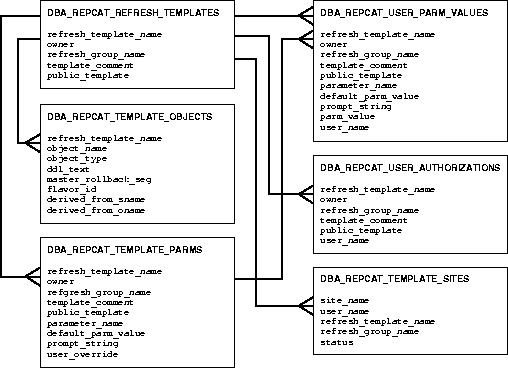
To prepare a snapshot environment for deployment, the DBA creates a deployment template at the master site. This template will store all of the information needed to deploy a snapshot environment, including the DDL (Data Definition Language) to create the objects at the remote site and the target refresh group. This template also maintains links to user security information and template parameters for custom snapshot creation.
Each Deployment Template contains the "blueprint" for creating the necessary snapshots and related objects at a snapshot site. Specifically, the DBA creates the Deployment Template at the master site, adding the necessary snapshots, triggers, views, etc. to the template as needed to create the snapshot environment. The DBA can optionally define template parameters and authorized users, giving the template greater flexibility and security during the instantiation process. Deployment template elements can be divided into four categories.
Oracle deployment templates center around the general template information, which consists of the template name, target refresh group, and private/public status. As illustrated in Figure 4-1, the refresh_template_name is used in all aspects of deployment template definitions. The DBA adds the snapshot environment objects to the template prior to releasing the template for distribution according to the specified template identification (see Figure 4-2).
A deployment template is defined at a single master site. While you cannot have two deployment templates at the master site with the same name, you could copy a deployment template to another site with the same deployment template name.
After the template has been defined, the DBA adds the required objects to the template. When the template is instantiated at the snapshot site, the object DDL (e.g. CREATE SNAPSHOT... or CREATE TABLE...) will be executed to create the appropriate objects at the snapshot site.
Objects added to a deployment template can be created based on an existing master object (object contained in a master group), but if necessary, the DBA can create a new template object by defining new object DDL. Oracle will check any new object DDL to make sure that it is lexically correct, which prevents executing faulty DDL.
In most cases, the DBA will be adding snapshots to the template, but if necessary, the DBA can add other objects. For example, constraints can be added to enforce data integrity at the snapshot site, views can be added for displaying data, or tables can be added for local data storage. In some cases, the DBA may even want to include all objects for an application in a deployment template. Snapshots created using a deployment template will automatically be added to the refresh group defined for the template (see "General Template Information" for more information).
Also, if the target snapshot sites will require data sets unique to their site, the DBA has the option of defining variables in the object DDL. These variables will create a parameterized template that allows for custom data sets when the same template is instantiated, allowing different snapshot sites to have different data sets.
Since the DBA has the ability to define variables in the template object DDL, Oracle allows the DBA to specify default values, prompt text, and user-specific parameter values for a template.
User-specific parameter values are optional and if the DBA has not defined any, the user can specify runtime parameter values to be used during an instantiation. If the user is using the client instantiation tool, the user will see the prompt text specified by the DBA and can enter a value for a specified prompt or accept the default value, also specified by the DBA (if the API will be used, the user will not automatically see the prompt text and default values).
|
Note: Parameter values must be pre-defined by a DBA when performing an online instantiation from a site using Oracle Lite. |
If user-specific parameter values do exist for either public or private templates, then these values will automatically be used when the specified user instantiates the template. For example, consider the variable REGION. If the DBA establishes the following user-specific parameter values for template X,
| USER | REGION |
|---|---|
| SCOTT | EAST |
| LARRY | WEST |
and users SCOTT and LARRY instantiate template X, their resulting snapshot data sets will be:
| User SCOTT | User LARRY | |||
|---|---|---|---|---|
| CUST ID | REGION | CUST ID | REGION | |
| A123 | EAST | B123 | WEST | |
| A234 | EAST | B234 | WEST | |
| A345 | EAST | B345 | WEST | |
| A456 | EAST | B456 | WEST | |
Deployment templates can be either public or private (defined when the template is created). If a template is public, any user with access to the master site can instantiate the template.
If a template has been created for private use, only authorized users ar able to instantiate the target template. To enforce private use, the DBA creates a list of authorized users at the master site and if an unauthorized user attempts to instantiate the target template, the instantiation process fails.
Private templates that have user specific parameters defined securely limit the snapshot site to viewing and changing only the data that satisfies the WHERE clause of the snapshot.
For example, the DBA has added user SCOTT to the user authorization list, has specified the following for the REGION parameter in the user specific parameters list
| USER | REGION |
|---|---|
| SCOTT | EAST |
| LARRY | WEST |
and the defining SELECT statement for the snapshot is:
SELECT cust_id, sales_to_date, status FROM table_x WHERE region_id=:region;
Users accessing the snapshot instantiated by user SCOTT will only see data for region EAST and will only be able to view, update, or delete data that complies with this WHERE clause. In other words, a user of this snapshot will not be able to view, update, or delete data for region WEST.
Maintaining the emphasis on centralized control, the DBA can monitor and manage certain characteristics of the instantiated environment at the remote snapshot site. Specifically, the DBA has the ability to view the sites that have instantiated a deployment template (which includes the deployment template name, authorized user, and status of the instantiated environment).
When you have completed defining your deployment template, you need to prepare the template for instantiation at the remote snapshot site. As you will learn in the next section, remote snapshot sites can perform either online or offline instantiations. Regardless of the method used, you need to package your deployment template for the appropriate instantiation method.
Either the DBA or the target user can package the deployment template. There is a public and private version of the packaging API (public is meant for users and private is meant for DBAs). In many cases, the DBA will perform the offline packaging on behalf of a user, while the user may perform their own packaging for an online instantiation, though there no restrictions on users or DBAs performing either type of instantiation.
After a deployment template has been packaged for deployment, the snapshot environment can be created via online or offline instantiation.
The target instantiation site will be required to run one of several Oracle database clients: Oracle8i Server, Oracle8i Server Enterprise Edition, Personal Oracle8i or Oracle8i Lite. The typical mass deployment scenario will have Oracle8i Server Enterprise Edition at the master site and Oracle8i Lite (which has a footprint between 350K and 750K) at the remote site, which will often be a laptop.
Online instantiation allows a snapshot site to instantiate a deployment template while connected to the target master site. When the snapshot site connects to the master site, a list of available templates is displayed (if you are using the API, you must supply the template name as a parameter value). During the instantiation process, the specified data subset is pulled from the master site and stored in the appropriate snapshot base tables.
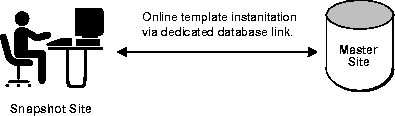
One of the benefits of online instantiation is that the data subset will be current as of the instantiation process. This data currency, however, comes at a cost. Online instantiation requires a "live" connection between the snapshot and master sites, which (depending on the size of the snapshot environment created) may cause extreme network traffic, possibly degrading other network services. Furthermore, laptop users connected by a modem may be required to stay connected for a long duration, depending on the number of objects created and the amount of data retrieved from the master site.
An online instantiation does not require the DBA to create the setup files in advance, create distribution media (e.g. CD-ROM), or physically distribute the offline instantiation media.
To decrease server loads during peak usage periods and reduce remote connection times, you may choose to instantiate the template offline. To instantiate a template offline, the DBA packages the template and required data on to some type of storage media (tape, CD-ROM, etc.).
Instead of pulling the template and data from the master site, they are pulled from the storage media containing the template and data. While this has the benefit of reducing network traffic and the eliminating the need for a "live" connection, the data is not current until after the first fast refresh process.
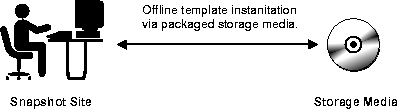
Offline instantiation is an ideal solution for mass deployment situations where many laptops and other disconnected computers will be instantiating the target template.
Oracle uses standard snapshot architecture with Deployment Templates to distribute snapshot environments quickly and effectively. Deployment Templates use the same methods in creating snapshot definitions, refresh characteristics, conflict resolution, and grouping as used when manually building a snapshot environment. The distinction to remember is that instead of executing the DDL to create the object immediately, the object DDL is simply contained in a deployment template and will be executed when the template is instantiated.
Instead of executing DDL at the snapshot site to immediately create a snapshot environment, the snapshot and other related object definitions are stored within the deployment template. After all of the object definitions have been added to the deployment template, the template can be instantiated and all of the stored DDL will be executed at the remote snapshot site to create the necessary snapshot environment.
All of these object definitions are stored in system tables maintained at the deployment template definition site, keyed on the deployment template name. When the deployment template is instantiated, the stored object DDL is pulled from these system tables to create the snapshot environment.
Template object definitions are created using the same DDL that is used to create the objects locally at the snapshot site. For example, you would execute the following to create a snapshot locally:
CREATE SNAPSHOT foo_snap AS SELECT empid, region, dept, salary
   FROM scott.foo@hq.com;
To add this same snapshot to a Deployment Template, you would use the Deployment Template Wizard or execute the CREATE_TEMPLATE_OBJECT function:
DECLARE
a NUMBER;
BEGIN
   a := DBMS_REPCAT_RGT.CREATE_TEMPLATE_OBJECT(
      refresh_template_name => 'dt_snapenv',
      object_name => 'foo_snap',
      object_type => 'snapshot',
      ddl_text => 'CREATE SNAPSHOT foo_snap AS SELECT empid, region, dept, salary
                   FROM scott.foo@hq.com');
END;
Executing the above function adds the snapshot definition to the deployment template named DT_SNAPENV. When this particular snapshot is instantiated, the snapshot FOO_SNAP will be created. In addition to creating snapshots, you can add table, trigger, procedure, index, and other object definitions to the deployment template (see "DBMS_REPCAT_RGT.CREATE_TEMPLATE_OBJECT" in the Oracle8i Replication API Reference for usage information).
When you package your deployment template in preparation for remote snapshot site instantiation, Oracle creates a script that is stored in a temporary table that contains all of the DDL and, in the case of offline instantiation, the DML (Data Manipulation Language) to create the snapshot environment.
When you package a template for online instantiation, the DDL that is required to create the remote snapshot environment is stored in the temporary view USER_REPCAT_TEMP_OUTPUT.
During an online instantiation, the remote snapshot site "pulls" the script directly from the master site. The script creates the snapshot environment using the stored DDL and the snapshots are populated with the data while online.
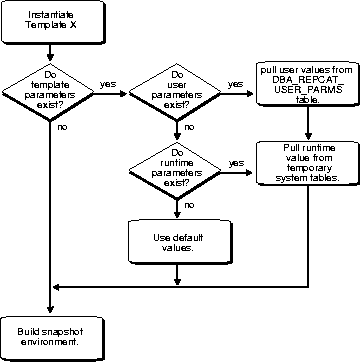
All template parameters are evaluated when the remote snapshot site begins the template instantiation procedure.
When a deployment template is packaged for offline instantiation, any template parameters are evaluated at the time of packaging. Since the parameters are evaluated before the actual instantiation at the remote snapshot site, any runtime parameter values must be defined before packaging the template.
When you package a template for offline instantiation, the DDL that is required to create the remote snapshot environment and the DML to populate the environment with the "snapshot" of data is stored in the temporary view USER_REPCAT_TEMP_OUTPUT.
The script that is created in the temporary table for offline instantiation is copied to a storage device using Replication Manager (e.g. hard disk, CD-ROM, tape, etc.). When the remote snapshot site instantiates the template, the script is executed from the storage media. This script creates the snapshot environment and uses DML to populate the environment according to the data set defined during the packaging process (recall that the data set according to the template parameters is defined during the packaging process).
Once the remote snapshot site begins the instantiation procedure (either online or offline), Oracle immediately executes the script that was created during the packaging process. This script will create the remote snapshot environment and populate the environment as specified. The following sections will discuss online and offline instantiation in greater detail.
Once the remote snapshot site begins the online instantiation process, Oracle evaluates the parameters that have been defined for the deployment template. Any values defined for these parameters will be used when the object DDL in the template is executed so that custom data sets may be installed at the remote snapshot site.
There are several possible methods that can be used to define template parameter values: default parameter values, runtime parameter values, or user parameter values. Oracle checks to see if these parameter values exist and uses them according to the hierarchy:
If user parameter values have been defined and a listed user is instantiating the template, the user parameter values will be used when instantiating the template.
If user parameter values do not exist, Oracle will check to see if any runtime parameter values have been defined. If runtime parameter values have been defined, they will be used during the instantiation process.
|
Note: Parameter values must be pre-defined by a DBA when performing an online instantiation from a site using Oracle Lite. |
If no user parameter values or runtime parameter values have been defined, Oracle will use the default parameter values.
Once any deployment template parameter values have been resolved, the object DDL is generated and stored in the temporary USER_REPCAT_TEMP_OUTPUT view. Remember the distinction between an online and offline instantiation; with an online instantiation, the contents of the USER_REPCAT_TEMP_OUTPUT view will only contain the DDL to create the snapshot environment (vs. DDL and DML for an offline instantiation). When this DDL is executed at the remote client site, there must be a connection to the master site in order to build the snapshot environment and populate it with the appropriate data.
The contents of this view can be saved to a file for distribution, or if the Oracle Client Instantiation Tool or similar tool is used at the remote site, the contents of this view will be retrieved and executed at the remote client site.
The objects created by the template are then added to the refresh group specified when the template was created.
In a mass deployment environment, most snapshot environments will use the offline instantiation method to create the necessary snapshot environment. When the DBA prepares the deployment template for deployment, an image is created that stores the DDL needed to create the snapshot environment, the parameter values used during the instantiation process, and the data needed to populate the snapshot environment.
The image can be copied to a CD-ROM, floppy disk, or other storage media or can be posted on a Web or FTP site to be downloaded to the remote snapshot site. The flexibility in delivery mechanisms allows you and your users to choose the most effective method for instantiating a deployment template.
Once any deployment template parameter values have been resolved, the object DDL to create the environment and the DML to populate the environment is generated and is stored in the temporary USER_REPCAT_TEMP_OUTPUT view (again, online instantiation generates only the DDL whereas offline generates both DDL and DML to create and populate the environment).
With respect to the data, the longer the duration between DDL and DML generation and instantiation at the remote site, the longer it will take for the first refresh after instantiation at the remote snapshot site (the snapshot site will use the snapshot log at the master site to perform the fast refresh from the time that the template was packaged). Recall that changes made to the master table will be logged to the snapshot log as soon as you package the deployment template.
After instantiating a deployment template at a remote snapshot site, the structure created is exactly the same as if you had created the snapshot environment locally at the snapshot site. Specifically, Oracle creates the snapshot (with the specified name) and an index based on the primary key to maintain constraint consistency. Other objects in the template are also created as if they were created manually at the snapshot site. (See "Snapshot Architecture" for more information.)
Objects created by an instantiated deployment template are added to a snapshot group with a name derived from the object's master group. For example, if you instantiated the DT_SNAPENV deployment template which contains objects from the PERSONNEL and TECHNICAL master groups, your template objects will be added to snapshot groups PERSONNEL01 and TECHNICAL01, respectively (the numbered suffix may change if multiple templates contain objects from the same master group). Remember that a snapshot group helps to maintain organizational consistency with the target master group and, more importantly, is required for updateable snapshots. See "Snapshot Groups" for more information.
When you first begin building a deployment template, you define the name of the refresh group to which the template's snapshot objects will be added. Also, when you execute the instantiation procedure, you have the option of specifying values for the next_refresh and refresh_interval parameters (disconnected laptop users will not specify values since they will refresh their snapshots on demand). After instantiation has been completed, the template objects will have been added to the specified refresh group and will have the refresh characteristics given at the time of instantiation. The ability to define refresh characteristics at the time of instantiation allows each site to specify refresh requirements specific to their site.
|
Note: The name of the refresh group must be the same as the name of the deployment template when building deployment templates to be instantiated at an Oracle Lite site. |
Before you begin assembling your deployment template, you should take some time to critically think about how to build your templates.
The combination of deployment templates and subquery subsetting (see "Data Subsetting with Snapshots" for more information) gives the database administrator greater flexibility and power to administer a widely distributed database environment using assignment tables and horizontally partitioned data.
Additional design consideration needs to be given to vertical partitioning requirements and data sets needed for a replicated environment (see "Vertical Partitioning" for more information).
As discussed in the previous section, snapshot data sets are defined based on the snapshot's query, meaning that the user only sees data that complies with the snapshot's defining query.
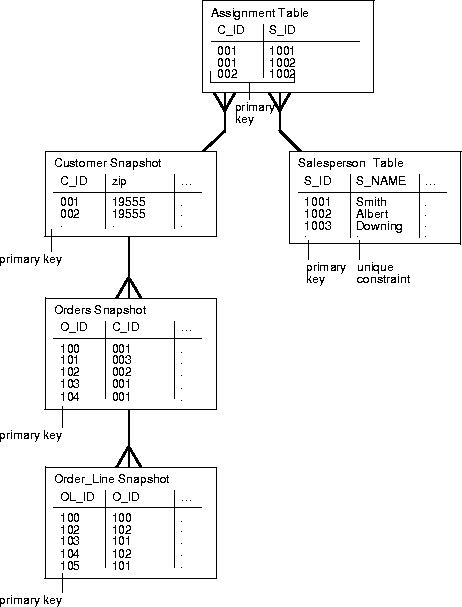
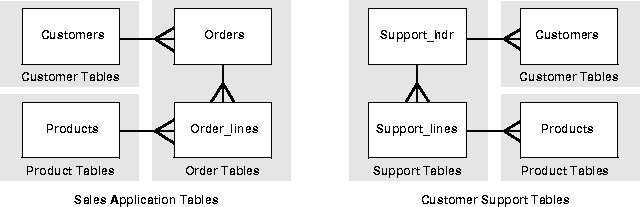
With this in mind, if "assignment" tables are used in conjunction with subquery subsetting, changes to the snapshot environment can easily be controlled by the DBA (for additional information about horizontal partitioning and using assignment tables, see "Data Subsetting with Snapshots"). For example, consider the customer/salesperson relationship in Figure 4-7.
In this example, a salesperson is assigned his/her customers based on the Assignment table. If new salespersons are hired or other salespersons leave, the existing customers can be assigned to their new salesperson by simply modifying the contents of the assignment table. Besides creating a single point of administration, assignment tables used in conjunction with subquery subsetting makes this easy administration remain secure. For example, salesman #1001 will not be able to view the customer information of other salesmen (very important if the customer information contains sensitive data).
Considering the relationships pictured in Figure 4-7, if the Orders snapshot's defining query was specified as (pay special attention to the :salesperson_id variable in the last line of the CREATE SNAPSHOT statement):
CREATE SNAPSHOT sales.orders AS
 SELECT * FROM sales.orders@hq.acme.com o
    -- conditions for customers
  WHERE EXISTS
  ( SELECT c_id FROM sales.customers@hq.acme.com c
    WHERE o.c_id = c.c_id
      AND EXISTS
    ( SELECT * FROM sales.assignments@hq.acme.com a
     WHERE a.c_id = c.c_id
     AND EXISTS
     ( SELECT * FROM sales.salespersons@hq.acme.com s
       WHERE s.s_id = ':salespercon_id')));
then the Orders Snapshot will be populated with order data for the customers that are assigned to the salesperson specified for the :salesperson_id variable.
With this flexibility, managers can easily control snapshot data sets by making simple changes to the assignment table (without requiring a DBA to modify any SQL). For example, if the specified salesperson was assigned two new customers, the manager would simply assign these two new customers to the salesperson in the assignment table. After the next snapshot refresh, the data for these two customers will be propagated to the target snapshot site, such as the salesperson's laptop. Conversely, if a customer was taken away from the specified salesperson, all data pertaining to the specified customer will be removed from the snapshot site after the next refresh and the salesperson will no longer be able to access that information.
Deployment templates offer the additional advantage of allowing you to build vertically partitioned updateable snapshots. For example, in a mass deployment environment with many "lightweight" clients, you may need to replicate tables that contain LOB data without actually replicating the LOB data itself. This can be achieved by excluding the LOB column from the selected columns to be replicated when defining the vertical partition.
The vertically partitioned snapshot that you add to your deployment template must contain the following:
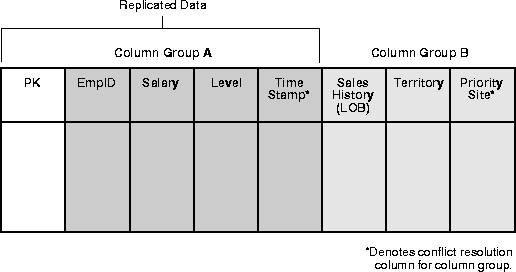
If you are adding a snapshot object that replicates columns PK, EmpID, Salary, and Level (illustrated in Figure 4-8), you need to also include the Time Stamp column since it is used for conflict resolution for columns contained in Column Group A.
When designing your deployment templates, you need to consider the different sets of users that need to access the target data. For example, salesmen and technicians both need customer information, but they both don't need sales information.
You don't want users to instantiate deployment templates that may contain extraneous data, as it will only require extra storage space and additional refresh times.
On the other hand, if you have users that will require both sales and customer support information, you don't want users to have to instantiate multiple deployment templates that may share redundant data. Instantiating multiple templates may cause data consistency problems; each deployment template uses a different refresh group, which means that data in the two deployment template may be refreshed at different times, possibly causing data consistency problems.
In this case, the best solution would be to have one deployment template for salesmen, one for customer service technicians, and one for users that require both sets of data.
To save time and DBA efforts, the best way to create the above three templates is to create the template with both sets of data first, copy the template twice, deleting unneeded items to create the other deployment templates.
Another design consideration you should take into account is the usage of parameters. If many of the tables above use the Customer ID field, you could define the same parameter in each of the template objects. By using the same parameter, you would only need to define the default parameter value and prompt string once, and it would be used for all objects during the instantiation process. Also, when you use the same parameter when defining multiple objects, you will be able to significantly reduce the amount of user defined values that need to be specified, reducing both deployment template development and maintenance times.
Using a single template parameter is even more useful when used with snapshots that use subquery subsetting. One parameter would allow a user to receive only the data for the customers that they need. Consider the following CREATE SNAPSHOT statements:
CREATE SNAPSHOT sales.orders AS
 SELECT * FROM sales.orders@hq.acme.com o
    -- conditions for customers
  WHERE EXISTS
  ( SELECT c_id FROM sales.customers@hq.acme.com c
    WHERE o.c_id = c.c_id
      AND EXISTS
    ( SELECT * FROM sales.assignments@hq.acme.com a
     WHERE a.c_id = c.c_id
     AND EXISTS
     ( SELECT * FROM sales.salespersons@hq.acme.com s
       WHERE s.s_id = ':salesperson_id')));
CREATE SNAPSHOT sales.customers AS
SELECT c_id FROM sales.customers@hq.acme.com c
    -- conditions for customers
  WHERE EXISTS
      ( SELECT * FROM sales.assignments@hq.acme.com a
     WHERE a.c_id = c.c_id
     AND EXISTS
     ( SELECT * FROM sales.salespersons@hq.acme.com s
       WHERE s.s_id = ':salesperson_id')));
Even though the two snapshots being created don't explicitly contain the SALESPERSON_ID field, using subquery subsetting makes using parameters very effective for instantiating only required data sets. Using a single parameter (:salesperson_id) makes managing and instantiating these snapshots easier for both the DBA and the user instantiating the deployment template.
Finally, you should consider what other objects need to be created at the remote snapshot site. Ask yourself the following questions:
This section will teach you how to use Replication Manager to build a deployment template. For more information about using the Replication Management API, please see Oracle8i Replication API Reference.
Before you begin the following procedures, please make sure that you have completed the following:
The Deployment Template wizard follows the approach listed below to construct a deployment template.
The Replication Manager Deployment Template wizard allows you to quickly and intuitively build a deployment template. The following steps guide you in starting the wizard and defining the general information for your deployment template:
If you will not be considered the owner of this deployment template, select the appropriate user name from the Owner pull-down list.
A refresh group with the same name as your deployment template is automatically entered in the Refresh Group field.
If you selected Public, skip to step 8.
The second page of the Deployment Templates wizard allows you to add objects to your template based on existing replicated objects. For example, if you have a PERSONNEL master group, you can add objects from this existing master group to your deployment template (Oracle will create snapshots when you add a replicated table).
Press the <SHIFT> key to select a range of objects or press the <CTRL> key to individually select multiple objects.
After you add an existing object to your deployment template, you have the ability to customize the selected object. In most cases, you will edit a snapshot object to define a WHERE clause, modify storage parameters, and select individual columns for replication (column subsetting). Complete the following to modify an existing object:
The following four sections describe how to modify your selected template object:
In most cases, you will want to leave the Logging and Cache checkboxes enabled (press the Help button to view detailed information about these properties).
If you want to create a parameterized template object, insert the variable name preceded by a colon (:) in your WHERE clause. For example, you might enter the following:
WHERE empno = :employee_id
An employee_id variable will automatically be created; you can use this variable to define a default value for the template or unique values for individual users.
You can only select columns that have been identified to be "skipped" during conflict checking. See "Identifying Subset Columns" for more information.
The selected column is no longer displayed in the list of Replicated Columns.
Shadow Group).
The selected column is now displayed in the list of Replicated Columns.
Press the OK button to complete editing your deployment template object.
You may want to create a new object at the snapshot site that does not exist at the master site. For example, you may want to create views or non-replicated tables at the snapshot site. The following procedure shows you how to define the DDL to execute at the snapshot site when the deployment template is instantiated:
The Create Template Object dialog box appears.
Do not include the semi-colon at the end of your object DDL. Also, if you wish to create a parameter in your DDL, be sure to place a colon (:) at the beginning of your parameter (e.g. :region).For example, you might enter the following:
CREATE SNAPSHOT scott.emp_snap AS
   SELECT * from scott.emp@orc1.world
   WHERE empno = :employee_id
An employee_id variable will automatically be created; you can use this variable to define a default value for the template or unique values for individual users (the next page of the Deployment Template Wizard allows you to customize your parameters).
You will be returned to the main body of the Deployment Template wizard; the new object will appear in the list of Template Objects.
When you add a template object to your deployment template, Oracle evaluates the DDL to see if any parameters have been specified (parameters are prefixed with a ":"). If any parameters have been specified in the DDL, use the Template Parameters page of the deployment template wizard to define default parameter values and prompt text. You can also use this form to create new parameters and define unique parameter values for individual users. See "Template Parameters" for more information about user parameter values.
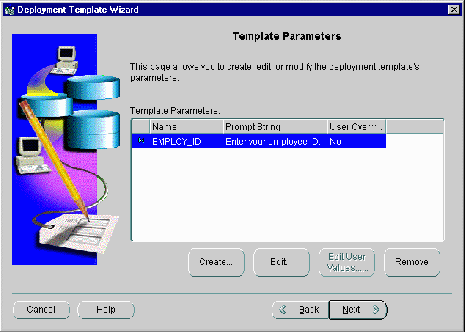
If you defined a parameter in a template object's DDL, you can select the parameter and add a default parameter value, define prompt text, and specify whether the user can override the default value. Complete the following steps to edit a parameter:
If you modify the name of an existing parameter, you need to edit the DDL for the objects that use the existing parameter (modifying the parameter name will not rename the parameter in existing DDL).
If you have parameters defined in your deployment template, you have the option of defining user parameter values. When a particular user instantiates your deployment template, the value that you specify for that user will be used (this is helpful when you want to replicate custom data sets to individual users). See "Template Parameters" for more information about user parameter values.
Press the <SHIFT> key to select a range of users or press the <CTRL> key to individually select multiple users.
If you are working with a public template, all database users will be listed in the Available Users list. If you are working with a private template, only authorized users will be listed.
If you do not know all of the user parameter values at this time, you will be able to specify additional user parameter values by modifying your deployment template or during the instantiation process.
Once you reach the Finish page of the Deployment Template wizard, you have defined all of the objects for your deployment template and optionally defined any template parameters and user parameter values. After Replication Manager completes building the deployment template, you will be ready to instantiate this deployment template at remote snapshot sites.
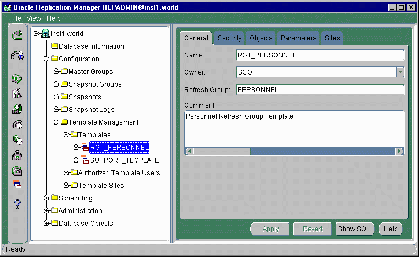
Your new deployment template will be displayed under the Template Management | Templates node (see Figure 4-14).
Before you begin editing your deployment template, make sure that you expand the Template Management | Templates node in the left pane (tree) of the Replication Manager user interface.
|
Note: Once a template has been instantiated at a snapshot site, you will not be able to modify the template. Copy the template and make the necessary modifications (see "Copy Template" for more information). |
The General page of the Deployment Template property sheet allows you to modify several characteristics of a deployment template, including the target refresh group, owner, and deployment template name.
If you need to modify the general properties of any existing deployment template, the following steps will guide you through the modification process:
The property sheet for the selected deployment template will appear in the right-pane of the Replication Manager user interface, displaying the current settings for the selected deployment template.
Name: The name of the deployment template.
Owner: The name of the user responsible for maintaining the deployment template.
Refresh Group: The name of the refresh group to which all snapshots in the deployment template will be added during the instantiation process.
Comment: User comments are stored in this field.
Since your replication requirements may grow, you may need to add additional replicated objects to your deployment template.
You can add template objects using one of two methods: create a new template object or create from an existing object.
Creating a new template object requires that you specify the object DDL used to create the object at the remote snapshot site (e.g. CREATE SNAPSHOT AS...). Adding an object based on existing object requires that you select the existing object and Oracle will determine the DDL for you.
Complete the following steps and, depending on how you want to create the new object, complete the steps in either the Add Template Objects or Add New Objects to Template sections:
The property sheet for the selected deployment template appears in the right-pane of the Replication Manager user interface, displaying the current settings for the selected deployment template.
Complete the steps in one of the following two sections:
Complete the following steps to add an object to your template by using an existing object:
Press the <SHIFT> key to select a range of objects or press the <CTRL> key to individually select multiple objects.

After you add an existing object to your deployment template, you have the ability to customize the selected object. In most cases, you will edit a snapshot object to define a WHERE clause, modify storage parameters, and select individual columns for replication (column subsetting). Complete the following to modify an existing object:
The following four sections describe how to modify your selected template object:
In most cases, you will want to leave the Logging and Cache checkboxes enabled (press the Help button to view detailed information about these properties).
If you want to create a parameterized template object, insert the variable name preceded by a colon (:) in your WHERE clause. For example, you might enter the following:
WHERE empno = :employee_id
An employee_id variable will automatically be created; you can use this variable to define a default value for the template or unique values for individual users.
You can only select columns that have been identified to be "skipped" during conflict checking. See "Identifying Subset Columns".
The selected column is no longer displayed in the list of Replicated Columns.
Shadow Group).
The selected column is now displayed in the list of Replicated Columns.
Press the OK button to complete editing your deployment template object.
You may want to create a new object at the snapshot site that does not exist at the master site. For example, you may want to create views or non-replicated tables at the snapshot site. The following procedure will show you how to define the DDL to execute at the snapshot site when the deployment template is instantiated:
The Create Template Object dialog box will appear.
Do not include the semi-colon at the end of your object DDL. Also, if you wish to create a parameter in your DDL, be sure to place an colon (:) at the beginning of your parameter (e.g. :region).For example, you might enter the following:
WHERE empno = :employee_id
An employee_id variable will automatically be created; you can use this variable to define a default value for the template or unique values for individual users (the next page of the Deployment Template Wizard will allow you to customize your parameters).
You will be returned to the main body of the Deployment Template wizard; the new object will appear in the list of Template Objects.
If you need to modify an existing template object's DDL to, for example, add a parameter, or you need to change an object's rollback segment, you can use the Template Objects Property page to make such modifications.
Complete the following steps to modify an existing deployment template object:
A property sheet for the selected deployment template object will appear in the right-pane of the Replication Manager user interface.
If a template object or objects are no longer required, you can use Replication Manager to remove these objects from a deployment template. You can either remove all deployment template objects at once or remove them individually:
Each time you add a new authorized user for a specific template, you may need to define one or more user parameter values. The following steps guide you through modifying template parameters and user parameter values:
A property sheet for the selected deployment template parameter appears in the right-pane of the Replication Manager user interface.
Press the <SHIFT> key to select a range of users or press the <CTRL> key to individually select multiple users. If you are working with a public template, all database users will be listed in the Available Users list. If you are working with a private template, only authorized users will be listed.
If you do not know all of the user parameter values at this time, you will be able to specify additional user parameter values by modifying your deployment template again or during the instantiation process.
There may be cases when you need to copy a deployment template to multiple master sites. For example, this may be necessary before you deploy the templates so that the snapshot sites will be distributed across multiple master sites to achieve more efficient load balancing. You may also need to create a new template that contains many objects contained in an existing template. It is easy to copy an existing template with a new name and modify as necessary instead of creating the template from "scratch."
<template name>_copy.
Press the <SHIFT> key to select a range of templates or press the <CTRL> key to individually select multiple templates.
If you have copied templates (see previous section), you may want to determine the differences between two templates. Replication Manager allows you to select two templates at the same site to compare. A report is generated that displays all of the differences at the object level between these two templates.
Press the <SHIFT> key to select two sequentially listed templates or press the <CTRL> key to individually select two templates.
The results of the compare operation are displayed at the bottom of the Compare Deployment Template Wizard. Results are also written to the path specified in step 3 above.
When a deployment template becomes obsolete, use Replication Manager to delete the target template.
After a deployment template has been created and is ready for deployment, you need to package the template, prepare the remote snapshot site, and perform the actual deployment template instantiation.
Once a deployment template contains all of the objects and parameters that are required by the snapshot environment, you need to prepare the deployment template for distribution to your end-users. You are essentially packaging the template to be instantiated at remote snapshot sites.
Replication Manager allows you to quickly and easily package your deployment templates for offline instantiation.
|
Note: The following procedures describe the steps to package your deployment template using Replication Manager. For information on packaging your template with the Replication Management API, see "Package for Instantiation" in the Oracle8i Replication API Reference book. |
If you are using Oracle's Client Instantiation tool, the packaging of the online instantiation file is automated and does not require you to generate and distribute an instantiation file.
For additional online instantiation options, see the "Package for Instantiation" section in Chapter 4 of the Oracle8i Replication API Reference manual.
After you have built your deployment templates, you may want to perform an offline instantiation of the template at a target snapshot site. Offline instantiation allows you to write all of the necessary DDL and data to an offline instantiation file that you will transfer to and run at your snapshot site.
This solution is ideal for laptop users who do not have high-speed LAN connections (which could make online instantiation difficult).
Press the <SHIFT> key to select a range of users or press the <CTRL> key to individually select multiple users.
If you are generating offline instantiation files for Oracle8i Lite sites, skip this step.
Press the <SHIFT> key to select a range of users or press the <CTRL> key to individually select multiple users.
The generated files are stored in the location that you specified in step 5.
After you have generated the offline instantiation file, you need to distribute this file (that was saved in the directory that you specified during step 5) to the target end-user. You can distribute the file by posting it to an FTP or web site or by saving the file to some storage medium (CD-ROM, floppy disk, etc.). Your user needs this offline instantiation file to build the snapshot environment at the remote site.
If a deployment template has been designed well, little preparation will need to be performed at the remote snapshot site. This section describes the most common preparations that need to be performed at the remote snapshot site. Once any required preparations have been completed, you are ready to perform either an online or offline instantiation.
Use the following questions as a guide to evaluate the remote snapshot site to determine what preparations need to be performed:
As with all replicated environments, network connectivity is a key component in Oracle Advanced Replication. Verify that the remote snapshot site has a proper SQL*Net or Net8 connection to the target master site. If the snapshot site does not have the appropriate network connectivity, consult the Net8 Administrator's Guide for information about setting up an Oracle network connection.
The snapshot site must have an Oracle8i release 8.1.5 or greater database to instantiate a deployment template. If your snapshot site is using Oracle8i Lite, release 4.0 or greater must be used. If your snapshot site does not meet the database version requirements, you need to upgrade your database before instantiating a deployment template.
Each snapshot site needs several users that have special privileges to support a snapshot site. In addition to having the administrative privileges, these users also participate in the propagation and refreshing of data.
Snapshot site setup also includes scheduling several automated jobs to handle the automatic refreshing of the snapshot (optional) and the purging of the deferred transaction queue.
You can setup your snapshot site with:
See "Setup Snapshot Site" in Chapter 2 of the Oracle8i Replication API Reference manual.
If the deployment template that you are instantiating will create objects in multiple schemas, you need to make sure that all of the necessary schemas have been created. Additionally, the user instantiating the deployment template needs to have the appropriate CREATE privilege(s) on that schema. For example, if the deployment template will create a procedure in schema FOO and the user SCOTT is instantiating the template, SCOTT must have the CREATE ANY PROCEDURE privilege on schema FOO.
While it is advantageous to include the DDL to create all necessary database links for a remote snapshot site in the deployment template, it is certainly not required. In the event that the database link DDL is not in the deployment template, you will need to manually create the database link to the target master site prior to instantiating the deployment template (the database link will be required to populate the snapshot base tables during an online instantiation and will of course be required for the proper operation of the snapshot environment).
If the deployment template that you are instantiating will use specific rollback segments that don't currently exist at the remote snapshot site, you will need to create the necessary rollback segment(s). To see if your template objects use the default rollback segment or a specific rollback segment, query the dba_repcat_template_objects view or complete the following steps in Replication Manager:
A property sheet for the selected deployment template object appears in the right-pane of the Replication Manager user interface. View the contents in the MASTER ROLLBACK SEGMENT field to determine which rollback segment will be used when the selected object is created at the remote snapshot site.
Instantiation of a deployment template can be performed at remote snapshot sites that are using Oracle8i Enterprise Edition, Oracle8i Server, Personal Oracle8i, and/or Oracle8i Lite.
The following section describes how to perform an instantiation at a remote Oracle8i Enterprise Edition, Oracle8i Server, or Personal Oracle8i site using an instantiation scrip; for more information about performing an instantiation at an Oracle8i Lite site, please see the Oracle8i Lite documentation.
The instantiation scrips can either be generated using Replication Manager (see "Package for Offline Instantiation") or by using the replication management API (see "Package for Instantiation" section in chapter 4 of the Oracle8i Replication API Reference manual). The procedure in the next section will work for either offline or online insanitation of a deployment template.
Before the end-user can begin the instantiation process at the remote snapshot site, make sure that the end-user has received the generated instantiation file (see "Package for Offline Instantiation" or the "Package for Instantiation" section in chapter 4 of the Oracle8i Replication API Reference manual).
This section describes how to use SQL*Plus to perform the instantiation. If the end-user has the Oracle Client Instantiation tool, please see the appropriate documentation for instantiation instructions.
The following steps are to be performed at the remote snapshot site:
For example, if SCOTT will be the owner of the snapshot objects contained in the deployment template, you will need to connect as SCOTT to the local database.
at the SQL> prompt (where path\filename is the location and name of the snapshot site setup script). For example, you might execute the following:
SQL> RUN d:\temp\snap_setup.sql
|
Note: If you have not received a snapshot setup script, you need to verify that your snapshot site has been setup to support snapshot replication before continuing with step 4. |
If you have not received a snapshot site setup script, skip to step 4.
at the SQL> prompt (where path\filename is the location and name of the generated offline instantiation file). For example, you might execute the following:
There is very little that you need to do after you have completed instantiating the deployment template at the remote snapshot site. The most critical step is to perform a fast refresh after performing an offline instantiation.
After you have performed an offline instantiation of a deployment template, you will need to perform a fast refresh of your snapshots. It is important that you refresh as soon as possible; the longer the duration between packaging the template and actual instantiation, the greater the amount of changes being stored in the snapshot logs for the snapshots in your deployment template.
If you do not have the Oracle Client Instantiation tool and/or your application cannot refresh your snapshot environment, the following procedure illustrates how to refresh your snapshot environment using SQL*Plus:
For example, if SCOTT will be the owner of the snapshot objects contained in the deployment template, you will need to connect as SCOTT to the local database.
at the SQL> prompt (where refresh_group is the name of the refresh group that your snapshots have been added to -- in most cases, the name of the refresh group has the same name as the deployment template). For example, you might execute the following:
Contact your database administrator for more information about the name of the refresh group that you should specify when executing the REFRESH procedure.
After your snapshot environment has been created, you will need to grant users at the snapshot site the privileges required to view, update, insert, and delete the data contained in the newly created replicated objects.
A Deployment Template is the most effective method of building and distributing a snapshot environment, even if distribution is limited. Even if distribution is limited to only two or three sites, you still significantly reduce the amount of steps needed to build a snapshot environment using Deployment Templates as opposed to individually creating the snapshot environment at those two or three sites. With deployment templates, you build once and distribute as needed.
One question remains though: If a deployment template is the most effective means for building and distributing a snapshot environment, when should you locally build the snapshot environment at the remote snapshot site? In most cases, you will want to build a snapshot environment using the Snapshot Group wizard or locally at the snapshot site when local control needs to be maintained at the snapshot site.
One scenario where you might find local control of snapshot creation helpful is when it is desirable for the snapshot site to control what data it receives. For example, this is especially true of decision support sites (DSS), which are typically read-only snapshot sites. A DDS site may occasionally need to run complex queries and they do not want to slow the OLTP site and/or bother the DBA at the OLTP site.
One of the major benefits of Deployment Templates is that control is maintained centrally by the DBA building the deployment template. There are instances, however, when the snapshot site needs to retain some control.
Local control may be required if the snapshot site:
Since snapshot groups are created with the Replication Manager Snapshot Group wizard locally at the snapshot site by its DBA or maybe a systems analyst with SQL knowledge, control can also be maintained at the snapshot site.
Consider the following as a perfect example for maintaining local control. Since multi-master replication does not allow for data partitioning, updateable snapshot sites are sometimes created primarily for their ability to partition data. These sites are typically secure, have experienced DBAs, and will require the ability to maintain control locally to meet user and application requirements. Snapshot groups created with the wizard or with the API allow for the localized control necessary to meet the requirements of the secure updateable snapshot site(s).
Also remember that when a snapshot environment is created with a deployment template, all objects in the snapshot environment are added to the same refresh group. While this might be OK for most installations, certain situations may require that the objects in a snapshot group are assigned to several different refresh groups.