Release 8.1.5
A67775-01
Library |
Product |
Contents |
Index |
| Oracle8i Tuning Release 8.1.5 A67775-01 |
|
![]()
![]()
This chapter contains:
Dimensions do not have to be defined, but spending time creating them can yield significant benefits because they help query rewrite perform more complex types of rewrite. They are mandatory if you use the advisor to recommend which materialized views to create, drop, or retain.
A business process is an operational process within an organization about which data can be collected. As an example, each store of a video chain might gather and store data regarding sales and rentals of video tapes at the check-out counter. The video chain management can build a data warehouse to analyze the sales of its products across all stores over time and help answer questions such as:
The data in the video chain's data warehouse system has two important components: dimensions and facts. The dimensions are products, locations (stores), promotions, and time. One approach for identifying your dimensions is to review your reference tables, such as a product table which contains everything about a product, or a store table containing all information about a store. The facts are sales (units sold or rented) and profits. A data warehouse contains facts about the sales of each product at each store on a daily basis.
Dimension values are usually organized into hierarchies. Going up a level in the hierarchy is called rolling up the data and going down a level in the hierarchy is called drilling down the data. In the video chain example:
Data analysis typically starts at higher levels in the dimensional hierarchy and gradually drills down if the situation warrants such analysis.
You can visualize the dimensions of a business process as an n-dimensional data cube. In the video chain example, the business dimensions product, location, and time can be represented along the three axes of the cube. Each unit along the product axis represents a different product, each unit along the location axis represents a store, and each unit along the time axis represents a month. At the intersection of these values is a cell that contains factual information, such as units sold and profits made. Higher-level analysis consists of selecting and aggregating the factual information within a subcube, such as rentals of comedy videos in California stores during the second quarter of 1998.
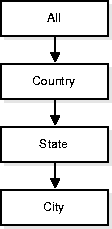
Therefore, the first step towards creating a dimension is to identify the dimensions within your data warehouse and then draw the hierarchies as shown in Figure 30-1. For example, city is a child of state (because you can aggregate city-level data up to state), and state. Using this approach, you should find it easier to translate this into an actual dimension.
In the case of normalized or partially normalized dimensions (a dimension that is stored in more than one table), identify how these tables are joined. Note whether the joins between the dimension tables can guarantee that each child-side row joins with one and only one parent-side row. In the case of denormalized dimensions, determine whether the child-side columns uniquely determine the parent-side (or attribute) columns. These constraints can be enabled with the NOVALIDATE and RELY options if the relationships represented by the constraints are guaranteed by other means. Note that if the joins between fact and dimension tables do not support this relationship, you still gain significant performance advantages from defining the dimension with the CREATE DIMENSION statement. Another alternative, subject to certain restrictions, is to use outer joins in the materialized view definition (that is, in the CREATE MATERIALIZED VIEW statement).
You must not create dimensions in any schema that does not satisfy these relationships, incorrect results can be returned from queries otherwise.
Before you can create a dimension, tables must exist in the database which contain this dimension data. For example, if you create a dimension called LOCATION, one or more tables must exist which contains the city, state, and country information. In a data warehouse, these dimension tables already exist. It is therefore a simple task to identify which ones will be used.
You create a dimension with the CREATE DIMENSION statement. Within the CREATE DIMENSION statement, use the LEVEL...IS clause to identify the names of the dimension levels.
The location dimension contains a single hierarchy, with arrows drawn from the child level to the parent level. At the top of this dimension graph is the special level ALL, that represents aggregation over all rows. Each arrow in this graph indicates that for any child there is one and only one parent. For example, each city must be contained in exactly one state and each state must be contained in exactly one country. States that belong to more than one country, or that belong to no country, violate hierarchical integrity. Hierarchical integrity is necessary for the correct operation of management functions for materialized views that include aggregates.
Therefore, using the entities illustrated in Figure 30-1 as an example, you can declare a dimension LOCATION which contains levels CITY, STATE, and COUNTRY:
CREATE DIMENSION location_dimLEVEL city IS location.city LEVEL state IS location.state LEVEL country IS location.country
Using your drawing of the dimension, translate each level in the diagram to a LEVEL clause in the CREATE DIMENSION statement. You therefore define 3 levels: city, state, and country. Then each level in the dimension must correspond to one or more columns in a table in the database. Thus, level city is identified by the column city in the table called location and level country is identified by a column called country in the same table.
In this example, the database tables are denormalized and all the columns exist in the same table. However, this is not a prerequisite for creating dimensions. "Using Normalized Dimension Tables" shows how to create a dimension that has a normalized schema design using the JOIN KEY clause.
The next step is to declare the relationship between the levels with the HIERARCHY statement and give that hierarchy a name. A hierarchical relationship is a functional dependency from one level of a hierarchy to the next level in the hierarchy. Using the level names defined previously, the CHILD OF relationship denotes that each child's level value is associated with one and only one parent level value. Again, using the entities in Figure 30-1, the following statements declare a hierarchy LOC_ROLLUP and define the relationship between CITY, STATE, and COUNTRY.
HIERARCHY loc_rollup (city CHILD OF state CHILD OF country )
In addition to the 1:n hierarchical relationships, dimensions also include 1:1 attribute relationships between the hierarchy levels and their dependent dimension attributes. For example, if there are columns governor and mayor, then the ATTRIBUTE...DETERMINES statement would be state to governor and city to mayor.
In our example, suppose a query was issued that queried by mayor instead of city. Since this 1-1 relationship exists between the attribute and the level, city can be used to identify the data.
ATTRIBUTE city DETERMINES mayor
This complete dimension definition is shown below including the creation of the location table.
CREATE TABLE location (city VARCHAR2(30), state VARCHAR2(30), country VARCHAR2(30), mayor VARCHAR2(30), governor VARCHAR2(30) );CREATE DIMENSION location_dimLEVEL city IS location.city LEVEL state IS location.state LEVEL country IS location.countryHIERARCHY loc_rollup (city CHILD OF state CHILD OF country )ATTRIBUTE city DETERMINES location.mayor ATTRIBUTE state DETERMINES location.governor;
The design, creation, and maintenance of dimensions is part of the design, creation, and maintenance of your data warehouse schema. Once the dimension has been created, check that it meets these requirements:
A single dimension definition can contain multiple hierarchies as illustrated below. Suppose a department store wants to track the sales of certain items over time. The first step is to define the time dimension over which sales will be tracked. Figure 30-2 illustrates a dimension "Time" with three time hierarchies.
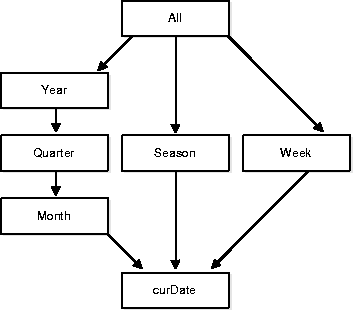
From the illustration, you can construct the following denormalized Time dimension statement. The associated CREATE TABLE statement is also shown.
CREATE TABLE time (curDate DATE, month INTEGER, quarter INTEGER, year INTEGER, season INTEGER, week_num INTEGER, dayofweek VARCHAR2(30), month_name VARCHAR2(30) );CREATE DIMENSION time_dimLEVEL curDate IS time.curDate LEVEL month IS time.month LEVEL quarter IS time.quarter LEVEL year IS time.year LEVEL season IS time.season LEVEL week_num IS time.week_numHIERARCHY calendar_rollup (curDate CHILD OF month CHILD OF quarter CHILD OF year )HIERARCHY weekly_rollup (curDate CHILD OF week_num )HIERARCHY seasonal_rollup (curDate CHILD OF season )ATTRIBUTE curDate DETERMINES time.dayofweek ATTRIBUTE month DETERMINES time.month_name;
The tables used to define a dimension may be normalized or denormalized and the individual hierarchies can be normalized or denormalized. If the levels of a hierarchy come from the same table, it is called a fully denormalized hierarchy. For example, CALENDAR_ROLLUP in the Time dimension is a denormalized hierarchy. If levels of a hierarchy come from different tables, such a hierarchy is either a fully or partially normalized hierarchy. This section shows how to define a normalized hierarchy.
Suppose the tracking of products is done by product, brand, and department. This data is stored in the tables PRODUCT, BRAND, and DEPARTMENT. The product dimension is normalized because the data entities ITEM_NAME, BRAND_ID, and DEPT_ID are taken from different tables. The clause JOIN KEY within the dimension definition specifies how to join together the levels in the hierarchy. The dimension statement and the associated CREATE TABLE statements for the PRODUCT, BRAND, and DEPARTMENT tables are shown below.
CREATE TABLE product (item_name VARCHAR2(30), brand_id INTEGER );CREATE TABLE brand (brand_id INTEGER, brand_name VARCHAR2(30), dept_id INTEGER);CREATE TABLE department (dept_id INTEGER, dept_name VARCHAR2(30), dept_type INTEGER);CREATE DIMENSION product_dimLEVEL item IS product.item_name LEVEL brand_id IS brand.brand_id LEVEL dept_id IS department.dept_idHIERARCHY merchandise_rollup (item CHILD OF brand_id CHILD OF dept_id JOIN KEY product.brand_id REFERENCES brand_id JOIN KEY brand.dept_id REFERENCES dept_id) ATTRIBUTE brand_id DETERMINES product.brand_name ATTRIBUTE dept_id DETERMINES (product.dept_name, product.dept_type);
Two procedures are available which allow you to display the dimensions that have been defined. First, the file smdim.sql must be executed to provide the DEMO_DIM package, which includes:
The DEMO_DIM.PRINT_DIM procedure has only one parameter, the name of the dimension to display. The example below shows how to display the dimension TIME_PD.
DEMO_DIM.PRINT_DIM ('TIME_PD');
To display all of the dimensions that have been defined, call the procedure DEMO_DIM.PRINT_ALLDIMS without any parameters as shown below.
DEMO_DIM.PRINT_ALLDIMS ();
Irrespective of which procedure is called, the output is identical. A sample display is shown below.
DIMENSION GROCERY.TIME_PD
LEVEL FISCAL_QTR IS GROCERY.WEEK.FISCAL_QTR
LEVEL MONTH IS GROCERY.MONTH.MONTH
LEVEL QUARTER IS GROCERY.QUARTER.QUARTER
LEVEL TIME_KEY IS GROCERY.TIME.TIME_KEY
LEVEL WEEK IS GROCERY.WEEK.WEEK
LEVEL YEAR IS GROCERY.YEAR.YEAR
HIERARCHY WEEKLY_ROLLUP (
      TIME_KEY
       CHILD OF WEEK
   JOIN KEY GROCERY.TIME.WEEK REFERENCES WEEK
  )
    HIERARCHY FISCAL_ROLLUP (
             TIME_KEY
             CHILD OF WEEK
             CHILD OF FISCAL_QTR
    JOIN KEY GROCERY.TIME.WEEK REFERENCES WEEK
    )
   HIERARCHY CALENDAR_ROLLUP (
             TIME_KEY
             CHILD OF MONTH
             CHILD OF QUARTER
             CHILD OF YEAR
      JOIN KEY GROCERY.TIME.MONTH REFERENCES MONTH
      JOIN KEY GROCERY.MONTH.QUARTER REFERENCES QUARTER
      JOIN KEY GROCERY.QUARTER.YEAR REFERENCES YEAR
    )

    ATTRIBUTE TIME_KEY DETERMINES GROCERY.TIME.DAY_NUMBER_IN_MONTH
    ATTRIBUTE TIME_KEY DETERMINES GROCERY.TIME.DAY_NUMBER_IN_YEAR
    ATTRIBUTE WEEK DETERMINES GROCERY.WEEK.WEEK_NUMBER_OF_YEAR
    ATTRIBUTE MONTH DETERMINES GROCERY.MONTH.FULL_MONTH_NAME
Constraints plan an important role with dimensions. In most cases, full referential integrity is enforced on the operational databases, and operational procedures can be used to ensure that data flowing into the data warehouse (after data cleansing) never violates referential integrity; so, in practice, referential integrity constraints may or may not be enabled in the data warehouse.
It is recommended that constraints be enabled and, if validation time is a concern, then the NOVALIDATE clause should be used as shown below. Primary and foreign keys should be implemented as described. Referential integrity constraints and NOT NULL constraints on the fact tables provide information that query rewrite can use to extend the usefulness of materialized views.
ENABLE NOVALIDATE CONSTRAINT pk_time;
In addition, the RELY clause should be used to advise query rewrite that it can rely upon the constraints being correct as shown below.
ALTER TABLE time MODIFY CONSTRAINT pk_time RELY;
If the relationships described by the dimensions are incorrect, wrong results could occur. Therefore, you should verify the relationships specified by CREATE DIMENSION using the DBMS_OLAP.VALIDATE_DIMENSION procedure periodically.
This procedure is easy to use and only has four parameters:
The example shown below validates the dimension time_fn in the Grocery schema
DBMS_OLAP.VALIDATE_DIMENSION ('TIME_FN', 'GROCERY', FALSE, TRUE);
All exceptions encountered by the VALIDATE_DIMENSION procedure are placed in the table MVIEW$_EXCEPTIONS, which is created in the user's schema. Querying this table will identify the exceptions that were found. For example:
OWNER    TABLE_NAME  DIMENSION_NAME RELATIONSHIP BAD_ROWID
-------- ----------- -------------- ------------ ------------------
GROCERY  MONTH       TIME_FN        FOREIGN KEY  AAAAuwAAJAAAARwAAA
However, rather than query this table, it may be better to query as follows where the rowid of the invalid row is used to retrieve the actual row that has violated the constraint. In this example, the dimension TIME_FD is checking a table called month. It has found a row that violates the constraints and using the rowid, we can see exactly which row in the month table is causing the problem.
SELECT * FROM month
WHERE rowid IN (select bad_rowid from mview$_exceptions);

MONTH      QUARTER    FISCAL_QTR YEAR       FULL_MONTH_NAME      MONTH_NUMB
---------- ---------- ---------- ---------- -------------------- ----------
199903     19981      19981      1998       March                3
Some modification can be made to the dimension using the ALTER DIMENSION statement. You can add or drop a level, hierarchy, or attribute from the dimension using this command.
Referring to the time dimension in Figure 30-2, you could remove the attribute month, drop the hierarchy weekly_rollup, and remove the level week. In addition, you could add a new level called qtr1.
ALTER DIMENSION time_dim DROP attribute month;
ALTER DIMENSION time_dim DROP hierarchy weekly_rollup;
ALTER DIMENSION time_dim DROP LEVEL week;
ALTER DIMENSION time_dim ADD LEVEL qtr1 IS time.fiscal_qtr;
A dimension becomes invalid if you change any schema object which the dimension is referencing. For example, if the table on which the dimension is defined is altered.
To check the status of a dimension, view the contents of the column invalid in the table ALL_DIMENSIONS.
To revalidate the dimension, use the COMPILE option as shown below.
ALTER DIMENSION time_dim COMPILE;
A dimension is removed using the DROP DIMENSION command. For example:
DROP DIMENSION time_dim;