Release 8.1.5
A67773-01
Library |
Product |
Contents |
Index |
| Oracle8i Backup and Recovery Guide Release 8.1.5 A67773-01 |
|
![]()
![]()
This chapter describes how to get started using RMAN. It includes the following topics:
Before using RMAN, you should decide:
Typically, you need to use a password file when connecting to the target database over a non-secure Net8 connection, especially when you:
See Also: For an example of a backup distributed over two nodes in an OPS cluster, see Oracle8i Parallel Server Concepts and Administration.
Before invoking RMAN, set the NLS_DATE_FORMAT and NLS_LANG environment variables. These variables determine the format used for the time parameters in RMAN commands such as restore, recover, and report.
The following example shows typical language and date format settings:
NLS_LANG=american
NLS_DATE_FORMAT='Mon DD YYYY HH24:MI:SS'
When specifying dates in RMAN commands, the date string can be either:
Following are examples of typical date settings in RMAN commands:
backup archivelog from time 'SYSDATE-31' until time 'SYSDATE-14';
restore database until time "TO_DATE('12/20/98','MM/DD/YY')";
If you are going to use RMAN to connect to a non-mounted database and then mount the database later while RMAN is still connected, set the NLS_LANG variable so that it also specifies the character set used by the database.
A database that is not mounted assumes the default character set, which is US7ASCII. If your character set is different from the default, then RMAN will return errors after the database is mounted. To avoid this problem, set the NLS_LANG to specify the target database's character set. For example, if the character set is WE8DEC, set the NLS_LANG parameter as follows:
NLS_LANG=american_america.we8dec.
See Also: For more information on the NLS_LANG and NLS_DATE_FORMAT parameters, see the Oracle8i Reference.
When RMAN needs to resynchronize from a read-consistent version of the control file, it creates a temporary snapshot control file. The default name for the snapshot control file is port-specific. Use the set snapshot controlfile name command to change the name of the snapshot control file; subsequent snapshot control files that RMAN creates use the name specified in the command.
For example, start RMAN and then enter:
set snapshot controlfile name to '/oracle/dba/prod/snap_prod.ctl';
You can also set the snapshot control file name to a raw device. This operation is important for OPS databases in which more than one instance in the cluster use RMAN because server sessions on each node must be able to create a snapshot control file with the same name and location. For example, enter:
set snapshot controlfile name to '/dev/vgd_1_0/rlvt5';
If one RMAN job is already backing up the control file while another needs to create a new snapshot control file, you may see the following message:
RMAN-08512: waiting for snapshot controlfile enqueue
Under normal circumstances, a job that must wait for the control file enqueue will wait for a brief interval and will then successfully retrieve the enqueue. Recovery Manager makes up to five attempts to get the enqueue and then fails the job. The conflict is usually caused when two jobs are both backing up the control file, and the job that starts backing up the control file first waits for service from the media manager.
See Also: For an overview of RMAN resynchronization using the snapshot control file, see "Resynchronization of the Recovery Catalog". For set command syntax, see "set".
Perhaps the most important decision you make when getting started with RMAN is whether to use a recovery catalog to store RMAN metadata. This section outlines some of the costs and benefits associated with using and not using a recovery catalog. If you decide to create a catalog, see "Creating the Recovery Catalog".
See Also: For an overview of RMAN metadata, see "Recovery Manager Metadata".
When you use a recovery catalog, RMAN can perform a wider variety of automated backup and recovery functions. For this reason, Oracle recommends that you use a recovery catalog with RMAN whenever possible.
When you use a recovery catalog, RMAN requires that you maintain a recovery catalog schema as well as any associated space used by that schema. The size of the recovery catalog schema:
If you use a recovery catalog, decide which database you will use to install the recovery catalog schema, and also how you will back this database up. If you use RMAN to back up several databases, you may wish to create a separate recovery catalog database and create the RMAN user in that database. Also, decide whether to operate this database in ARCHIVELOG mode, which is recommended.
If you store the recovery catalog in a separate database, you will require a small amount of disk space for the following:
An additional benefit of maintaining a separate recovery catalog is that it is only unavailable at your discretion. Most of the space used in this database is devoted to supporting tablespaces, e.g., the system, temp, and rollback tablespaces.
| Type of Space | Space Requirement |
|---|---|
|
System |
50 megabytes |
|
Temp |
5 megabytes |
|
Rollback |
5 megabytes |
|
Recovery catalog |
10 megabytes |
|
Online redo logs |
1 megabyte each (3 groups, each with 2 members) |
If you have more than one database to back up, you can create more than one recovery catalog and have each database serve as the other's recovery catalog. For example, assume you maintain two production databases, one called PRD1 and a second called PRD2. You can install the recovery catalog for PRD1 in the PRD2 database, and the recovery catalog for the PRD2 database in PRD1.
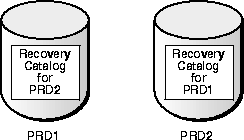
By allowing the production databases to serve as each other's recovery catalog, you avoid the extra space requirements and memory overhead of maintaining a separate recovery catalog database. This solution is not practical, however, if the recovery catalog databases for both reside in tablespaces on the same physical disk.
See Also: To learn how to manage the recovery catalog, see Chapter 6, "Managing Recovery Manager Metadata".
If you choose not to use a recovery catalog, you can still use RMAN very effectively. RMAN obtains the information it needs from the control file of the target database. The following commands are only available when you use a recovery catalog:
To restore and recover your database without using a recovery catalog, Oracle recommends that you:
See Also: For more information about maintaining the control file as the exclusive repository for RMAN metadata, see "Managing RMAN Metadata Without a Recovery Catalog".
To use RMAN, you must first connect to it. This connection is necessary to:
Whenever you start RMAN, you must connect to a target database. Even so, you have several options for how you connect to RMAN. For example, you can start RMAN:
This section includes the following sample Recovery Manager connection situations:
See Also: For an exhaustive list of command-line options, see "cmdLine".
In these examples, assume that:
|
sys |
User with SYSDBA privileges |
|
target_pwd |
The password for connecting as SYSDBA specified in the target database's |
|
target_str |
The net service name for the target database |
If the target database does not have a password file, then the user must be validated using O/S authentication. You can use O/S authentication only if you connect locally, i.e., RMAN and the target database reside on the same machine.
% ORACLE_SID=PROD1; export ORACLE_SID
% rman nocatalog
RMAN> connect target /
If the target database uses password files, you can connect using a password. Use a password file for either local or remote access. You must use a password file if you are connecting remotely using a net service name.
To connect from the O/S command line, enter the following, where sys_pwd is the password for SYS and target_str is the net service name for the target database:
% rman target sys/target_pwd@target_str nocatalog
Alternatively, start RMAN and connect to your target database from the RMAN prompt:
% rman nocatalog
RMAN> connect target sys/target_pwd@target_str
See Also: For information about command line options, see "cmdLine". For information about the connect command, see "connect". To learn about password files, see the Oracle8i Administrator's Guide.
In these examples, assume that you maintain a recovery catalog and:
If the target database does not have a password file, then the user must be validated using O/S authentication. You can use O/S authentication only if you connect locally, i.e., RMAN and the target database reside on the same machine.
ORACLE_SID to the target database. For example, at the UNIX prompt type:
% ORACLE_SID=PROD1; export ORACLE_SID
% rman catalog rman/cat_pwd@cat_str
RMAN> connect target
If the target and recovery catalog databases use password files, you can connect using a password. Use a password file for either local or remote access. You must use a password file if you are connecting remotely via a net service name.
To connect to RMAN from the O/S command line, enter the following:
% rman target sys/target_pwd@target_str catalog rman/cat_pwd@cat_str
Alternatively, you can start RMAN and connect to the target database from the RMAN prompt:
% rman
RMAN> connect target sys/target_pwd@target_str
RMAN> connect catalog rman/cat_pwd@cat_str
To use the duplicate command or to perform RMAN TSPITR, you need to connect to an auxiliary instance. In these examples, assume that:
If the auxiliary database uses password files, you can connect using a password. Use a password file for either local or remote access. You must use a password file if you are connecting remotely via a net service name.
To connect to an auxiliary instance from the O/S command line, enter the following:
% rman auxiliary sys/aux_pwd@aux_str
To connect to the target, auxiliary, and recovery catalog databases, issue the following (all on one line):
% rman target sys/target_pwd@target_str catalog rman/cat_pwd@cat_str \
> auxiliary sys/aux_pwd@aux_str
Alternatively, you can start RMAN and connect to the auxiliary database from the RMAN prompt:
% rman
RMAN> connect auxiliary sys/aux_pwd@aux_str
To connect to the target, auxiliary, and recovery catalog databases, issue the following:
% rman
RMAN> connect target sys/target_pwd@target_str
RMAN> connect catalog rman/cat_pwd@cat_str
RMAN> connect auxiliary sys/aux_pwd@aux_str
See Also: For duplicate command syntax, see "duplicate". To learn how to perform RMAN TSPITR, see Appendix A, "Performing Tablespace Point-in-Time Recovery with Recovery Manager".
To disconnect from RMAN, type exit at the RMAN prompt:
RMAN> exit
Once you have learned how to connect to RMAN, you can immediately begin performing backup, recovery, and maintenance operations. Use the examples in this section to sample a few basic commands.
These examples assume the following:
You will learn how to perform the following tasks:
Your first task is to connect to the target database. If you have created a recovery catalog, you can connect to it as well--although these examples assume you are connecting without a recovery catalog.
At the command line, enter the following:
% rman target / nocatalog
If your database is already mounted or open, you will see output similar to the following:
Recovery Manager: Release 8.1.5.0.0

RMAN-06005: connected to target database: RMAN (DBID=1237603294)
RMAN-06009: using target database controlfile instead of recovery catalog
The DBID displayed is the database identifier for your database.
If your database is not started, RMAN displays the following message when it connects:
RMAN-06193: connected to target database (not started)

See Also: For command line connection options, see "cmdLine".
Because you are not using a recovery catalog, RMAN must obtain the information it needs from the target database control file. Consequently, the database must be mounted or open. For these examples, we will mount the database but not open it.
If the database is not started, issue the startup command, specifying a parameter file if the file is in a non-default location. This example uses the parameter file initPROD1.ora:
RMAN> startup mount pfile=/oracle/dbs/temp/initPROD1.ora

RMAN-06196: Oracle instance started
RMAN-06199: database mounted

Total System Global Area      19799144 bytes

Fixed Size                       64616 bytes
Variable Size                 11001856 bytes
Database Buffers               8192000 bytes
Redo Buffers                    540672 bytes

RMAN>
RMAN displays the size of the SGA, including the size of the database and redo buffers, and returns you to the RMAN prompt.
If the database is open, issue the following to close it cleanly and then mount it:
RMAN> shutdown immediate

RMAN-06405: database closed
RMAN-06404: database dismounted
RMAN-06402: Oracle instance shut down

RMAN> startup mount pfile = initPROD1.ora  # specify a parameter file if necessary

See Also: For startup syntax, see "startup".
In this example, ask RMAN to report which datafiles your target database contains. Use the report schema command as follows:
RMAN> report schema;
RMAN displays the datafiles currently in your database. Depending on the contents of your database, you will see output similar to the following:
RMAN-03022: compiling command: report
Report of database schema
File K-bytes    Tablespace           RB segs Name
---- ---------- -------------------- ------- -------------------
1         47104 SYSTEM               ***     /oracle/dbs/tbs_01.f
2           978 SYSTEM               ***     /oracle/dbs/tbs_02.f
3           978 TBS_1                ***     /oracle/dbs/tbs_11.f
4           978 TBS_1                ***     /oracle/dbs/tbs_12.f
5           978 TBS_2                ***     /oracle/dbs/tbs_21.f
6           978 TBS_2                ***     /oracle/dbs/tbs_22.f
7           500 TBS_1                ***     /oracle/dbs/tbs_13.f
8           500 TBS_2                ***     /oracle/dbs/tbs_23.f
9           500 TBS_2                ***     /oracle/dbs/tbs_24.f
10         5120 SYSTEM               ***     /oracle/dbs/tbs_03.f
11         2048 TBS_1                ***     /oracle/dbs/tbs_14.f
12         2048 TBS_2                ***     /oracle/dbs/tbs_25.f

See Also: For report syntax, see "report". To learn how to make lists
and reports, see Chapter  7, "Generating Lists and Reports with Recovery Manager".
In this example, copy datafile 1 to a new location. Of course, if you do not want to copy this particular datafile, copy any datafile you choose. This example allocates the disk channel c1 and creates a datafile copy named df1.bak.
Use the copy command as follows:
RMAN> run {
2> allocate channel c1 type disk;
3> copy datafile 1 to 'df1.bak';
4> }
You will see output similar to the following:
RMAN-03022: compiling command: allocate
RMAN-03023: executing command: allocate
RMAN-08030: allocated channel: c1
RMAN-08500: channel c1: sid=12 devtype=DISK

RMAN-03022: compiling command: copy
RMAN-03023: executing command: copy
RMAN-08000: channel c1: copied datafile 1
RMAN-08501: output filename=/oracle/dbs/df1.bak recid=3 stamp=352381826
RMAN-08031: released channel: c1
The RMAN-08000 message informs you that the copy was successful. Note that RMAN displays the full filename of the output copy in message RMAN-08501.
See Also: For copy syntax, see "copy". For allocate syntax, see
"allocate". To learn how to make image copies, see "Making Image
Copies".
In this example, back up your SYSTEM tablespace to disk. Of course, you can choose to back up a different object.
This example backs up the tablespace to its default backup location, which is port-specific: on UNIX systems the location is $ORACLE_HOME/dbs. Because you do not specify the format parameter, RMAN automatically assigns the backup a unique filename.
Use the backup command as follows:
RMAN> run {
2> allocate channel c1 type disk;
3> backup tablespace system;
4> }
You will see output similar to the following:
RMAN-03022: compiling command: allocate
RMAN-03023: executing command: allocate
RMAN-08030: allocated channel: c1
RMAN-08500: channel c1: sid=12 devtype=DISK

RMAN-03022: compiling command: backup
RMAN-03023: executing command: backup
RMAN-08008: channel c1: starting full datafile backupset
RMAN-08502: set_count=1 set_stamp=352382211 creation_time=18-DEC-98
RMAN-08010: channel c1: specifying datafile(s) in backupset
RMAN-08522: input datafile fno=00001 name=/vobs/oracle/dbs/tbs_01.f
RMAN-08011: including current controlfile in backupset
RMAN-08522: input datafile fno=00016 name=/oracle/dbs/tbs_03.f
RMAN-08522: input datafile fno=00002 name=/oracle/dbs/tbs_02.f
RMAN-08013: channel c1: piece 1 created
RMAN-08503: piece handle=/oracle/dbs/1hag1r83_1_1 comment=NONE
RMAN-08525: backup set complete, elapsed time: 00:00:27
RMAN-08031: released channel: c1
The RMAN-08525 message informs you that RMAN created the backup set successfully. Note that RMAN displays the full filename for the backup piece in message RMAN-08503.
See Also: For backup syntax, see "backup". To learn how to make
image copies, see "Making Backups".
In this example, list your backup sets and image copies. Issue the list command as follows:
RMAN> list backup;
You will see output similar to the following:
List of Backup Sets
Key     Recid      Stamp      LV Set Stamp  Set Count  Completion Time
------- ---------- ---------- -- ---------- ---------- ----------------------
3       3          352382231  0  352382211  49         18-DEC-98

    List of Backup Pieces
    Key     Pc# Cp# Status      Completion Time        Piece Name
    ------- --- --- ----------- ---------------------- ------------------------
    2       1   1   AVAILABLE   18-DEC-98              /oracle/dbs/1hag1r83_1_1

    List of Datafiles Included
    File Name                                  LV Type Ckp SCN    Ckp Time
    ---- ------------------------------------- -- ---- ---------- -------------
    1    /oracle/dbs/tbs_01.f             0  Full 114149     18-DEC-98
    2    /oracle/dbs/tbs_02.f             0  Full 114149     18-DEC-98
    16   /oracle/dbs/tbs_03.f             0  Full 114149     18-DEC-98
RMAN tells you which backup sets and pieces it created as well as which datafiles it included in those sets.
Now list your image copies as follows:
RMAN> list copy;
You will see output similar to the following:
List of Datafile Copies
Key     File S Completion time Ckp SCN    Ckp time        Name
------- ---- - --------------- ---------- --------------- ------
2       1    A 18-DEC-98       114148     18-DEC-98       /oracle/dbs/df1.bak

See Also: For an explanation of the column headings in the list output, see "list". To learn how to make lists and reports, see "Generating Lists".
Finally, check that you are able to restore your backup in case of a media failure. Use the output from the list backup command to determine the primary key for the backup set:
List of Backup Sets
Key     Recid      Stamp      LV Set Stamp  Set Count  Completion Time
------- ---------- ---------- -- ---------- ---------- ----------------------
3       3          352382231  0  352382211  49         18-DEC-98
In this example, the primary key is 3. Use the primary key value in your backup set in the validate backupset command as follows:
RMAN> run {
2> allocate channel c1 type disk;
3> validate backupset 3;
4> }
You should see output similar to the following:
RMAN-03022: compiling command: allocate
RMAN-03023: executing command: allocate
RMAN-08030: allocated channel: c1
RMAN-08500: channel c1: sid=12 devtype=DISK

RMAN-03022: compiling command: validate
RMAN-03023: executing command: validate
RMAN-08096: channel c1: starting validation of datafile backupset
RMAN-08502: set_count=49 set_stamp=352382211 creation_time=18-DEC-98
RMAN-08023: channel c1: restored backup piece 1
RMAN-08511: piece handle=/oracle/dbs/1hag1r83_1_1 params=NULL
RMAN-08098: channel c1: validation complete
RMAN-08031: released channel: c1
If there are no error messages, then RMAN confirms that it is able to restore the backup set. When there is an error, RMAN always displays an error banner and provides messages indicating the nature of the error.
For example, if you try to allocate a channel on the target database when not connected to it you see:
RMAN-00571: ===========================================================
RMAN-00569: =============== ERROR MESSAGE STACK FOLLOWS ===============
RMAN-00571: ===========================================================
RMAN-03002: failure during compilation of command
RMAN-03013: command type: allocate
RMAN-06171: not connected to target database
See Also: For validate syntax, see "validate". To learn how to restore backups and copies, see "Restoring Datafiles, Control Files, and Archived Redo Logs".
To back up to and restore from sequential media such as tape you must integrate a media manager with Oracle. This section includes the following topics:
See Also: For an overview of media management software, see "Media Management".
To integrate Oracle with a media manager, you must:
Use the substitution variables provided by RMAN to generate unique backup piece names when writing backups to a media manager (see "backup" for the complete list of variables). A backup piece name is determined by the format string specified either in the backup command or in the allocate channel command.
If you do not specify the format parameter, RMAN automatically generates a unique filename using the %U substitution variable. The media manager considers the backup piece name as the filename backed up, so this name must be unique in the media manager catalog.
Some media managers have limits on the maximum size of files that they can back up or restore. File size is an issue in those situations in which RMAN multiplexes multiple datafiles into one output file, but the backup piece size is in excess of the size that the media manager or file system is able to store.
To avoid problems, see your media management documentation for operational limits on file sizes. Ensure that the files written out by RMAN do not exceed these limits. To limit backup piece file sizes, use the parameter kbytes in a set limit channel command. See the scripts in your $ORACLE_HOME/rdbms/demo directory for an example.
See Also: To learn about various parameters affecting the run command, see "set_run_option".
Use the send command to send a vendor-specific quoted string to the media management software. See your media management documentation to determine which commands it supports.You can use:
See Also: For send command syntax, see "send".
To aid in troubleshooting media management, Oracle offers a client program, sbttest. This program, which is linked to RMAN to perform backups to tape, provides a stand-alone test of the media management software. Use it when Oracle is unable to create or restore backups using either the bundled Legato Storage Manager or another vendor's media management product. Only use the sbttest program at the direction of Oracle support.
The $ORACLE_HOME/rdbms/demo sub-directory (the location may differ depending on your operating system) contains a number of sample RMAN scripts. These files are executable Recovery Manager command files that are fully documented so that you can understand the features used. Edit them to customize them for your site.
The first file provides a number of scripts that back up, restore, and recover a database. These scripts are typical of how some DBAs back up their databases; use them as a starting point for developing backup, restore, and recovery scripts. The remaining files contain either a backup, recovery, or duplication scenario.
Run command files from either the O/S command line or the RMAN prompt. If you use a recovery catalog, you can also create scripts using the create script command and execute them within a run command.
See Also: To learn how to run command files from the RMAN prompt, see "rmanCmd". To learn how to run command files from the command line, see "cmdLine". To learn how to create and execute stored scripts, see "Storing Scripts in the Recovery Catalog".