Release 8.1.5
A67766-01
Library |
Product |
Contents |
Index |
| Oracle Advanced Security Administrator's Guide Release 8.1.5 A67766-01 |
|
![]()
![]()
This chapter covers the following topics:
SSL (Secure Sockets Layer) is an industry standard protocol designed by Netscape Communications Corporation for securing network connections. SSL provides authentication, encryption, and data integrity using public key infrastructure (PKI).
This section discusses the following topics.
By including the SSL feature, the Oracle Advanced Security option expands its own support for encryption, and provides public key authentication based on the SSL standard.
You can use the SSL feature of the Oracle Advanced Security option to secure communications between any client and any server. Specifically, you can use SSL to authenticate:
You can use SSL features by themselves or in combination with other authentication methods supported by the Oracle Advanced Security option. For example, you can use the encryption provided by SSL in combination with the authentication provided by Kerberos.
|
More Information:
For more information on authentication methods, see Chapter 1, "Introduction to Oracle Advanced Security". |
You can use SSL in one of three authentication modes. You can require:
You can also disable SSL authentication and use its encryption feature alone.
|
More Information:
For a full explanation of SSL, see the Internet Engineering Task Force document The SSL Protocol, Version 3.0. For important security concepts and terminology, see the Glossary. |
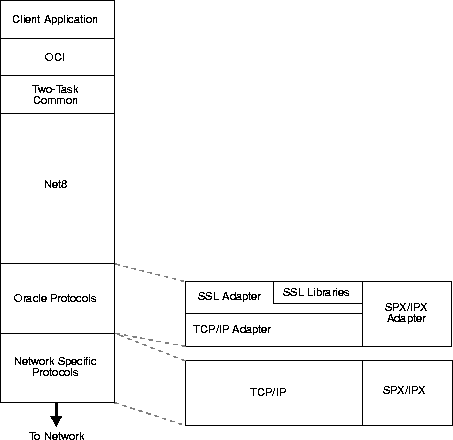
In an Oracle environment, SSL operates at the Oracle Protocols layer using TCP/IP as illustrated in Figure 9-1.
The components of SSL in an Oracle environment include the following, each of which is described below:
A certificate ensures that the entity's identity information is correct and that the public key actually belongs to that entity. A certificate is created when an entity's public key is signed by a trusted identity, that is, a certificate authority (CA), described more fully in this section.
A certificate contains the entity's name, public key, serial number, and expiration date. It may contain information about the privileges associated with the certificate. Finally, it contains information about the CA that issued it.
When an entity receives a certificate--either its own certificate from a CA or a certificate from another entity--it verifies that certificate is a trusted certificate, that is, that it is issued by a trusted certificate authority. A certificate is valid until it expires.
A trusted third party that certifies that other entities--users, databases, administrators, clients, servers--are who they say they are. The certificate authority verifies the user's identity and grants a certificate, signing it with the certificate authority's private key.
Different CAs may have different identification requirements when issuing certificates. One certificate authority may want to see a user's driver's license, another may want the certificate request form to be notarized, yet another may want fingerprints of the person requesting a certificate.
The certificate authority publishes its own certificate which includes its public key. Each network entity has a list of such certificates of the CAs it trusts. Before communicating with another entity, a given entity uses this list to verify that the signature on the other entity's certificate is from a trusted CA.
Network entities can obtain their certificates from the same or from different CAs.
|
Note: The Oracle Advanced Security option is installed with a set of VeriSign certificates. For information on adding certificates, see "Step 5: Create a new wallet". For information on adding trusted certificates, see "Step 7: Add new trusted certificates". |
An abstraction used to store and manage authentication data such as keys, certificates, and trusted certificates which are needed by SSL. In an Oracle environment, each system using SSL has a wallet with an X509 version 3 certificate, private key, and list of trusted certificates.
Security administrators use the Oracle Wallet Manager to manage security credentials on the server. Wallet owners use it to manage security credentials on clients. Specifically, the Oracle Wallet Manager is used to do the following:
For information on the Oracle Wallet Manager, see the sections beginning with "Step 4: Start the Oracle Wallet Manager". See also "Managing Wallets".
More Information:
At the beginning of their communication, the client and server perform an SSL handshake which includes three important tasks:
Similarly, if client authentication is required, the client sends its own certificate to the server. The server verifies that the client's certificate was signed by a trusted CA.
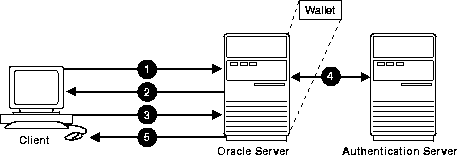
In an Oracle environment, the authentication process involves three basic steps:
You can use the SSL feature of the Oracle Advanced Security option to secure connections between non-Oracle clients and Oracle servers. For example, SSL can allow a client outside an Oracle network to access authorized data securely within the Oracle network.
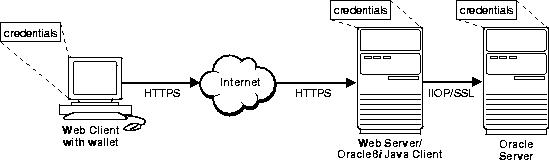
Figure 9-2 offers an example of how you can use SSL to secure connections between Oracle and non-Oracle entities--beginning over the Internet and proceeding to an Oracle server. In this example, a Web server runs as an Oracle8i Java client. It receives messages over HTTPS (HTTP secured by SSL), and sends CORBA requests to the Oracle server via a servlet over IIOP/SSL (IIOP secured by SSL.). Note that, in this example, the Web server passes its own--and not the Web client's--certificate to the Oracle server.
|
More Information:
For information on using and configuring IIOP/SSL, see Oracle8i Enterprise JavaBeans and CORBA Developer's Guide. |
You can combine the features of SSL with other authentication methods supported by the Oracle Advanced Security option, for example, Kerberos, SecurID, or Identix.
|
More Information:
For more information on authentication methods, see Chapter 1, "Introduction to Oracle Advanced Security". |
This section discusses the topics in the following list.
As Figure 9-3 illustrates, the Oracle Advanced Security option operates at the session layer, on top of SSL which uses TCP/IP at the transport layer.
|
More Information:
For more information on stack communications in an Oracle networking environment, see Net8 Administrator's Guide. |
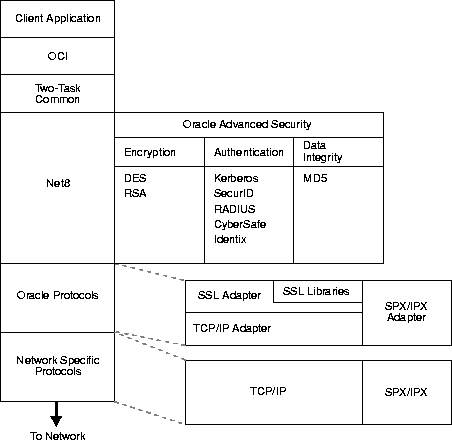
Figure 9-4 illustrates one possible scenario when using SSL in combination with another authentication method supported by the Oracle Advanced Security option. In this scenario, server authentication uses SSL, and client authentication uses an authentication method supported by the Oracle Advanced Security option, for example, Kerberos, SecurID, Identix.
You can use SSL encryption in combination with another authentication method of the Oracle Advanced Security option. When you do this, you must disable any non-SSL encryption to comply with government regulations prohibiting double encryption. If you do not do this, the connection will fail.
For information on how to disable encryption in the Oracle Advanced Security option, see "Negotiating Encryption and Checksumming".
You cannot use SSL authentication with the Oracle Advanced Security option encryption.
Note:
SSL cannot be proxied through traditional application level firewalls (such as the CERN proxy server).
SSL does not provide authorization, that is, the allocation of privileges and roles. Rather, these are provided in Oracle8i by the Oracle server.
Because SSL does authentication and encryption, from a performance standpoint it is slower than the standard Net8 TCP/IP transport.
The SSL feature of the Oracle Advanced Security option does not work with versions of Oracle earlier than Oracle8i.
Each SSL authentication mode as described requires unique configuration settings. These unique settings are explained in the section "Enabling SSL".
To enable SSL, you perform the general tasks in the following list. Each task is explained more fully in the next several pages.
Do this on both the client and server.
When you install the Oracle Advanced Security option, the Oracle Universal Installer adds both SSL and the Oracle Wallet Manager to your system.
To configure SSL on the client, perform the tasks in the following list, each of which is described more fully below.
There are two ways to configure a parameter:
For the dynamic parameter names, see "Parameters for Clients and Servers using SSL".
More Information:
This graphical interface tool makes it easy to set parameters in the sqlnet.ora file and other Oracle8i configuration files.
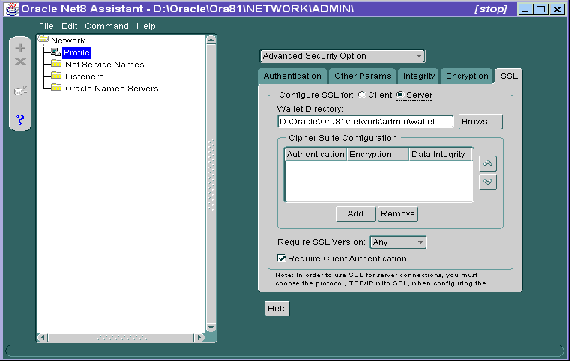
In the Net8 Assistant's left pane, click the Profile folder. Then go to the drop down list box at the top of the right pane, and select Advanced Security Option. The tabbed pages for the Oracle Advanced Security option appear.
Go to the menu bar and click File > Save Network Configuration.
You need to do this only if you are using Net8 Assistant.
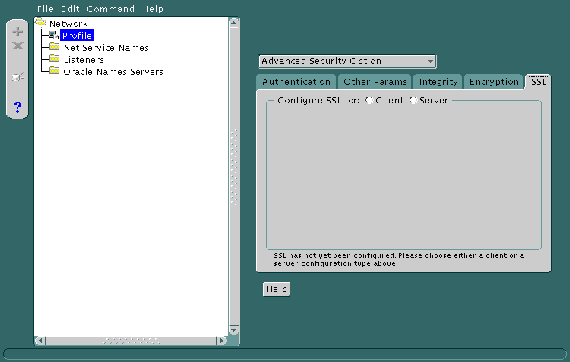
Refer to Figure 9-5.
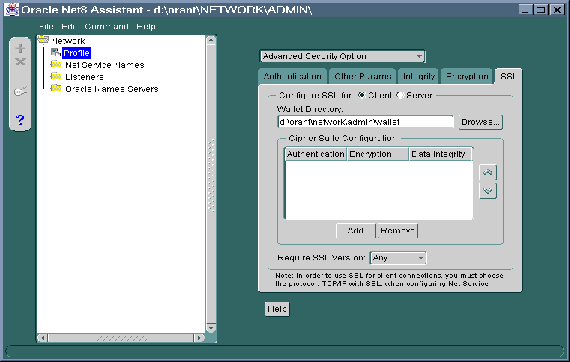
Do this by setting the The OSS.SOURCE.MY_WALLET parameter. There is no default for this parameter.
| Use the Net8 Assistant... | ... or modify SQLNET.ORA |
|---|---|
|
Refer to Figure 9-6.
Note: You must enter this same directory later when you come to "Step 5: Create a new wallet". |
Set the following parameter: oss.source.my_wallet = (SOURCE= (METHOD=File) (METHOD_DATA= (DIRECTORY=<your_wallet_ ) |
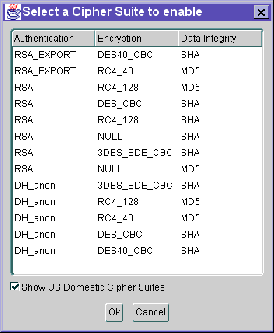
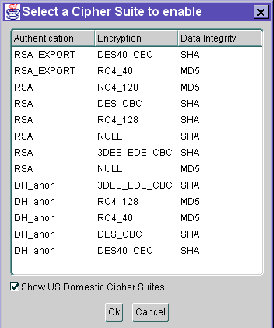
A cipher suite is a set of authentication, encryption, and data integrity algorithms used for exchanging messages between network entities. During an SSL handshake, two entities negotiate to see which cipher suite they will use when transmitting messages back and forth.
The SSL_CIPHER_SUITES parameter sets the cipher suites SSL uses.
When you install the Oracle Advanced Security option, several SSL cipher suites are set for you by default. Setting one or more cipher suites yourself overrides the other default cipher suites set during installation. For example, if you use Net8 Assistant to add the cipher suite SSL_RSA_WITH_RC4_128_SHA, all other cipher suites in the default setting are ignored.
You can prioritize the cipher suites. When the client negotiates with servers regarding which cipher suite to use, it follows the prioritization you set. When you prioritize the cipher suites, consider the following:
Normally, you would prioritize cipher suites starting with the strongest and moving to the weakest.
The following two tables list the available SSL cipher suites supported in both the domestic and export versions of the Oracle Advanced Security option. These cipher suites are set by default when you install Oracle Advanced Security option. These tables also list the authentication, encryption, and data integrity types each cipher suite uses.
|
Note: If you use SSL in conjunction with another authentication method supported by the Oracle Advanced Security option, you must disable any non-SSL encryption to comply with government regulations prohibiting double encryption. If you do not do this, the connection will fail. For information on how to disable encryption in the Oracle Advanced Security option, see "Negotiating Encryption and Checksumming". |
| Use the Net8 Assistant... | ... or modify SQLNET.ORA |
|---|---|
|
Refer to Figure 9-6.
|
Set the following parameter in the server's sqlnet.ora file, listing the cipher suites in priority: SSL_CIPHER_SUITES= |
Do this by setting the SSL_VERSION parameter. This parameter determines which version of SSL must be running on the machines with which the client is communicating. You can require those machines to use SSL 3.0, or any existing or future versions. The default setting for this parameter in sqlnet.ora is "0"; in Net8 Assistant it is "Any".
| Use the Net8 Assistant... | ... or modify SQLNET.ORA |
|---|---|
|
Refer to Figure 9-6. |
Set the following parameter: SSL_VERSION={ 0 | 3.0 } |
The SQLNET.AUTHENTICATION_SERVICES parameter sets the SSL authentication service.
You must set this parameter only if both of the following two conditions apply:
and
If both of the above conditions apply, add TCPS to this parameter in the sqlnet.ora file by using a text editor. For example:
 SQLNET.AUTHENTICATION_SERVICES = (BEQ,

                                    TCPS,
                                    identix,
                                    securid)
If either or both of the above conditions do not apply, you do not need to set this parameter.
The client must be configured with the location of the listener. For an SSL connection, the address of the listener must use the TCP/IP with SSL protocol.
During installation, Oracle sets defaults on both the Oracle server and the Oracle client for all SSL parameters except the location of the Oracle wallet. To configure SSL on the server, perform the tasks in the following list, each of which is described below.
As with the Oracle client, there are two ways to configure a parameter on the Oracle server:
For the dynamic parameter names, see "Parameters for Clients and Servers using SSL".
More Information:
This graphical interface tool makes it easy to set parameters in the sqlnet.ora file and other Oracle8i configuration files.
In the Net8 Assistant's left pane, click the Profile folder. Then go to the drop down list box at the top of the right pane, and select Advanced Security Option. The tabbed pages for the Oracle Advanced Security option appear.
Go to the menu bar and click File > Save Network Configuration.
You need to do this only if you are using Net8 Assistant.
Refer to Figure 9-8.
Do this by setting the OSS.SOURCE.MY_WALLET parameter. There is no default for this parameter.
|
Note: There are two occasions during the client and the server configuration when you set the location of the Oracle wallet. Be sure to enter the same location on both occasions.
|
| Use the Net8 Assistant... | ... or modify SQLNET.ORA |
|---|---|
|
Refer to Figure 9-9.
Note: You must enter this same directory later when you come to "Step 5: Create a new wallet". |
Set the following parameter: oss.source.my_wallet = (SOURCE= (METHOD=File) (METHOD_DATA= (DIRECTORY=your wallet location) ) |
The SSL_CIPHER_SUITES parameter sets the cipher suites SSL uses.
When you install the Oracle Advanced Security option, several SSL cipher suites are set for you by default. Setting one or more cipher suites yourself overrides the other default cipher suites set during installation. For example, if you use Net8 Assistant to add the cipher suite SSL_RSA_WITH_RC4_128_SHA, all other cipher suites in the default setting are removed.
You can prioritize the cipher suites. When the server negotiates with clients over which cipher suite to use, it follows the prioritization you set.
When you prioritize the cipher suites, consider the following:
Inversion 8.1.5 of the Oracle Advanced Security option, if you set a cipher suite employing Diffie-Hellman anonymous authentication on the server, you must also set the same cipher suite on the client. Otherwise, the connection will fail.
If you have decided to use a cipher suite employing Diffie-Hellman anonymous, you must set the SSL_CLIENT_AUTHENTICATION parameter to FALSE. See "Set SSL client authentication (optional)".
Note:
Normally, you would prioritize cipher suites starting with the strongest and moving to the weakest.
The following two tables list the available SSL cipher suites supported in both the domestic and export versions of the Oracle Advanced Security option. These tables also list the authentication, encryption, and data integrity types each cipher suite uses.
| Use the Net8 Assistant... | ... or modify SQLNET.ORA |
|---|---|
|
Refer to Figure 9-9.
|
Set the following parameter in the server's sqlnet.ora file, listing the cipher suites in priority: SSL_CIPHER_SUITES= |
Do this by setting the SSL_VERSION parameter. This parameter determines which version of SSL must be running on the machines with which the server communicates. You can require those machines to use SSL 3.0 or any existing or future versions.
The default setting for this parameter in sqlnet.ora is "0"; in Net8 Assistant it is "Any." Oracle recommends accepting the default value which allows clients with previous SSL versions to interoperate with servers using later SSL versions.
| Use the Net8 Assistant... | ... or modify SQLNET.ORA |
|---|---|
|
Refer to Figure 9-9. |
Set the following parameter:
|
The SSL_CLIENT_AUTHENTICATION parameter controls whether the client is authenticated using SSL. The default value is TRUE.
You must set this parameter to FALSE if you are using a cipher suite that contains Diffie-Hellman anonymous authentication (DH_anon). Also, you may want to set this parameter to FALSE if you want the client to authenticate itself to the server by using any of the non-SSL authentication methods supported by Oracle Advanced Security option, for example, Kerberos, Identix, etc.
| Use the Net8 Assistant... | ... or modify SQLNET.ORA |
|---|---|
|
Refer to Figure 9-9. |
Set the following parameter: SSL_CLIENT_AUTHENTICATION={ TRUE | FALSE } |
The SQLNET.AUTHENTICATION_SERVICES parameter sets the SSL authentication service.
You must set this parameter only if both of the following two conditions apply:
and
If both of the above conditions apply, add TCPS to this parameter in the sqlnet.ora file by using a text editor. For example:
SQLNET.AUTHENTICATION_SERVICES = (BEQ, TCPS, selected_method_1, selected_method_2)
If either or both of the above conditions do not apply, you do not need to set this parameter.
To activate SSL for a client connection, you must select the TCP/IP with SSL protocol as the listening endpoint in listener.ora. If you have IIOP clients connecting to the Java option in the database, be sure the port number is 2482.
You use the Oracle Wallet Manager to do the following on both the client and the server:
The way you invoke the Oracle Wallet Manager depends on what kind of system you use.
Start the Oracle Wallet Manager on a Windows NT by clicking Start > Programs > Oracle Wallet Manager > Oracle Wallet Manager. You can also start the application by typing wmtgui at a command prompt. The Oracle Wallet Manager's Oracle Wallet dialog box (Figure 9-11) appears.
Type wmtgui at the command line to invoke the Oracle Wallet Manager. The Oracle Wallet Manager's Oracle Wallet dialog box (Figure 9-11) appears.
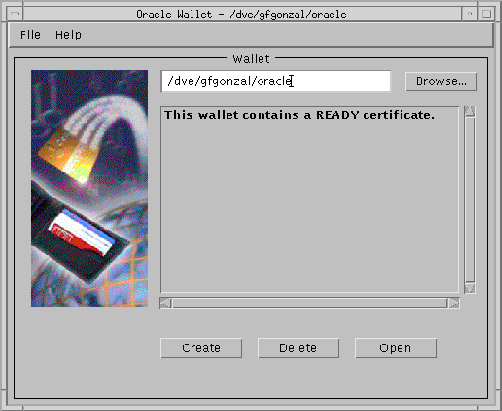
This dialog box displays the default wallet location, the version of the certificate that is stored in the wallet, and the status of the wallet: EMPTY, REQUESTED, or READY. The following tables describe the fields and buttons in the dialog box.
|
Create |
Creates a new wallet. |
|
Delete |
Deletes the wallet displayed in this dialog box. |
|
Open |
Opens the wallet displayed in this dialog box. |
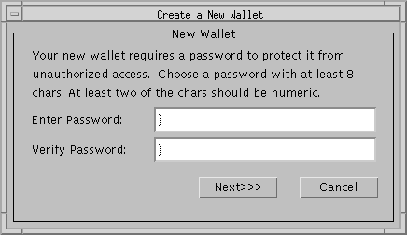
Follow the steps below to create a new wallet. The steps assume that you have started the Oracle Wallet Manager and are at the program's initial dialog box (Figure 9-11).
The New Wallet Identity dialog box (Figure 9-12) appears.
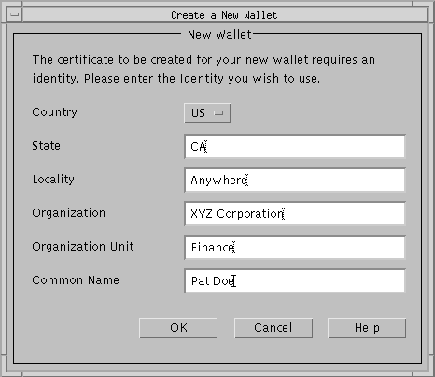
If you are using single sign-on, make a note of the fields in this dialog box and value you enter in each one. You will need this information later when you create a global user. See "Step 10: Create a user identified globally through certificates on the Oracle server".
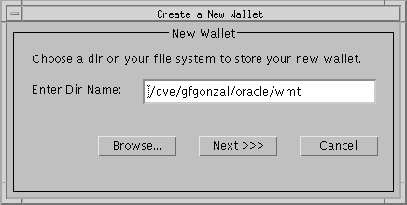
The New Wallet location dialog box (Figure 9-13) prompts you to choose a directory on your file system in which to store the new wallet.
|
Note: There are two occasions when you set the location of the Oracle wallet. Be sure to enter the same location on both occasions.
|
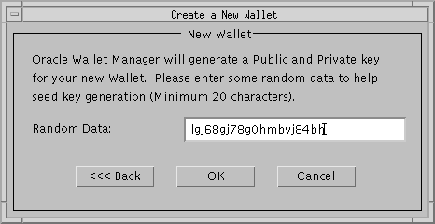
The New Wallet Random Data dialog box (Figure 9-15) appears.
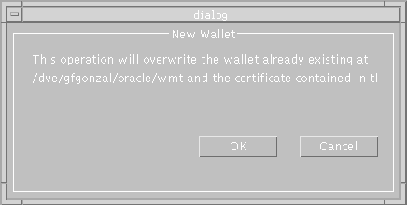
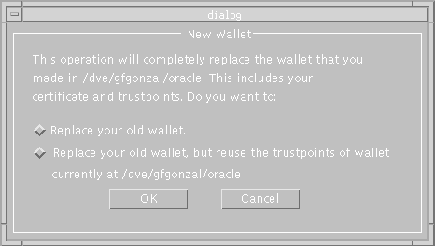
A New Wallet dialog box (Figure 9-16) informs you that the new wallet will overwrite the wallet, certificate and trusted certificates that already exist at the default file location. This occurs when you already have an existing wallet in the default location.
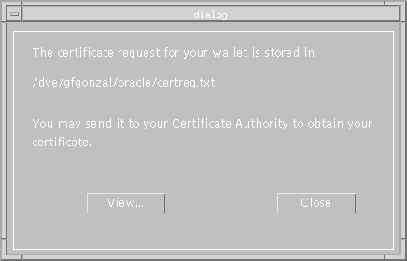
A dialog box (Figure 9-18) displays the location of your certificate request file. This is the file you send to your Certificate Authority.
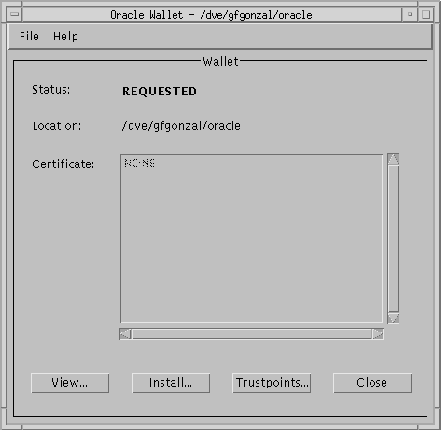
The Oracle Wallet dialog box (Figure 9-19) appears with a status value of REQUESTED and a certificate value of NONE.
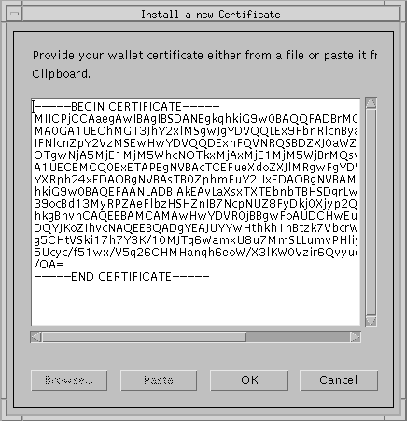
Once you send the certificate request to the certificate authority, wait until you receive an e-mail reply containing your signed certificate. Depending upon the Certificate Authority, you may receive a certificate file such as certificate.txt. Proceed to install the certificate into the new wallet using either of the following two options.
The Install a new Certificate dialog box (Figure 9-20) appears.
A directory dialog box appears. Use this dialog box to locate the certificate.txt file (it may also have some other name depending upon the Certificate Authority).
You are returned to the Oracle Wallet dialog box. Its status changes to READY.
A trusted certificate is a third party identity that is qualified with a level of trust. Trusted certificates are contained within a wallet. The trusted certificate is used when an identity is being validated as the entity it claims to be. Trusted certificates are also referred to as trustpoints.
A default set of trusted certificates from VeriSign is installed in your default wallet when you install the Oracle Wallet Manager. You manage these trusted certificates by using the Oracle Wallet Manager which enables you to add a new trusted certificate, view existing trusted certificate information, and delete a trusted certificate.
If you are using a certificate that is issued by a CA not yet on your list of trusted certificates, you must add that CA to the list. If a CA's certificate is signed by a root CA, you must add to the list the entire certificate chain, one certificate at a time.
|
More Information:
For instructions on adding, viewing and managing trusted certificates, see "Managing Trusted Certificates". |
Once the wallet is in the file system, applications can start using SSL, provided each application has been configured to locate the wallet.
Click File > Save in the Oracle Wallet dialog box to save changes you make to the wallet.
If you want to use SSL's single sign-on functionality--as opposed to having users enter passwords each time they open their wallets--you must create an auto-login wallet from the wallet you created earlier in "Step 5: Create a new wallet". You do this by using the command line version of the Oracle Wallet Manager.
oss.source.my_wallet =
(SOURCE=
  (METHOD=File)
  (METHOD_DATA=
    (DIRECTORY=your wallet
location)
) )
setenv TNS_ADMIN your_sqlnet.ora_file
owmcmd -f
For example:
/vobs/oracle/network/bin/owmcmd -f
The command line version of the Oracle Wallet Manager prompts you for the user's password.
Enter the password you entered when you created in Step 5: Create a new wallet
The Oracle Wallet Manager creates the auto-login wallet, names it cwallet.sso, and places it at the Wallet Resource Locator you specified. If the initial wallet is stored on a directory server rather than on the local machine, the Oracle Wallet Manager downloads it from the directory server, uses it to create an auto-login wallet, and places the latter at the Wallet Resource Locator you specified.
If you are using an enterprise directory service, you create global users in each local database by using the Security Manager tool of the Oracle Enterprise Manager, or by typing the following commands:
CONNECT system/manager@database_name;
CREATE USER username IDENTIFIED GLOBALLY AS 'external_name'
The external_name must match the full distinguished name of the user.
A distinguished name consists of up to six fields of information which uniquely identify a user. The fields are:
The format of a distinguished name begins at the left with the lowest level of granularity:
CN=user, L=location, ST=state, OU=unit, O=organization, C=country
For example, suppose you have a user with the following attributes:
The full distinguished name of this user would be:
CN=Tom Jones, L=HQ, ST=CA, OU=Information Technologies, O=Acme Corporation,
C=US
Thus, the following statement creates a new account for Tom Jones:
CREATE USER tjones IDENTIFIED GLOBALLY AS "CN=Tom Jones, L=HQ, ST=CA,
OU=Information Technologies, O=Acme Corporation, C=US"
Refer to the values you entered in the Create a New Wallet dialog box in "Step 5: Create a new wallet". Start with the field at the bottom of that dialog box, namely, Common Name, and record the value you entered in that field. Then move successively up to the next field, namely, Organizational Unit, and record the value you entered in that field. Then move up to the next field, and so on, until you have recorded the value for each field. Be sure to use the correct format for the distinguished name as described above.
Once you have initially configured the SSL feature of the Oracle Advanced Security option, there are various tasks you may need to perform from time to time. This section discusses these tasks in the following categories:
Use the Oracle Wallet Manager to open, view, or modify an existing wallet or to create a new wallet.
This section discusses the following tasks:
For information on starting the Oracle Wallet Manager, see "Step 4: Start the Oracle Wallet Manager".
For information on creating a new wallet, see "Step 5: Create a new wallet".
For information on installing a certificate into a new wallet, see "Step 6: Install a certificate into the new wallet".
More Information:
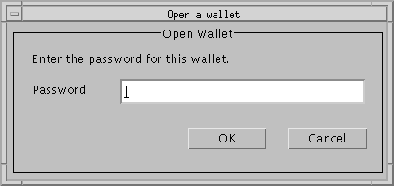
The Oracle Wallet Manager enables wallet owners to open their default wallets. The default wallet is displayed in the Oracle Wallet Manager Start-up dialog box. Wallet owners must provide a valid Wallet Resource Locator (WRL) and the correct password to open the wallet.
The Open Wallet Password dialog box (Figure 9-21) appears.
The Oracle Wallet dialog box (Figure 9-22) appears.
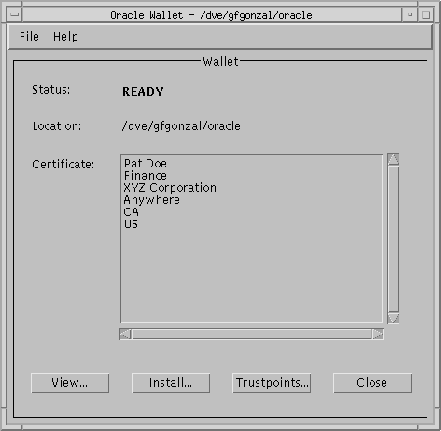
Use the Oracle Wallet dialog box to access functions that allow you to view or modify the wallet's contents. This dialog box contains the following fields and buttons.
If you are using replicated servers, each node must have the same wallet.
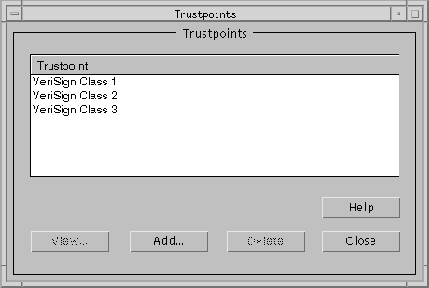
Use the Oracle Wallet Manager to manage the trusted certificates in your wallet. You can add a new trusted certificate, view existing trusted certificate information, and delete a trusted certificate. A default set of four trusted certificates is installed in your default wallet when you install the Oracle Wallet Manager.
This section discusses the following tasks:
Add a new trusted certificate to your wallet as follows.
The Trustpoints dialog box (Figure 9-23) appears.
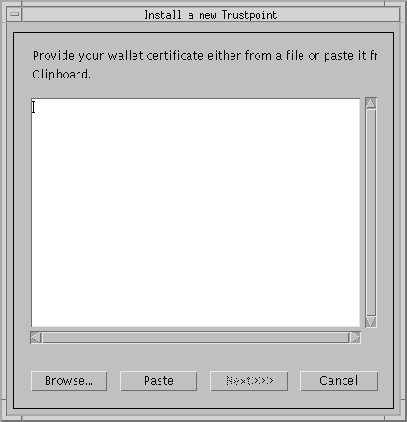
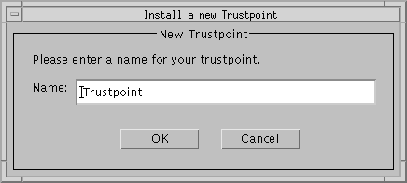
The Install a New Trustpoint dialog box (Figure 9-24) appears. This is the dialog box into which you paste the trusted certificate.
The Trustpoint Name dialog box (Figure 9-25) appears.
The trusted certificate you created is added to the list of trusted certificates in the Trustpoints dialog box (Figure 9-23).
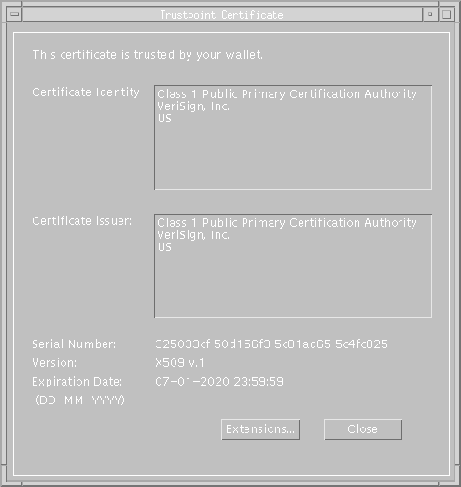
You can view detailed trusted certificate information from the Trustpoints dialog box as follows.
The Trustpoint Certificate dialog box (Figure 9-26) appears.
The Oracle Wallet Manager offers you the option of deleting selected trusted certificates in the event that they become compromised. Delete a trusted certificate from the Trustpoints dialog box (Figure 9-23) as follows.
A dialog box prompts you with, "Do you really want to delete this trusted certificate?"
You are returned to the Trustpoints dialog box, and the deleted trusted certificate is no longer displayed in the trusted certificate list.
If you click No, you are returned to the Trustpoints dialog box, and the trusted certificate remains displayed in the trusted certificate list.
Click File > Save in the Oracle Wallet dialog box to save changes you make to the wallet.
If you are using SSL authentication, launch SQL*Plus and, at the prompt, type the following:
CONNECT/@database_alias
If you are not using SSL authentication, launch SQL*Plus and, at the prompt, type the following:
CONNECT username/password@database_alias