Release 2.1.8
A42334_4
Library |
Product |
Contents |
Index |
| Oracle
Video Client Software Guide Release 2.1.8 A42334_4 |
|
The Oracle Video Client software allows you to develop interactive, video-based multimedia applications for such uses as computer-based training (CBT), interactive kiosks, and corporate repositories that receive and control networked Motion Picture Experts Groups (MPEG) streams. The Oracle Video Custom Control software allow multimedia applications to start, stop, and seek MPEG video streams from the Oracle Video Server. The Oracle Video Server allows many different clients to concurrently access MPEG video streams.
Note that while the Oracle Video Client can work with many other Oracle products (such as Oracle Power Objects and Oracle Forms), not all those products are currently supported for Windows 95. The product's release notes will describe the platforms it is supported on.
This chapter explains how to install and configure the Oracle Video Client software for Microsoft Windows 95. (If you are installing on a Windows for Workgroups client, see Chapter 1, Installing the Oracle Video Client: Windows for Workgroups.) It also explains how to test the software with local and networked MPEG streams. This chapter contains these sections:
The Oracle Video Client software includes:
The software also includes:
Before installing the Oracle Video Client software, ensure that the client PC meets these minimum hardware and software requirements.
You may also use SMC Elite Ultra 16 ISA cards within a PCI/ISA client machine.
The Oracle Video Client provides support for two MPEG-1 decoding solutions:
MPEG-1 decoding on the client is best performed by a hardware accelerator card that is capable of providing full-screen, full-motion digital video at 30 frames per second (fps) with CD-quality audio. Software decoding, even on high-end CPUs (such as a Pentium 133) will most likely have reduced performance, perhaps as low as 15 fps, with lower motion quality. Oracle does not recommend software MPEG-1 decoding for production applications. Instead, software decoding is best used for system testing or application development.
Before you install the Oracle Video Client, make sure you complete the following:
Any CD-ROM drive that can be attached as a logical drive (for example, the D: drive) can be used to install the Oracle Video Client software. Refer to the CD-ROM drive documentation for instructions on its use.
In general, the instructions in this chapter assume that your CD-ROM drive is recognized as the logical drive D. If the PC CD-ROM drive letter differs, substitute the correct logical letter.
This section explains how to install the Oracle Video Client software on a client PC.
The installation process uses the Oracle Installer, a Windows 95 application that is supplied on the Oracle Video Client CD-ROM.
Set up the Oracle Installer in the Windows 95 Start Menu by starting the Oracle Installer application from the CD-ROM, as described in the section "Running the Oracle Installer." After you start the Oracle Installer, it performs the following tasks:
If you have previously installed other Oracle Windows 95 products, the Oracle Installer does not re-create directories.
The Oracle Installer provides a common interface for the installation of all Oracle products. A complete installation of the Oracle Video Client requires three components:
Run the Oracle Installer by following the steps in this section.
If you have previously installed another Oracle product for Windows 95, the Oracle Installer may already be installed on the hard disk. However, you should follow these steps to ensure that you have the latest Installer software available.
To begin the installation process:


The Oracle Installer's default location for all Oracle Products is the c:\orawin95 directory. Choosing a different directory can disable currently installed Oracle products. Products installed in the previously active Oracle Home directory will no longer be available until you switch back to the that directory.
For the Oracle Video Client to operate properly, these two items must be installed:
Choosing Oracle Video Client automatically installs Oracle Media Net and Oracle Installer.
Before you continue with the installation, click on the Options button and choose the level of installation reporting (Figure 2-4). The reports are written to the orainst.log file which is stored in the C:\orawin95\orainst directory.

The Options provided in this dialog window set the level of confirmation prompts and information messages you can receive during the installation process.
When you are ready to continue the installation, click Install. Click Yes on the Confirmation dialog, unless you have disabled it, to confirm that you want to install the selected products.
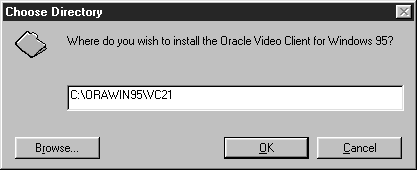
After you have confirmed that you wish to install the Oracle Video Client software, the Choose Directory dialog window displays the subdirectory into which the Oracle Video Client software will be installed. The Installer will create the vc21 subdirectory underneath the C:\orawin95 directory (Figure 2-5).
 .
.Choose only one. Support files for your choice are copied into the installation directory, and the oravideo.ini file is created to reflect the MPEG decoder you choose. You can choose support for one of the decoders now and install the actual MPEG decoder at a later time.
You use the Oracle Video Client software with these application development tools to develop applications that use MPEG video from the Oracle Video Server. Choose the application development tools that you will use. The installer copies files for the tools you choose onto the hard disk. If you choose support for Visual Basic, the Installer automatically registers the Oracle Video Custom Control with the Windows 95 registry.
If you choose the Oracle Video Web Plug-in, the Installer prompts you for the location of the directory in which to put the plug-in. The default is C:\program files\netscape\navigator\program\plugins.
If the C:\program files\netscape\navigator\program\plugins directory does not exist on your machine, a dialog box prompts you for the name of the appropriate Netscape plug-in directory. If necessary, the Installer updates the Windows 95 system files on your machine and installs Microsoft Re-Distributable Support files. These enable your machine to run applications that take advantage of OLE2 features.
The Text Entry/IP address window asks for the IP address of the Oracle Video Server. Enter the IP address and click OK.
(Refer to Chapter 3 of the Oracle Video Server Administrator's Guide for your system or contact your System Administrator for more information on Oracle Media Net addresses, IP addresses and UDP port numbers.)
Once the installation completes, you will see a Windows 95 Program Group named "Oracle Video Client for Windows 95" (Figure 2-6); that group will contain the OVS Player icon, Notepad icon for the oravideo.ini file, and the Video Client Configuration Utility.

The Oracle Installer makes the necessary modifications to the Windows 95 registry. If necessary, use the Oracle Video Client configuration utility to alter the Media Net Address, Media Net Trace Option, and the Media Net Trace filename. This utility is provided as part of the Oracle Video Client installation.
Before the Oracle Video Client installation can be verified, one of the two MPEG decoding solutions must installed:
The Sigma Designs decoder installs a media player to view MPEG files. The media player can be found as an icon in the Windows 95 Program Group created by the installation of the decoder. Use the media player to test that the client software can decode local MPEG files from the CD-ROM or local hard disk.
The CompCore decoder does not come with a video player. However, you may use the OVS Player to test your installation.
After you have tested using the media player installed with your MPEG solution, test using OVS Player, which is installed with the Oracle Video Client software. OVS Player can be found as an icon in the Windows 95 Program Group created by the installation of the Oracle Video Client.
To use OVS Player, perform the following steps:
Note: You may have to transfer an MPEG file to the client PC in order to verify that OVS Player works with the installed decoder. See your system administrator for assistance in transferring files.
If local MPEG files do not play, see your system administrator for assistance.
After you have successfully viewed video from a local file, you can test using a network MPEG stream. Use OVS Player to test viewing MPEG streams from an Oracle Video Server over a network.
Before testing streamed MPEG over the network, you should verify:
Use the Ping utility that accompanies the TCP/IP stack software installed on your system to verify that the network is capable of delivering video. This example shows a generic ping utility.
If the network is not capable of using 8K packets, you will be notified that the data length is too long for your network's MTU (maximum transfer unit). If this happens, call your network administrator to resolve this problem. Video will not work with packet sizes smaller than 8K. You can still query the Oracle Video Server for a list of videos, but you cannot play them.
Verifying the network stream is similar to verifying the local stream, except that the MPEG stream comes from the Oracle Video Server over a network instead of from an MPEG file on a local hard disk.
Use the following procedure to test viewing MPEG streams from an Oracle Video Server:
If nothing appears in the Network list, contact your system administrator.
When the OVS Player loads a video it first "prepares" it. Preparing it means linking the video pump on the Oracle Video Server with the Oracle Media Net address of the client. When the preparation is successful, the movie controls are returned to you and you can play the video.
|
Copyright © 1997 Oracle Corporation. All Rights Reserved. |
|