Release 8.0
A54651-01
Library |
Product |
Contents |
Index |
| Oracle8(TM)
Server Replication Release 8.0 A54651-01 |
|
This chapter covers the following topics:
Note: Many of the activities described in this chapter can be accomplished much more easily by using Oracle's Replication Manager, a GUI interface for replication. See the documentation for Oracle Replication Manager.
Oracle always detects and logs update conflicts, uniqueness conflicts, and delete conflicts. In addition, Oracle provides system-defined conflict resolution routines that enable an environment using asynchronous row-level replication to resolve update conflicts and uniqueness conflicts. You can also write your own conflict resolution routines.
The purposes of conflict resolution are
Convergence ensures that all sites in your replicated environment agree and have the same data. Avoiding cascading errors ensures that your system will run smoothly.
Attention: If one (or more) rows in a transaction causes a conflict that remains unresolved, the entire transaction is written to the error log. Subsequent transactions that depend on the original transaction can now conflict, and in turn, be written to the error log.
If one or more sites in your replicated environment propagate changes asynchronously, conflicts can occur if two or more sites update the same replicated data. Even if your environment is designed to avoid conflicts (for example, by partitioning data ownership), it is prudent to
Note: If you do not designate a conflict resolution method, Oracle logs any unresolved conflicts as error transactions. You can view error transactions at the receiving site by using Replication Manager or by querying the site's DEFERROR view.
If all of your sites propagate changes synchronously and you have no updatable snapshot sites, conflicting updates cannot occur, and you do not need to designate a conflict resolution method.
The advanced replication facility uses a column group to detect and resolve update conflicts. A column group links a collection of columns in a table to a single "logical column." A column group can consist of a single column, any number of columns, or all of the columns in a table. Each column, however, can belong to only one column group.
The conflict detection mechanism detects update conflict column group by column group, so all columns must be a part of some column group.
You do not have to assign all of the columns in a table to a column group. However, you can only designate a conflict resolution method for the columns you assign to a column group.
Any column that you do not assign to a column group is automatically assigned to a "shadow" column group for conflict detection. A shadow column group is not visible to the user. You cannot assign a conflict resolution method to the columns in a shadow group. Do not use a shadow group for columns if you expect conflicts to occur on those columns.
When you propagate changes in a replicated environment by pushing the deferred transaction queue, Oracle's advanced replication facility calls a remote procedure in the generated package at the receiving site. Oracle uses the remote procedure to detect conflicts, if any. If, for example, two sites modify the same row before propagating their updates to each other, a conflict occurs. (If you have set up a conflict resolution method, Oracle attempts to resolve the conflict.)
If you have minimized data propagation for each changed row, Oracle forwards
Note: If you are inserting a row, it has no old value. If you are deleting a row, it has no new value.
Additional Information: "Minimizing Data Propagation" on page 7-30.
Say we have a table called EMP where all columns are contained in one column group. As shown in Figure 5-1, Oracle at the receiving site compares the old and current values of the row. Oracle detects a conflict if there are any differences between these values for any column in the row.
Note: Because a row can have different ROWIDs at different sites, Oracle uses the row's primary key to determine which rows to compare. If you do not want to use the primary key, designate one or more different columns by calling DBMS_REPCAT.SET_COLUMNS.
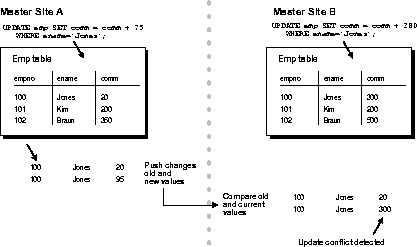
If the procedure at the receiving site detects no conflict, the server at the receiving site writes the new value(s).
If a conflict is detected, Oracle applies the appropriate conflict resolution routine, if one is available. Any unresolved conflicts are logged in the DEFERROR view at the receiving site. You can also view error transactions using Replication Manager.
When you replicate a table using row-level replication, you can designate one or more conflict resolution methods. Oracle applies these methods in the priority order you define until the conflict is resolved, or no more routines are available.
Note: For procedural replication, you must supply a conflict resolution method as part of your replicated procedure.
The three types of conflicts that the advanced replication facility detects are
The procedures at the receiving site detect an update conflict if there is any difference between the old values of the replicated row and the current values of the same row at the receiving site.
A uniqueness conflict is detected if a unique constraint is violated during an INSERT or UPDATE of the replicated row.
A delete conflict is detected if you change a row at a remote site after you delete that row from the local site. The delete conflict occurs because the old values of the deleted row at the local site do not match the current values of the same row at the remote site.
Warning: Because the primary key is used to determine which rows to compare, allowing modifications to the primary key is extremely risky to the integrity of your data.
Having column groups allows you to designate different methods of resolving conflicts for different types of data. For example, numeric data is often suited for an arithmetical resolution method, and character data is often suited for a timestamp resolution method.
Oracle evaluates each column group individually, so some portions of a row can be updated using the data from the originating site, while other portions can maintain the values of the data at the destination site. When you use multiple column groups, a conflict resolution mechanism can result in data convergence (all sites having the same values for a given row) without necessarily resulting in data integrity (data convergence on the appropriate value). For example, if the zip code column uses the latest timestamp resolution method while the city column uses the site priority resolution method, all sites could converge on a zip code that does match the city.
Attention: If two or more columns in a table must remain consistent with respect to each other, place these columns within the same column group.
When examining a row to determine if an update conflict has occurred, the replication facility uses the following algorithm:
The advanced replication facility's declarative conflict resolution mechanism provides system-defined routines for resolving update and uniqueness conflicts.
These system-defined routines do not support the following situations:
For these situations, either provide your own conflict resolution routine or determine a method of resolving error transactions manually.
The table below specifies the system-defined resolution methods for update conflicts that guarantee convergence in three types of replication environments.
Table 5-1: System Defined Methods to Resolve Update Conflicts
Note: The conflict resolution methods you assign need to ensure data convergence and provide results that are appropriate for how your business uses the data.
The advanced replication facility provides three methods for resolving uniqueness conflicts:
If you have more than one master site, none of these routines result in convergence, and these routines should only be used in conjunction with a notification facility. See the Conflict Notification section on page "Conflict Notification" on page 5-23.
If your replicated environment has more than two masters:
Figure 5-2 shows how having three master sites can lead to ordering conflicts. Master Site A has priority 30; Master Site B has priority 25; and Master Site C has priority 10; x is a column of a particular row in a column group that is assigned the site-priority conflict resolution method.
Note: The highest priority is given to the site with the highest priority value. Priority values can be any Oracle number and do not have to be consecutive integers
Table 5-2: Ordering Conflicts With Site Priority - More Than Two Masters
You can guarantee convergence when using priority groups if you require that the flow of ownership be ordered. For example, the workflow model dictates that information flow one-way through a three-step sequence:
If the billing site receives a change to a row from the ordering site after the billing site received a change to that row from the shipping site, the billing site ignores the out-of-order change because the change from shipping has a higher priority.
Suggestion: To help determine which conflict resolution method to use, make a diagram or time-action table (such as Figure 5-2) to help uncover any potential loopholes in your conflict resolution methodology.
The "Understanding Column Groups" section of this chapter explained that multiple column groups provide multiple conflict resolution methods for a single row. You can also use multiple conflict resolution methods for each column group. Use multiple resolutions methods
Multiple resolution methods are applied in the sequence you set.
Your preferred conflict resolution method might not always succeed. You can specify a backup method to have a greater chance of conflict resolution without manual intervention.
Some system-defined resolution methods, such as latest timestamp, occasionally require a backup method to successfully resolve conflicts. (Site priority is a possible backup method.) The latest timestamp method uses a special timestamp column to determine and apply the most recent change. In the unlikely event that the row at the originating site and the row at another site change at precisely the same second, you must provide a backup method.
Note: Oracle stores time to a granularity of one second.
You can also provide a user-defined method that records conflict information or notifies the DBA if the conflict cannot be resolved. You can arrange to receive notification for all conflicts, or for only those conflicts that cannot be resolved. You can mix any number of user-defined and system-defined conflict resolution routines.
Convergence means that all sites ultimately agree on the same value. Table 5-3 summarizes the system-defined conflict resolution methods, and whether they guarantee convergence between multiple master sites and their associated snapshot sites. Following sections describe each of these methods in greater detail.
Table 5-3: Standard Conflict Resolution Methods
When the advanced replication facility detects a conflict with a column group and calls the minimum value conflict resolution routine, it compares the new value from the originating site with the current value from the destination site for a designated column in the column group. You must designate this column when you select the minimum value conflict resolution routine.
If the new value of the designated column is less than the current value, the column group values from the originating site are applied at the destination site (assuming that all other errors were successfully resolved for the row). If the new value of the designated column is greater than the current value, the conflict is resolved by leaving the current values of the column group unchanged.
Note: If the two values for the designated column are the same (for example, if the designated column was not the column causing the conflict), the conflict is not resolved, and the values of the columns in the column group remain unchanged. Designate a backup conflict resolution method to be used in this case.
The maximum value method is the same as the minimum value method, except that the values from the originating site are only applied if the value of the designated column at the originating site is greater than the value of the designated column at the destination site.
There are no restrictions on the datatypes of the columns in the column group. Convergence for more than two master sites is only guaranteed if
Note: You should not enforce an always-increasing restriction by using a CHECK constraint because the constraint could interfere with conflict resolution.
The earliest timestamp and latest timestamp methods are variations on the minimum and maximum value methods. For the timestamp method, the designated column must be of type DATE. Whenever any column in a column group is updated, your application should update the value of this timestamp column with the local SYSDATE. For a change applied from another site, the timestamp value should be set to the timestamp value from the originating site.
Consider this sequence of events:
Note: If your replicated environment crosses time zones, your application should convert all timestamps to a common time zone. Otherwise, although your data will converge, you may not apply the most recent update.
Oracle does not enforce time synchronization, which should be provided by another mechanism.
Note: A sample timestamp and site maintenance trigger is shown in the Example section (see "Examples" on page 5-48).
The earliest timestamp method applies the changes from the site with the earliest timestamp, and the latest timestamp method applies the changes from the site with the latest timestamp.
Suggestion: Designate a backup method, such as site priority, to be called if two sites have the same timestamp. Standardize your timestamping mechanism; for example, you can convert the timestamp to a designated time zone, such as Greenwich Mean Time (GMT).
A clock counts seconds as an increasing value. Assuming that you have properly designed your timestamping mechanism and established a backup method in case two sites have the same timestamp, the latest timestamp method (like the maximum value method) guarantees convergence. The earliest timestamp method, however, cannot guarantee convergence for more than two masters.
The additive and average routines work with column groups consisting of a single numeric column only.
The additive routine adds the difference between the old and new values at the originating site to the current value at the destination site.
current value = current value + (new value - old value)
The additive conflict resolution method provides convergence for any number of master sites.
The average conflict resolution method averages the new column value from the originating site with the current value at the destination site.
current value = (current value + new value)/2
The average method cannot guarantee convergence if your replicated environment has more than one master. This method is useful for an environment with a single master site and multiple updatable snapshots.
Priority groups allow you to assign a priority level to each possible value of a particular column. If a conflict is detected, the table whose "priority" column has a lower value will be updated using the data from the table with the higher priority value.
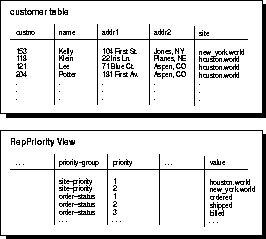
As shown in Figure 5-2, the REPPRIORITY view displays the priority level assigned to each value that the "priority" column can contain. You must specify a priority level for all possible values of the "priority" column.
When you select the priority group method of conflict resolution, you must designate which column in your table is the "priority" column.
The REPPRIORITY view displays the values of all priority groups defined at the current location. In the example shown in Figure 5-2, there are two different priority groups, site-priority and order-status. The customer table is using the site-priority priority group.
Site priority is a special kind of priority group. With site priority, the "priority" column that you designate is automatically updated with the global database name of the site where the update originated. The REPPRIORITY view displays the priority level assigned to each database site. Site priority can be useful if one site is considered to be more likely to have the most accurate information.
For example, in Figure 5-2, the New York site (priority value = 2) is corporate headquarters, while the Houston site (priority value = 1) is a sales office.
The headquarters office (New York = 2) is considered more likely than the sales office (Houston = 1) to have the most accurate information about the credit that can be extended to each customer.
Note: The priority-group column of the REPPRIORITY view shows both the site-priority group and the order-status group.
When you are using site priority, convergence with more than two masters is not guaranteed. You can guarantee convergence with more than two masters when you are using priority groups, however, if the value of the "priority" column is always increasing. That is, the values in the priority column correspond to an ordered sequence of events; for example: ordered, shipped, billed.
The overwrite and discard methods ignore the values from either the originating or destination site and therefore can never guarantee convergence with more than one master site. These methods are designed to be used by a single master site and multiple snapshot sites, or with some form of a user-defined notification facility.
For example, if you have a single master site that you expect to be used primarily for queries, with all updates being performed at the snapshot sites, you might select the overwrite method. The overwrite and discard methods are also useful if:
The overwrite routine replaces the current value at the destination site with the new value from the originating site. Conversely, the discard method ignores the new value from the originating site.
The append site name and append sequence routines work by appending a string to a column that is generating a DUP_VAL_ON_INDEX exception. Although this allows the column to be inserted or updated without violating a unique integrity constraint, it does not provide any form of convergence between multiple master sites. The resulting discrepancies must be manually resolved; therefore, these methods are meant to be used with some form of a notification facility (see "Conflict Notification" on page 5-23). Both append site name and append sequence can be used on character columns only.
These methods can be useful when the availability of the data may be more important than the complete accuracy of the data. To allow data to be available as soon as it is replicated
When a uniqueness conflict occurs, the append site name routine appends the global database name of the site originating the transaction to the replicated column value. The name is appended to the first period (.). For example, HOUSTON.WORLD becomes HOUSTON.
Note: Similarly, the append sequence routine appends a generated sequence number to the column value. The column value is truncated as needed. If the generated portion of the column value exceeds the column length, the conflict routine does not resolve the error.
The discard uniqueness conflict resolution routine resolves uniqueness conflicts by simply discarding the row from the originating site that caused the error. This method does not guarantees convergence with multiple masters and should be used with a notification facility.
Unlike the append methods, the discard uniqueness method minimizes the propagation of data until data accuracy can be verified.
A conflict notification routine is a user-defined conflict resolution routine that provides notification, rather than resolution. You can have conflict information logged in a database view, or you can write a procedure that, for example, sends an e-mail message to the DBA (or dials a beeper).
You can set up notification to occur when you want it:
Suggestion: To define the conflict notification routine(s) for your site, use the example on page 5-48. Modify and/or expand upon the example with your own conflict resolution routines.
Note: If the conflict cannot ultimately be resolved, the entire transaction, including any updates to a notification table, will be rolled back. You can design your notification mechanism to use the Oracle DBMS_PIPES package or the interface to Oracle Office to ensure that notification occurs.
As you create a replicated table, you should designate one or more methods to resolve any potential conflicts.
To declare a conflict resolution method, first complete the planning phase:
After planning, call the appropriate procedures in the DBMS_REPCAT package:
If you are creating a new replication group, follow the instructions for creating a replication group and creating replicated objects. See "Creating a Master Group" on page 3-16.
Note: Do not use this option if each remote site is to customize the notification package.
Attention: Do not generate replication support for the conflict notification table. The data in this table must remain specific to its site.
Suggestion: To define the conflict notification routine(s) for your site, use the example on page 5-48. Modify and/or expand upon the example with your own conflict resolution routines.
Before selecting or writing a conflict resolution routine, you should first ensure that you have done everything possible to avoid the conflict in the first place. This section outlines how to
When designing a replicated environment, the guidelines to good single-database schema design apply:
In addition, to reduce the potential for conflicts, consider using
Use generated sequence numbers for the primary key of each table. By using unique sequence numbers at each site, you can avoid uniqueness conflicts and determine ownership of rows based on the primary key. Although you could simply partition the sequence numbers among the sites, this can become problematic as the number of sites, or number of entries, grows. Instead, allow each site to use the full range of sequence values, and include a unique site identifier as part of the primary key.
If primary site ownership or distributed access to the data is not appropriate, consider dynamic ownership of data. Dynamic ownership permits only one database (the owner) to update the data at a time. Ownership of the data is allowed to move between sites, but only in a way that guarantees that the owner has the most recent data. Non-owners can have out-of-date data, and ordering conflicts can occur, but such conflicts are easily and correctly resolved using a method such as "priority group" or "maximum." Note that single-master methods, such as "overwrite", would result in inconsistencies.
Dynamic ownership is most useful in cases in which
Additional Information: See "Using Dynamic Ownership Conflict Avoidance" on page 7-22.
Dynamic ownership is unnecessarily restrictive for many types of data. Data such as "date-of-birth" or "address" are rarely crucial to the correct operation of an application. Once this information is inserted into the database, it is rarely updated. Therefore the probability of a conflict is very low. Furthermore, the real world often has checks-and-balances (such as a forwarding address) that can compensate for slightly out-of-date information. Often, you can resolve conflicts with these types of data by using the "latest timestamp" method. (Designate a backup method, such as site priority, in case of identical timestamps.)
The timestamp method is particularly useful because the data will converge regardless of the number of sites, but special care must be taken:
The timestamp method is not appropriate for all data with shared ownership. User-provided conflict resolution routines can be used when the semantics of how data is used do not match those provided by Oracle's predefined conflict resolution routines. User-provided routines can also be used for monitoring and notification in case of conflicts.
Note: The conflict resolution methods you assign need to ensure data convergence and provide results that are appropriate for how your business uses the data.
The replicated application should not overuse deletes. Conflicts involving deletes are difficult to resolve because they require a history about deleted rows. Oracle advanced replication does not maintain this history.
Where conflicts are possible, define a propagation interval that is less than the average interval between updates to the same row. Use small propagation intervals to minimize the probability of conflicts.
Suggestion: Make a table (or a diagram) similar to that shown on page 5-11 to analyze the implications of the conflict resolution methods you select.
The procedures available in the DBMS_REPCAT package allow you to create and delete column groups, and to add members to, and remove members from, an existing column group.
Additional Information: You can also create and manage column groups using Replication Manager. See the Replication Manager help for more information.
To create a new column group with one or more members, call the MAKE_COLUMN_GROUP procedure in the DBMS_REPCAT package, as shown in the following example:
DBMS_REPCAT.MAKE_COLUMN_GROUP(

           sname             => 'acct',

           oname             => 'inv',

           column_group      => 'address',

           list_of_column_names => 'addr1, addr2, city, state, zip');
This example creates a column group called ADDRESS that consists of the ADDR1, ADDR2, CITY, STATE, and ZIP columns in the INV table.
To create a column group consisting of all of the columns in the table, you simply pass an asterisk (*) as the final argument to the call. You must call this procedure from the master definition site. Your changes take effect when you generate replication support for the table.
Additional Information: The parameters for the MAKE_COLUMN_GROUP procedure are described in Table 10-162 on page 10-136, and the exceptions are listed in Table 10-163 on page 10-136.
To add members to an existing column group, call the ADD_GROUPED_COLUMN procedure in the DBMS_REPCAT package, as shown in the following example:
DBMS_REPCAT.ADD_GROUPED_COLUMN(

          sname             => 'acct',

          oname             => 'inv',

          column_group      => 'address',

          list_of_column_names => 'phone, fax');
This example adds the columns PHONE and FAX to the ADDRESS column group created in a previous example. To add all of the columns in the table to the column group, you could specify '*' as the LIST_OF_COLUMN_NAMES value.
You must call this procedure from the master definition site. Your changes take effect when you generate replication support for the table.
Additional Information: The parameters for the ADD_GROUPED_ COLUMN procedure are described in Table 10-73 on page 10-69, and the exceptions are listed in Table 10-74.
To remove members from a column group, call the DROP_GROUPED_ COLUMN procedure in the DBMS_REPCAT package, as shown in the following example:
DBMS_REPCAT.DROP_GROUPED_COLUMN(

             sname               => 'acct',

             oname               => 'inv',

             column_group        => 'address',

             list_of_column_names => 'phone, fax');
This example removes the columns PHONE and FAX from the ADDRESS column group. To remove all of the columns in the table from the column group, you could specify '*' as the LIST_OF_COLUMN_NAMES value.
You must call this procedure from the master definition site. Your changes take effect when you generate replication support for the table.
Additional Information: The parameters for the DROP_GROUPED_ COLUMN procedure are described in Table 10-130, and the exceptions are listed in Table 10-131.
To drop a column group, call the DROP_COLUMN_GROUP procedure in the DBMS_REPCAT package, as shown in the following example:
DBMS_REPCAT.DROP_COLUMN_GROUP(

            sname       => 'acct',

            oname       => 'inv',

            column_group => 'address');
This example drops the ADDRESS column group associated with the INV table.
You must call this procedure from the master definition site. Your changes take effect when you generate replication support for the table.
Additional Information: The parameters for the DROP_COLUMN_GROUP procedure are described in Table 10-128, and the exceptions are listed in Table 10-129.
To create a new, empty column group, call the DEFINE_COLUMN_GROUP procedure in the DBMS_REPCAT package, as shown in the following example:
DBMS_REPCAT.DEFINE_COLUMN_GROUP(

           sname => 'acct',

           oname => 'inv',

           gname  => 'address');
This example creates the ADDRESS column group associated with the INV table. This column group has no members. You must call the ADD_GROUPED_COLUMN procedure to add members to this group.
You must call this procedure from the master definition site. Your changes take effect when you generate replication support for the table.
Additional Information: The parameters for the DEFINE_COLUMN_ GROUP procedure are described in Table 10-120, and the exceptions are listed in Table 10-121.
There are separate procedures in the DBMS_REPCAT package for designating methods to resolve update, delete, and uniqueness conflicts. Use the ADD_UPDATE_RESOLUTION procedure to designate a method for resolving update conflicts for a given column group. Use the ADD_UNIQUE_RESOLUTION procedure to designate a method for resolving uniqueness conflicts involving a given unique constraint. Use the ADD_DELETE_RESOLUTION procedure to designate a method for resolving delete conflicts for a given table. (Recall that delete conflicts can result from an update to a primary key value.)
You must call these procedures from the master definition site. The conflict resolution method that you specify is not actually added until after the next time you generate replication support for the table.
You can designate multiple conflict resolution methods for a single column group, table, or constraint. If you provide multiple methods, they are applied in sequential order until the conflict is resolved or no more methods are available. You must provide a sequence order for each method that you add.
You can either designate one of the standard methods provided with the advanced replication facility, or you can provide the name of a function that you have written yourself.
Additional Information: See "Writing Your Own Conflict Resolution Routine" on page 5-56 for instructions.
If you write your own conflict resolution routine, you must call CREATE_MASTER_REPOBJECT for this function to ensure that it exists at each master site.
For example, to indicate that you first want to use the TIMESTAMP method to resolve UPDATE conflicts with the ADDRESS column group, you would make a procedure call similar to the following:
DBMS_REPCAT.ADD_UPDATE_RESOLUTION(

            sname                 => 'acctg',

            oname                 => 'orders',

            column_group          => 'address',

            sequence_no           => 1,

            method                => 'TIMESTAMP',

            parameter_column_name => 'update_time');
Additional Information: The parameters for the ADD_UPDATE_RESOLUTION, ADD_DELETE_RESOLUTION, and ADD_UNIQUE_RESOLUTION procedures are described in Table 10-81 on page 10-77, and the exceptions are listed in Table 10-82 on page 10-78.
To change the conflict resolution method used for a table, you need to complete the following steps:
Because it is not necessary to recreate the generated replication triggers and their associated packages, you can save time by using the DBMS_REPCAT.GENERATE_REPLICATION_PACKAGE procedure.
To generate the supporting package for a replicated object at all master sites, as well as the audit tables and conflict resolution packages, call the DBMS_REPCAT.GENERATE_REPLICATION_PACKAGE procedure, as shown in the following example:
DBMS_REPCAT.GENERATE_REPLICATION_PACKAGE

   ( sname=> 'acct_rec',

     oname=> 'inventory');
You must call this procedure from the master definition site for the given replicated object. Oracle must successfully create the necessary packages at the master definition site for this procedure to complete successfully. These objects are asynchronously created at the other master sites.
Additional Information: The parameters for the GENERATE_ REPLICATION_PACKAGE procedure are described in Table 10-154 on page 10-128, and the exceptions are listed in Table 10-155.
There are separate procedures in the DBMS_REPCAT package for removing conflict resolution routines. Use the DROP_UPDATE_RESOLUTION procedure to drop a given routine for resolving update conflicts for a given column group. Use the DROP_DELETE_RESOLUTION procedure to drop a given routine for resolving delete conflicts for a given table. Use the DROP_UNIQUE_RESOLUTION procedure to drop a given routine for resolving uniqueness conflicts involving a given unique constraint.
These procedures must be called from the master definition site. The routine you designate is not actually dropped from usage until after the next time you generate replication support for the table.
The following example drops the TIMESTAMP resolution method for the ADDRESS column group:
DBMS_REPCAT.DROP_UPDATE_RESOLUTION(

            sname            => 'acctg',

            oname            => 'orders',

            column_group     => 'address',

            sequence_no       => 1);
Additional Information: The parameters for the DROP_UPDATE_ RESOLUTION, DROP_DELETE_RESOLUTION, and DROP_UNIQUE_RESOLUTION procedures are described in Table 10-150, and the exceptions are listed in Table 10-151.
To use the priority group method to resolve update conflicts, first create a priority group, then add this conflict resolution method for a column group. To create a priority group, do the following:
A single priority group can be used by multiple tables. Therefore, the name that you select for your priority group must be unique within a replicated object group. The column corresponding to this priority group can have different names in different tables.
You must indicate which column in a table is associated with a particular priority group when you add the priority group conflict resolution routine for the table. The priority group must therefore contain all possible values for all columns associated with that priority group.
For example, suppose that you had a table, INVENTORY, with a column of type VARCHAR2, STATUS, that could have three possible values: ORDERED, SHIPPED, and BILLED. Now suppose that you want to resolve update conflicts based upon the value of this STATUS column.
Your procedure calls would look similar to those shown below.
DBMS_REPCAT.MAKE_COLUMN_GROUP(

            sname                  =>'acct',

            oname                  =>'inventory',

            column_group           =>'all',

            list_of_column_names   =>'*');
DBMS_REPCAT.DEFINE_PRIORITY_GROUP(

            gname                 => 'acct',

            pgroup                => 'status',

            datatype               =>'varchar2');
DBMS_REPCAT.ADD_PRIORITY_VARCHAR2(

           gname                  => 'acct',

           pgroup                 => 'status',

            value                => 'ordered',

            priority             => 1);
DBMS_REPCAT.ADD_PRIORITY_VARCHAR2(

            sname                => 'acct',

            pgroup               => 'status',

            value                => 'shipped',

            priority             => 2);
DBMS_REPCAT.ADD_PRIORITY_VARCHAR2(

            sname                => 'acct',

            pgroup               => 'status',

            value                => 'billed',

            priority             => 3);
DBMS_REPCAT.ADD_UPDATE_RESOLUTION(

           sname                 =>'acct',

           oname                 =>'inventory',

           column_group          =>'all',

           sequence_no           =>1,

           method                =>'PRIORITY_GROUP',

           parameter_column_name =>'status');
The next several sections describe how to manage priority groups.
Use the DEFINE_PRIORITY_GROUP procedure in the DBMS_REPCAT package to create a new priority group for a replicated object group, as shown in the following example:
DBMS_REPCAT.DEFINE_PRIORITY_GROUP(

            gname      => 'acct',

            pgroup     => 'status',

            datatype   => 'varchar2');
This example creates a priority group called STATUS for the ACCT object group. The members of this priority group will have values of type VARCHAR2.
You must call this procedure from the master definition site. The member is not added to the priority group until you call the procedure GENERATE_REPLICATION_SUPPORT for any table in the object group (since there is no group-level equivalent for this command).
Additional Information: The parameters for the DEFINE_PRIORITY_GROUP procedure are described in Table 10-122, and the exceptions are listed in Table 10-123.
There are several different procedures in the DBMS_REPCAT package for adding members to a priority group. These procedures are of the form ADD_PRIORITY_type, where type is equivalent to the datatype that you specified when you created the priority group:
The procedure that you must call is determined by the datatype of your "priority" column. You must call this procedure once for each of the possible values of the "priority" column.
You must call this procedure from the master definition site. The value is synchronously available at the master definition site, but is not available at any other master sites until you run GENERATE_REPLICATION_SUPPORT. If you are modifying a priority group that is already in use, call the procedures in the following order to ensure proper resolution of conflicts:
The following example adds the value SHIPPED to the STATUS priority group:
DBMS_REPCAT.ADD_PRIORITY_VARCHAR2(

            gname     => 'acct',

            pgroup    => 'status',

            value     => 'shipped',

            priority    => 2);
Additional Information: The parameters for the ADD_PRIORITY_datatype procedures are described in Table 10-77, and the exceptions are listed in Table 10-78.
There are several different procedures in the DBMS_REPCAT package for altering the value of a member of a priority group. These procedures are of the form ALTER_PRIORITY_type, where type is equivalent to the datatype that you specified when you created the priority group:
The procedure that you must call is determined by the datatype of your "priority" column. Because a priority group member consists of a priority associated with a particular value, these procedures enable you to change the value associated with a given priority level.
You must call this procedure from the master definition site. The value is synchronously available at the master definition site, but is not available at any other master sites until you run GENERATE_REPLICATION_SUPPORT. If you are modifying a priority group that is already in use, call the procedures in the following order to ensure proper resolution of conflicts:
You must call this procedure from the master definition site. The value of the member is not altered until you call the procedure GENERATE_REPLICATION_SUPPORT for any table in the object group (since there is no group-level equivalent for this command).
The following example changes the recognized value of items at priority
level 2 from SHIPPED to IN_SHIPPING:
DBMS_REPCAT.ALTER_PRIORITY_VARCHAR2(

               gname        => 'acct',

               pgroup       => 'status',

               old_value    => 'shipped',

               new_value      => 'in_shipping');
Additional Information: The parameters for the ALTER_PRIORITY_datatype procedures are described in Table 10-89, and the exceptions are listed in Table 10-90.
Use the ALTER_PRIORITY procedure in the DBMS_REPCAT package to alter the priority level associated with a given priority group member. Because a priority group member consists of a priority associated with a particular value, this procedure lets you raise or lower the priority of a given column value. Members with higher priority values are given higher priority when resolving conflicts.
You must call this procedure from the master definition site. The priority level of the member is not altered until you call the procedure GENERATE_ REPLICATION_SUPPORT for any table in the object group (since there is no group-level equivalent for this command).
The following example changes the priority of items marked as IN_SHIPPING from level 2 to level 4:
DBMS_REPCAT.ALTER_PRIORITY(

             gname            => 'acct',

             pgroup           => 'status',

             old_priority     => 2,

             new_priority     => 4);
Additional Information: The parameters for the ALTER_PRIORITY procedure are described in Table 10-87, and the exceptions are listed in Table 10-88.
There are several different procedures in the DBMS_REPCAT package for dropping a member of a priority group by value. These procedures are of the form DROP_PRIORITY_type, where type is equivalent to the datatype that you specified when you created the priority group:
The procedure that you must call is determined by the datatype of your "priority" column.
You must call this procedure from the master definition site. The member is not actually removed from the priority group until you call the procedure GENERATE_REPLICATION_SUPPORT for any table in the object group (since there is no group-level equivalent for this command).
In the following example, IN_SHIPPING is no longer a valid state for items in the STATUS priority group:
DBMS_REPCAT.DROP_PRIORITY_VARCHAR2(

           gname        => 'acct',

           pgroup       => 'status',

           value          => 'in_shipping');
Additional Information: The parameters for the DROP_PRIORITY_datatype procedures are described in Table 10-138, and the exceptions are listed in Table 10-139.
Use the DROP_PRIORITY procedure in the DBMS_REPCAT package to drop a member of a priority group by priority level.
You must call this procedure from the master definition site. The member is not actually removed from the priority group until you call the procedure GENERATE_REPLICATION_SUPPORT for any table in the object group (since there is no group-level equivalent for this command).
In the following example, IN_SHIPPING (which was assigned to priority level 4) is no longer a valid state for items in the STATUS priority group:
DBMS_REPCAT.DROP_PRIORITY(

           gname         => 'acct',

           pgroup        => 'status',

           priority_num    => 4);
Additional Information: The parameters for the DROP_PRIORITY procedure are described in Table 10-136, and the exceptions are listed in Table 10-137.
Use the DROP_PRIORITY_GROUP procedure in the DBMS_REPCAT package to drop a priority group for a given replicated object group, as shown in the following example:
DBMS_REPCAT.DROP_PRIORITY_GROUP(

           gname      => 'acct',

           pgroup       => 'status');
In this example, STATUS is no longer a valid priority group.
Attention: Before calling this procedure, you must call the DROP_UPDATE_RESOLUTION procedure for any column groups in the replicated object group that are using the PRIORITY GROUP conflict resolution method with this priority group. You can determine which column groups are affected by querying the REPRESOLUTION view.
You must call this procedure from the master definition site. The priority group is not actually dropped until you call the procedure GENERATE_REPLICATION_SUPPORT for any table in the object group (since there is no group-level equivalent for this command).
Additional Information: The parameters for the DROP_PRIORITY_GROUP procedure are described in Table 10-140, and the exceptions are listed in Table 10-141.
Site priority is a specialized form of priority groups. Thus, many of the procedures associated with site priority behave similarly to the procedures associated with priority groups.
If you have chosen to use the site priority method to resolve update conflicts, you must first create a site priority group before you can add this conflict resolution method for a column group. Creation of a site priority group consists of two steps.
In general, you will need only one site priority group for a replicated object group. This site priority group can be used by any number of replicated tables.
The next several sections describe how to manage site priority groups.
Use the DEFINE_SITE_PRIORITY procedure in the DBMS_REPCAT package to create a new site priority group for a replicated object group, as shown in the following example:
DBMS_REPCAT.DEFINE_SITE_PRIORITY(

            gname     => 'acct',

            name        => 'site');
This example creates a site priority group called SITE for the ACCT object group.
You must call this procedure from the master definition site. The necessary support for site priority is not generated until you call GENERATE_REPLICATION_SUPPORT for any table in the object group (since there is no group-level equivalent for this command).
Additional Information: The parameters for the DEFINE_SITE_PRIORITY procedure are described in Table 10-124, and the exceptions are listed in Table 10-125.
Use the ADD_SITE_PRIORITY_SITE procedure in the DBMS_REPCAT package to add a new site to a site priority group, as shown in the following example:
DBMS_REPCAT.ADD_SITE_PRIORITY_SITE(

           gname       => 'acct',

           name        => 'site',

           site        => 'hq.widgetek.com',

           priority      => 100);
This example adds the HQ site to the SITE group and sets its priority level to 100.
Note: The highest priority is given to the site with the highest priority value. Priority values do not have to be consecutive integers.
You must call this procedure from the master definition site. The site is not added to the group until you call the procedure GENERATE_REPLICATION_SUPPORT for any table in the object group (since there is no group-level equivalent for this command).
Additional Information: The parameters for the ADD_SITE_PRIORITY_SITE procedure are described in Table 10-79, and the exceptions are listed in Table 10-80.
Use the ALTER_SITE_PRIORITY procedure in the DBMS_REPCAT package to alter the priority level associated with a given site, as shown in the following example:
DBMS_REPCAT.ALTER_SITE_PRIORITY(

            gname        => 'acct',

            name         => 'site',

            old_priority => 100,

            new_priority   => 200);
This example changes the priority level of a site in the SITE group from 100 to 200.
Note: The highest priority is given to the site with the highest priority value. Priority values do not have to be consecutive integers.
You must call this procedure from the master definition site. The priority level is not actually updated until you call the procedure GENERATE_REPLICATION_SUPPORT for any table in the object group (since there is no group-level equivalent for this command).
Additional Information: The parameters for the ALTER_SITE_PRIORITY procedure are described in Table 10-91, and the exceptions are listed in Table 10-92.
Use the ALTER_SITE_PRIORITY_SITE procedure in the DBMS_REPCAT package to alter the site associated with a given priority level, as shown in the following example:
DBMS_REPCAT.ALTER_SITE_PRIORITY_SITE(

           gname         => 'acct',

           name          => 'site',

           old_site      => 'hq.widgetek.com',

           new_site        => 'hq.widgetworld.com);
This example changes the global database name of the HQ site to HQ.WIDGETWORLD.COM, while its priority level remains the same.
You must call this procedure from the master definition site. The site name is not actually updated until you call the procedure GENERATE_REPLICATION_SUPPORT for any table in the object group (since there is no group-level equivalent for this command).
Additional Information: The parameters for the ALTER_SITE_PRIORITY_ SITE procedure are described in Table 10-93, and the exceptions are listed in Table 10-94.
Use the DROP_SITE_PRIORITY_SITE procedure in the DBMS_REPCAT package to drop a given site, by name, from a site priority group, as shown in the following example:
DBMS_REPCAT.DROP_SITE_PRIORITY_SITE(

           gname    => 'acct',

           name     => 'site',

           site       => 'hq.widgetek.com');
This example drops the HQ site from the SITE group.
You must call this procedure from the master definition site. The site is not actually removed from the group until you call the procedure GENERATE_REPLICATION_SUPPORT for any table in the object group (since there is no group-level equivalent for this command).
The parameters for the DROP_SITE_PRIORITY_SITE procedure are described in Table 10-144, and the exceptions are listed in Table 10-145.
Use the DBMS_REPCAT.DROP_PRIORITY procedure described on page 5-41 to drop a site from a site priority group by priority level.
Use the DROP_SITE_PRIORITY procedure in the DBMS_REPCAT package to drop a site priority group for a given replicated object group, as shown in the following example:
DBMS_REPCAT.DROP_SITE_PRIORITY(

           gname   => 'acct',

           name      => 'site');
In this example, SITE is no longer a valid site priority group.
Attention: Before calling this procedure, you must call the DROP_UPDATE_RESOLUTION procedure for any column groups in the replicated object group that are using the SITE PRIORITY conflict resolution method with this site priority group. You can determine which column groups are affected by querying the REPRESOLUTION view.
You must call this procedure from the master definition site. The site priority group is not actually dropped until you call the procedure GENERATE_REPLICATION_SUPPORT for any table in the object group (since there is no group-level equivalent for this command).
Additional Information: The parameters for the DROP_SITE_PRIORITY procedure are described in Table 10-142, and the exceptions are listed in Table 10-143.
The advanced replication facility provides replication catalog (REPCAT) views that you can use to determine what conflict resolution methods are being used by each of the tables and column groups in your replicated environment.
Each view has three versions: USER_*, ALL_*, SYS.DBA_*. The views available include the following:
Additional Information: See Chapter 11, "Data Dictionary Views".
This section provides examples that you can modify and/or expand with your own conflict resolution routines.
Suppose that you allowed multiple sites to update your CUSTOMER table, and want to set up conflict resolution as follows:
This example
CREATE TABLE customers

(

    custno     NUMBER(4) PRIMARY KEY,

    last_name  VARCHAR2(10),

    first_name VARCHAR2(10),

    addr1      VARCHAR2(30),

    addr2      VARCHAR2(30),

    amount     NUMBER(7,2),

    timestamp  DATE,

    site       VARCHAR2(128),

    CONSTRAINT c_cust_name UNIQUE (last_name, first_name)

)
This example
CREATE TABLE conf_report

(

    line          NUMBER(2),    --- used to order message text

    txt           VARCHAR2(80), --- conflict notification message

    timestamp     DATE,         --- time of conflict

    table_name    VARCHAR2(30), --- table in which the

                                --- conflict occurred

    table_owner   VARCHAR2(30), --- owner of the table

    conflict_type VARCHAR2(6)   --- INSERT, DELETE or UNIQUE

)
The following package and package body perform a simple form of conflict notification by logging UNIQUENESS conflicts for the CUSTOMERS table into the CONF_REPORT table. With simple modifications, the user-defined conflict resolution routine can take more active steps. For example, instead of just recording the notification message, the package DBMS_OFFICE can be used to send an Oracle Office e-mail message to the DBA.
Note: This example of conflict notification does not resolve any conflicts. You should either provide a method to resolve conflicts (for example, discard or overwrite), or provide a notification mechanism that will succeed (for example, using e-mail) even if the error is not resolved and the transaction is rolled back.
CREATE OR REPLACE PACKAGE notify AS


    --- Report uniqueness constraint violations on customer table

    FUNCTION customer_unique_violation(
                             first_name         IN OUT VARCHAR2,

                             last_name          IN OUT VARCHAR2,

                             discard_new_values IN OUT BOOLEAN)

    RETURN BOOLEAN;

END notify;

/
CREATE OR REPLACE PACKAGE BODY notify AS


    --- Define a PL/SQL table to hold the notification message

    TYPE message_table IS TABLE OF VARCHAR2(80) INDEX BY BINARY_INTEGER;


PROCEDURE report_conflict(conflict_report IN MESSAGE_TABLE,

                          report_length   IN NUMBER,

                          conflict_time   IN DATE,

                          conflict_table  IN VARCHAR2,

                          table_owner     IN VARCHAR2,

                          conflict_type   IN VARCHAR2) IS


BEGIN

    FOR idx IN 1..report_length LOOP

        BEGIN

          INSERT INTO off_shore_accounts.conf_report

          (line, txt, timestamp, table_name, table_owner, conflict_type)

           VALUES (idx, SUBSTR(conflict_report(idx),1,80), conflict_time,

                    conflict_table, table_owner, conflict_type);

        EXCEPTION WHEN others THEN NULL;

        END;

    END LOOP;

END report_conflict;


--- This is the conflict resolution routine that will be called first

--- when a uniqueness constraint violated is detected in the customer

--- table.

FUNCTION customer_unique_violation(first_name  IN OUT VARCHAR2,

                                   last_nameIN OUT VARCHAR2,

                                   discard_new_valuesIN OUT BOOLEAN)

    RETURN BOOLEAN IS

   local_node  VARCHAR2(128);

   conf_report MESSAGE_TABLE;

   conf_time   DATE := SYSDATE;

BEGIN

    --- Get the global name of the local site

  BEGIN

    SELECT global_name INTO local_node FROM global_name;

  EXCEPTION WHEN others THEN local_node := '?';

  END;
  --- Generate a message for the DBA

  conf_report(1) :='UNIQUENESS CONFLICT DETECTED IN TABLE

                                             CUSTOMER ON ' ||

                    TO_CHAR(conf_time, 'MM-DD-YYYY HH24:MI:SS');

  conf_report(2) :='  AT NODE ' || local_node;

  conf_report(3) :='ATTEMPTING TO RESOLVE CONFLICT USING' ||

                 ' APPEND SEQUENCE METHOD';

  conf_report(4) :='FIRST NAME: ' || first_name;

  conf_report(5) :='LAST NAME:  ' || last_name;

  conf_report(6) :=NULL;
  --- Report the conflict

  report_conflict(conf_report, 5, conf_time, 'CUSTOMER',

                'OFF_SHORE_ACCOUNTS', 'UNIQUE');

  --- Do not discard the new column values. They are still needed by

  --- other conflict resolution routines

  discard_new_values := FALSE;
  --- Indicate that the conflict was not resolved.

    RETURN FALSE;

  END customer_unique_violation;

END notify;

/
After defining the tables and the NOTIFY package and package body, you can now create the object group and replicated objects. The CUSTOMERS table, CONF_REPORT tables, and the NOTIFY package and package body are defined as replicated objects in the same object group. You can also use the advanced Replication facility to distribute these objects to all master sites, but you must generate replication support for the CUSTOMER table.
--- Create the replicated object group

dbms_repcat.create_master_repgroup(gname          => 'ORDER_ENTRY',

                                   group_Comment  => 'Foreign Orders',

                                   master_Comment => 'Main Office: NY');


--- Register customer as a replicated object.

dbms_repcat.create_master_repobject(gname => 'ORDER_ENTRY',

                                    sname => 'OFF_SHORE_ACCOUNTS',

                                    oname => 'CUSTOMERS',

                                    type  => 'TABLE');


--- Replication only the DDL for the notification table. Do NOT generate

--- replication support on this table

dbms_repcat.create_master_repobject(gname => 'ORDER_ENTRY',

                                    sname => 'OFF_SHORE_ACCOUNTS',

                                    oname => 'CONF_REPORT',

                                    type  => 'TABLE');


--- Register Notify package and body as a replicated object.

dbms_repcat.create_master_repobject(gname => 'ORDER_ENTRY',

                                    sname => 'OFF_SHORE_ACCOUNTS',

                                    oname => 'NOTIFY',

                                    type  => 'PACKAGE');

dbms_repcat.create_master_repobject(gname => 'ORDER_ENTRY',

                                    sname => 'OFF_SHORE_ACCOUNTS',

                                    oname => 'NOTIFY',

                                   type  => 'PACKAGE BODY');
After declaring the replicated objects, you can then begin declaring the conflict resolution methods. Here, we define two object groups: one for the AMOUNT column and one for the other non-primary key columns. The primary key in this example would be generated by a sequence that has its numbers partitioned among the sites so that this column should avoid being involved in conflicts.
The column group for the AMOUNT column is assigned the ADDITIVE method.
The other column group is assigned the TIMESTAMP method with SITE PRIORITY
as a back-up method. This example defines the priority of two sites.
--- Indicate the columns to resolve if a conflict is detected

--- Primary key is not in a user-defined column group


dbms_repcat.make_column_group(

    sname =>'OFF_SHORE_ACCOUNTS',

    oname=>'CUSTOMERS',

    column_group=>'CG_CUSTOMERS',

    list_of_column_names=>'LAST_NAME,FIRST_NAME,' ||

                          'ADDR1,ADDR2,' ||

                             'TIMESTAMP,SITE');
dbms_repcat.make_column_group(

                        sname              =>'OFF_SHORE_ACCOUNTS',

                        oname              =>'CUSTOMERS',

                        column_group       =>'CG_CUST_AMT',

                        list_of_column_name=>'AMOUNT');


--- make priority group for site priority


dbms_repcat.define_site_priority(

           gname      => 'ORDER_ENTRY',

           name       => 'SITE PRIORITY',

           comment    => 'site priority for customers');


--- add values to site priority group


dbms_repcat.add_site_priority_site(

           gname     =>'ORDER_ENTRY',

           name      =>'SITE PRIORITY',

           site      =>'DBS1.REGRESS.RDBMS.DEV.US.ORACLE.COM',

           priority  =>200);


dbms_repcat.add_site_priority_site(

          gname      =>'ORDER_ENTRY',

          name       =>'SITE PRIORITY',

          site       =>'DBS2.REGRESS.RDBMS.DEV.US.ORACLE.COM',

          priority   =>100);
--- define update resolution for Amount column

dbms_repcat.add_update_resolution(

          sname                =>'OFF_SHORE_ACCOUNTS',

          oname                =>'CUSTOMERS',

          column_group         =>'CG_CUST_AMT',

          sequence_no          =>1,

          method               =>'ADDITIVE',

          parameter_column_name=>'AMOUNT');


--- define timestamp with site-priority backup for other column group

dbms_repcat.add_update_resolution(

            sname                  => 'OFF_SHORE_ACCOUNTS',

            oname                  => 'CUSTOMERS',

            column_group           => 'CG_CUSTOMERS',

            sequence_no            => 1,

            method                 => 'LATEST TIMESTAMP',

            parameter_column_name => 'TIMESTAMP');


dbms_repcat.add_update_resolution(

            sname                 => 'OFF_SHORE_ACCOUNTS',

            oname                 => 'CUSTOMERS',

            column_group          => 'CG_CUSTOMERS',

            sequence_no           => 2,

            method                => 'SITE PRIORITY',

            parameter_column_name => 'SITE',

            priority_group       => 'SITE PRIORITY');
You can also declare methods for handling uniqueness conflicts
for
the C_CUST_NAME constraint:
--- register a user-defined resolution routine for notification


dbms_repcat.add_unique_resolution(

  sname                 => 'OFF_SHORE_ACCOUNTS',

  oname                 => 'CUSTOMERS',

  constraint_name       => 'C_CUST_NAME',

  sequence_no           => 1,

  method                => 'USER FUNCTION',

  comment               => 'Notify DBA',

  parameter_column_name => 'FIRST_NAME,LAST_NAME',

  function_name         =>'OFF_SHORE_ACCOUNTS.NOTIFY.

                               CUSTOMER_UNIQUE_VIOLATION');


--- register a system-defined resolution routine for non-convergent

--- resolution of the uniqueness conflict.


  dbms_repcat.add_unique_resolution(

              sname                 => 'OFF_SHORE_ACCOUNTS',

              oname                 => 'CUSTOMERS',

              constraint_name       => 'C_CUST_NAME',

              sequence_no           => 2,

              method                => 'APPEND SEQUENCE',

              comment               => 'Resolve Conflict',

              parameter_column_name => 'LAST_NAME');
In either a trigger or in your application, you must implement the logic necessary to maintain the timestamp and site information. The following example trigger considers clock synchronization problems, but needs to be modified if the application crosses time zones. This trigger is specific to the CG_CUSTOMERS column group.
Because the trigger uses one of the generated procedures to check whether or not the trigger should actually be fired, it is necessary to generate replication support for the CUSTOMERS table before creating the trigger. This will also allow transactions on the customer table to be propagated.
dbms_repcat.generate_replication_support(sname=> 'OFF_SHORE_ACCOUNTS',

                                         oname=> 'CUSTOMERS',

                                        type=> 'TABLE');
Now you can define the trigger:
CREATE OR REPLACE TRIGGER "OFF_SHORE_ACCOUNTS"."T_CUSTOMERS"

  before insert or update on "OFF_SHORE_ACCOUNTS"."CUSTOMERS"

  for each row

declare

  TIMESTAMP$X DATE := SYSDATE;

  SITE$X VARCHAR2(128) := dbms_reputil.global_name;

begin

 -- Don't fire if a snapshot refreshing;

 -- Don't fire if a master and replication is turned off

 if (not (dbms_snapshot.i_am_a_refresh)

 and dbms_reputil.replication_is_on) then

  if not dbms_reputil.from_remote then

    if inserting then

       -- set site and timestamp columns.

       :new."TIMESTAMP" := TIMESTAMP$X;

       :new."SITE" := SITE$X;

    elsif updating then

        if(:old."ADDR1" = :new."ADDR1" or

          (:old."ADDR1" is null and :new."ADDR1" is null)) and

          (:old."ADDR2" = :new."ADDR2" or

          (:old."ADDR2" is null and :new."ADDR2" is null)) and

          (:old."FIRST_NAME" = :new."FIRST_NAME" or

          (:old."FIRST_NAME" is null and :new."FIRST_NAME"

                                                 is null)) and

          (:old."LAST_NAME" = :new."LAST_NAME" or

          (:old."LAST_NAME" is null and :new."LAST_NAME" is null)) and

          (:old."SITE" = :new."SITE" or

          (:old."SITE" is null and :new."SITE" is null)) and

          (:old."TIMESTAMP" = :new."TIMESTAMP" or

          (:old."TIMESTAMP" is null and :new."TIMESTAMP" is null)) then

          -- column group was not changed; do nothing

          NULL;

        else

          -- column group was changed; set site and timestamp columns.

          :new."SITE" := SITE$X;

          :new."TIMESTAMP" := TIMESTAMP$X;

          -- consider time synchronization problems;

          -- previous update to this row may have originated from a site

          -- with a clock time ahead of the local clock time.

          if:old."TIMESTAMP" is not null and

             :old."TIMESTAMP" > :new."TIMESTAMP" then

             :new."TIMESTAMP" := :old."TIMESTAMP" + 1 / 86400;

          elsif :old."TIMESTAMP" is not null and

             :old."TIMESTAMP" = :new."TIMESTAMP" and

            (:old."SITE" is null OR :old."SITE" != :new."SITE") then

            :new."TIMESTAMP" := :old."TIMESTAMP" + 1 / 86400;

          end if;

        end if;

      end if;

    end if;

  end if;

end;
You can propagate the trigger to other masters by registering it with the advanced replication facility:
dbms_repcat.create_master_repobject(gname=> 'ORDER_ENTRY',

sname       => 'OFF_SHORE_ACCOUNTS',

oname       => 'T_CUSTOMERS',

type        => 'TRIGGER');
After confirming that all replication objects are correctly generated and replicated, start up replication activity:
dbms_repcat.resume_master_activity(gname => 'ORDER_ENTRY');
Oracle allows you to write your own conflict resolution routines. A conflict resolution routine is a PL/SQL function that returns either TRUE or FALSE. TRUE indicates that the routine has successfully resolved all conflicting modifications for a column group. If the conflict cannot be successfully resolved, the routine should return FALSE. Oracle continues to evaluate available conflict resolution routines, in sequence order, until either a routine returns TRUE or there are no more routines available.
If the conflict resolution routine raises an exception, Oracle stops evaluation of the routine, and, if any other routines were provided to resolve the conflict (with a later sequence number), Oracle does not evaluate them.
The parameters needed by a conflict resolution routine are determined by the type of conflict being resolved (unique, update, or delete) and the columns of the table being replicated. All conflict resolution routines take some combination of old, new, and current column values for the table.
The old value represents the value of the row at the initiating site before you made the change. The new value represents the value of the row at the initiating site after you made the change. The current value represents the value of the equivalent row at the receiving site. Recall that Oracle uses the primary key (or the key specified by SET_COLUMNS) to determine which rows to compare.
The conflict resolution function should accept as parameters the values for the columns specified in the PARAMETER_COLUMN_NAME argument to the DBMS_REPCAT.ADD_conflicttype_RESOLUTION procedures. The column parameters are passed to the conflict resolution routine in the order listed in the PARAMETER_COLUMN_NAME argument, or in ascending alphabetical order if you specified `*' for this argument. Where both old and new column values are passed as parameters (for update conflicts), the old value of the column immediately precedes the new value.
Attention: Type checking of parameter columns in user-defined conflict resolution routines is not performed until the DBMS_REPCAT.GENERATE_REPLICATION_SUPPORT procedure generates and compiles the packages.
For update conflicts, the function should accept the following values for each column in the column group:
The old, new, and current values for a column are received consecutively. The final argument to the conflict resolution routine should be a boolean flag. If this flag is FALSE, it indicates that you have updated the value of the IN OUT parameter, new, and that you should update the current column value with this new value. If this flag is TRUE, it indicates that the current column value should not be changed.
Uniqueness conflicts can occur as the result of an INSERT or UPDATE. Your uniqueness conflict resolution routine should accept the new column value from the initiating site in IN OUT mode for each column in the column group. The final parameter to the conflict resolution routine should be a BOOLEAN flag.
If the routine can resolve the conflict, it should modify the new column values so that the advanced replication facility can insert or update the current row with the new column values. Your function should set the BOOLEAN flag to TRUE if it wants to discard the new column values, and FALSE otherwise.
Because your conflict resolution routine cannot guarantee convergence for uniqueness conflicts, your routine should include a notification mechanism.
Delete conflicts occur when you successfully delete from the local site, but the associated row cannot be found at the remote site (for example, because it had been updated). For delete conflicts, the function should accept old column values in IN OUT mode for the entire row. The final parameter to the conflict resolution routine should be a BOOLEAN flag.
If the conflict resolution routine can resolve the conflict, it modifies the old column values so that the advanced replication facility can delete the current row that matches all old column values. Your function should set the BOOLEAN flag to TRUE if it wants to discard these column values, and FALSE otherwise.
If you perform a delete at the local site and an update at the remote site, the remote site detects the delete conflict, but the local site detects an unresolvable update conflict. This type of conflict cannot be handled automatically. The conflict will raise a NO_DATA_FOUND exception and the transaction will be placed in the error table.
Designing a mechanism to properly handle these types of update/delete conflicts is difficult. It is far easier to avoid these types of conflicts entirely, by simply "marking" deleted rows, and then purging them using procedural replication.
Additional Information: See "Avoiding Delete Conflicts" on page 7-20.
You should avoid the following commands in your conflict resolution routines. Use of these commands can result in unpredictable results.
The following examples show variations on the standard MAXIMUM and ADDITIVE conflict resolution methods. Unlike the standard methods, these user functions are designed to handle nulls in the columns used to resolve the conflict.
-- User function similar to MAXIMUM method.

-- If curr is null or curr < new, use new values.

-- If new is null or new < curr, use current values.

-- If both are null, no resolution.

-- Does not converge with > 2 masters, unless

-- always increasing.


FUNCTION max_null_loses(old                 IN    NUMBER,

                        new                 IN  OUT  NUMBER,

                        cur                 IN    NUMBER,

                        ignore_discard_flag OUT    BOOLEAN)

  RETURN BOOLEAN IS

BEGIN

   IF (new IS NULL AND cur IS NULL) OR new = cur THEN

       RETURN FALSE;

   END IF;

   IF new IS NULL THEN

       ignore_discard_flag := TRUE;

   ELSIF cur IS NULL THEN

       ignore_discard_flag := FALSE;

   ELSIF new < cur THEN

       ignore_discard_flag := TRUE;

   ELSE

       ignore_discard_flag := FALSE;

   END IF;

   RETURN TRUE;

END max_null_loses;
-- User function similar to ADDITIVE method.

-- If old is null, old = 0.

-- If new is null, new = 0.

-- If curr is null, curr = 0.

-- new = curr + (new - old) -> just like ADDITIVE method.


FUNCTION additive_nulls(old                 IN    NUMBER,

                        new                 IN  OUT  NUMBER,

                        cur                 IN    NUMBER,

                        ignore_discard_flag OUT    BOOLEAN)

   RETURN BOOLEAN IS

   old_val NUMBER := 0.0;

   new_val NUMBER := 0.0;

   cur_val NUMBER := 0.0;

BEGIN

   IF old IS NOT NULL THEN

      old_val := old;

   END IF;

   IF new IS NOT NULL THEN

      new_val := new;

   END IF;

   IF cur IS NOT NULL THEN

      cur_val := cur;

   END IF;

   new := cur_val + (new_val - old_val);

   ignore_discard_flag := FALSE;

   RETURN TRUE;

END additive_nulls;
|
Copyright © 1997 Oracle Corporation. All Rights Reserved. |
|