Release 1.4.0
A53702_01
Library |
Product |
Contents |
Index |
| Oracle
Enterprise Manager Administrator's Guide Release 1.4.0 A53702_01 |
|
Oracle Software Manager provides key services that allow all software to be managed from a central location. This product addresses the problems faced by application software administrators by offering:
This chapter provides an overview of Oracle Software Manager and a conceptual look at software distribution. The following topics are included in this chapter:
For detailed information, see the Software Manager Online Help system. There are several ways of accessing the online Help system. In a main window, you can access the Help system by pressing F1 or choosing Contents from the Help menu. In a dialog box, click the Help button or press F1 to access the online Help system.
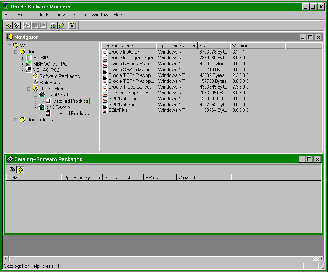
The first time you launch the Oracle Software Manager application, it displays the Navigator window and the Catalog window.
See Figure 15-1, "Oracle Software Manager Application" for an illustration of the application screen.
You can minimize, resize, or reposition these windows and you can open multiple copies of the same type of window. You can open additional Catalog windows by selecting "Another Catalog Window" or "Another Navigator Window" from the Window menu.
Use Save Layout Now or Save Layout on Exit to preserve the state of your application windows from one session to another.
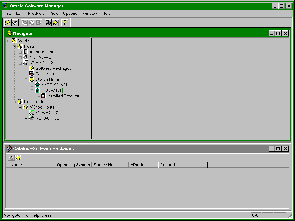
The Navigator window is divided into a left and right pane. After you have refreshed first, it shows all objects currently managed by Oracle Software Manager.
The left pane of the Navigator window shows the network tree with expandable contents displayed at the summary level.
To change the display of objects, you can
The right pane of the Navigator Window displays detailed information about the contents of each object.
This section describes the following procedures.
The Host folders object in the Navigator window stores host folders that you create using the Create Host Folder command on the Edit menu. This enables you to group hosts in any way you choose. For example, you might wish to group hosts by region.
To view the oracle home properties, double-click the home icon for the home which you want to view. The Oracle Home Properties dialog box appears.
The Oracle Homes Directory shows all Oracle Homes on a per-machine basis in the Oracle Software Manager application. It shows all products installed on all homes. It distinguishes active home (home on which the agent is running). NT hosts show NT and Windows 3.1 homes only. UNIX hosts show UNIX homes only.
To view its properties, double-click the product which you want to view. The Product Properties dialog box appears.
The Catalog shows all releases and software packages known to Oracle Software Manager.
A release is a collection of Oracle software products distributed as a unit. Releases may consist of several operating-system-specific collections.
A software package is a user-defined collection of products for a single operating system, intended for distribution across the Oracle Enterprise Manager network.
This Catalog View section describes the following procedures
When Oracle Software Manager is started for the first time in a session, the Catalog window shows Releases. Use the two icons at the top of the Catalog window to display either the Releases view or the Software Packages view.
When you create releases or software packages, Oracle Software Manager automatically lists these objects in the Catalog window in descending order: the object created most recently appears first.
However, you can change the order in which these objects appear to ascending order. You control this sort order through the Preferences dialog box.
To change the sort order of your objects:
These preferences pertain only to the order in which objects appear in Oracle Software Manager windows. Preferences do not affect objects in the Navigator window.
Below the menu bar is the toolbar, which can be displayed or hidden through the view menu. The toolbar icons represent items in the menus. Move the mouse cursor over a toolbar icon to display the description of the icon's function in the status bar at the bottom of the application.
The Oracle Software Manager supports dragging and dropping of certain window objects into other objects or into other windows. For example, software packages can be dragged from the Catalog window and dropped into certain objects in the Navigator; host objects can be dragged from one part of the Navigator window to another.
The following table shows the effects of drag and drop behavior in the Oracle Software Manager application.
You can use Oracle Software Manager to distribute software to one or more hosts across the network. The software distribution process has four steps.
| Step | Task | Process | See Page |
|---|---|---|---|
|
1 |
Specify Distribution Hosts |
Using Oracle Software Manager, designate one or more distribution hosts to house software releases and software packages. The software packages are later distributed over the network. |
|
|
2 |
Create Releases |
Using Oracle Software Manager, create software releases on the distribution host(s). These releases form the basis for the construction of software packages. You can view the status of the release creation under the current jobs window in Oracle Enterprise Manager. The list of releases is in the Oracle Software Manager Catalog window. The release properties describes products contained in release. |
|
|
3 |
Create Software Package |
Using Oracle Software Manager, select products from releases on a distribution host and create a software package that can be installed over the network. Note: If a product needs a custom installation, you must modify the package response file before distribution and/or installation. You can view the status of the package creation under the current jobs window in Oracle Enterprise Manager. The list of created packages is in the Oracle Software Manager Catalog window. Package properties have the list of products it contains. Refer to "Response File Generator" on page 15-30 for instructions. |
|
|
4 |
Distribute and Install Software Packages |
Using Oracle Enterprise Manager, create jobs that install, deinstall, delete, or distribute the software package. You could also use Oracle Software Manager's drag and drop feature to distribute and install software packages. |
Once the package is created, it can be copied, using the Distribute Software Package task, to other distribution hosts. These packages are designated as copies and cannot be altered. Copying a package to other distribution hosts allows the distribution load to be spread across multiple servers, which can be spread geographically over a wide-area network.
The first step in the software distribution process is to specify which hosts will be distribution hosts.
A distribution host is a server that has been designated as a creation, distribution and storage center for software packages and releases. Like all hosts, a distribution host runs the Oracle Intelligent Agent and appears in the Navigator window.
You can designate any host as a distribution host and add or delete distribution hosts from the application, but there must be at least one distribution host designated on each network managed by an Oracle Software Manager application.
Any host with adequate storage space can be a distribution host, including the application machine, if the application machine is also running the Oracle Intelligent Agent software.
To designate a distribution host:
A distribution host can only create packages whose operating systems are the same as its operating system.
You can only delete a distribution host if it is not the source host for a software package.
Removing distribution host status does not delete the host itself.
The second step in the software distribution process is to create releases. A release is an Oracle-defined collection of software whose location is registered with the Oracle Software Manager application.
Releases can be a stage area on a CD, a stage area on a network or local drive, or a stage created using the Oracle File Packager. For more information, see the Oracle File Packager section.
Releases can be created only on distribution hosts. If the application machine is also a distribution host, you can create releases on the application machine.
The Create Releases section describes the following procedures:
To create a release:
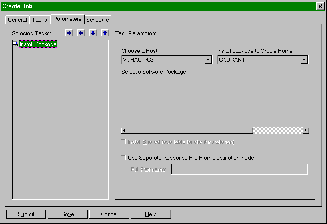
See Figure 15-3, "The Create a Release Dialog Box".
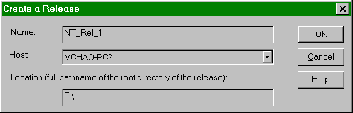
Software Manager looks for PRODINFO.ORA in the location you have specified in Create Release dialog. For NT only, Software Manager also recursively searches for *.PRD files under that location. For unix nodes, Oracle Software Manager searches for the unix.prd file on a single level only. The contents of PRODINFO.ORA and each PRD file are read and returned as a TCL list to the Oracle Software Manager application. The application stores the information about the release and the products it contains in its repository.
When Oracle Software Manager creates a release, it creates pointers to the location and identifying characteristics of that release. The contents of the release are not copied anywhere on the distribution host's or the application workstation's hard disk.
To display the properties of a release:
Releases are marked with three types of icons.
To remove a release from the Releases Catalog window:
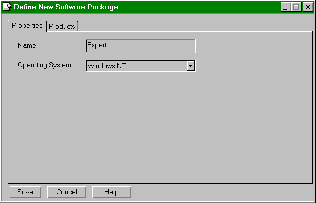
The third step in the software distribution process is to create software packages. A software package is a collection of products from one or more releases that can be distributed to/installed on hosts in the network.
You create software packages by selecting from the list of all products from created releases for a particular operating system on a particular distribution host. You might combine products from the same or multiple releases (as long as they are from the same distribution host) to form unique software packages.
You can then create a job in Oracle Enterprise Manager to distribute or install these packages on any host in the network.
The Create Software Packages section contains the following topics.
To create a software package from the Oracle Software Manager:
When Oracle Software Manager creates a software package, all the files representing the products in the package are copied to the distribution host, in compressed form.
Depending on the number of packages you create on a host, this can require significant disk space, and you should make sure that the host has ample storage space.
Software packages are shown in the Software Packages view of the Catalog window and in the Navigator window under the host's packages.
If a product needs a custom installation, you must specify the response file before the installation of the package.
A response file is a text file with the extension .RSP that contains the default responses for a package's installation. Oracle Software Manager uses the information in response file to install each product in a software package.
Software packages are marked with three types of icons.
To delete a software package:
The fourth step in the software distribution process is to use the Oracle Enterprise Manager job system to distribute and install software packages on specified hosts.
The Distribute and Install Software procedure consists of the following subsets
To set up job tasks with the Job Scheduling system of Oracle Enterprise Manager:
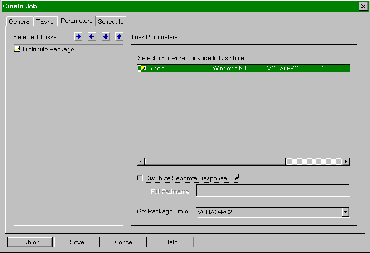
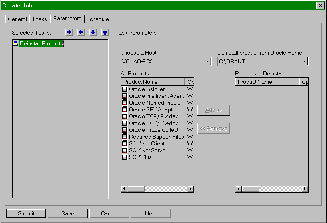
See Figure 15-4, "General Property Sheet".
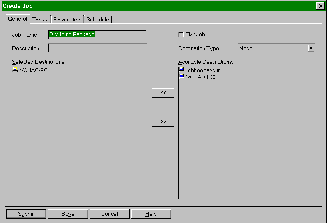
If you need to remove a destination from a job, select the destination in the Selected Destination list and click the >> (Remove) button. You can remove one node per task for deinstall and install.
To choose the tasks that you want to perform:
See Figure 15-5, "Tasks Property Sheet".
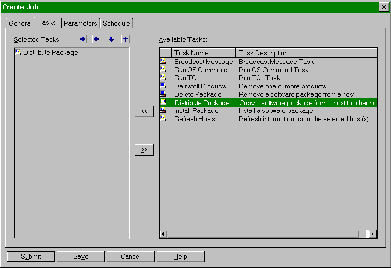
To remove a task from this list, select the task from Selected Tasks and click the >> (Remove) button.
You can change the order in which the tasks are executed. Select a task in the Selected Tasks list and click on the up or down arrow button to position the task.
You can make a task conditional on a previous task. Select a task and press the right arrow button to indent the task. A conditional, or indented, task is executed only if the previous task located further to the left successfully executes.
The following tasks can be used to complete the software distribution process:
To set parameters:
The parameters vary according to the job task. For information on the specific task parameters, refer to the appropriate parameter and function charts.
Use Install Package Task to specify a software package to be installed at the target nodes.
Refer to Table 15-8, "Install Package Task Parameters"for descriptions.
For multiple target jobs, you need to specify parameters for each host.
Deinstall Product Task directs the Oracle Installer to deinstall Oracle products from the target nodes.
Refer to Table 15-9, "Deinstall Product Task Parameters" for details.
Table 15-9 Deinstall Product Task Parameters
Deinstalling an Oracle product for Windows requires the use of the Oracle Installer for Windows. Be sure that the \ORAWIN directory on the target node includes the Oracle Installer for Windows before you try to execute this task.
Delete Package Task specifies a software package to be deleted from the target node(s).
Table 15-10 Delete Package Task Parameters
Distribute Package Task specifies a software package to be distributed to the target node.
Refer to Table 15-11, "Distribute Package Task Parameters" for details.
You can only distribute one software package per task. To distribute more than one software package at a time, add another Distribute Package task to the job.
When distributing a package from agent #1 to agent #2, you can optionally specify a separate response file located on agent #1 to be distributed to agent #2 as its default response file. This is an advanced feature that can be accessed through the Oracle Enterprise Manager console but not through the Oracle Software Manager application.
If you specify a separate response file, the task copies the response file from agent #1 to agent #2 and renames it so it becomes the default response file.
Refresh Hosts updates host information that has changed due to the completion of a stand-alone installation, SQL task, or a non-Oracle Enterprise Manager command.
When executing a Refresh Host, you can access all package information to cover multiple application/single agent configuration, oracle homes information, and installed product information.
You can also refresh hosts using the Oracle Software Manager Application menu.
To save and submit the new job:
When the agent begins processing the job, the job appears in the Active Jobs page in the Job window.
This section contains information on the Response File Generator and the Oracle File Packager.
A response file is a text file with the .RSP extension that contains the default responses for a package installation.
Response files can be edited by hand in a text editor, or they can be edited at the distribution host using the Response File Generator. The Response File Generator runs an installation during which you provide the answers you want to the installation questions. They are recorded in a new response file.
The Response File Generator generates files to a default location for a package as of version 1.4. You no longer need to specify input and output filenames in order to generate an RSP file. Instead, the Response File Generator automatically uses the default location, [Oracle_Home]\network\agent\packages\[Package_Name]\[Package_Name].RSP as both input and output files.
You can run the Response File Generator on a target machine in order to get a customized response file for your software package.
To generate an .RSP file:
In versions 1.3 and earlier, you had to move the RSP to your application machine for distribution and installation to other hosts. In version 1.4 and later, distribution and installation automatically uses this response file unless you specify another response file. You do not need to move or rename the RSP file.
To modify a response file (.RSP):
**************************************
#The user is asked which of the two SQL*Net products
#to install. The net2_adapter_content is set to
#whichever product is desired:
#"SQL*Net Client"
#"SQL*Net Server"
*************************************/
#net2_adapter_content="SQL*Net Client"
For example, the legal settings in the example above are SQL*Net Client and SQL*Net Server. The default setting is SQL*Net Client.)
The response file generation on UNIX can be performed using the following oratclsh application.
commands.
net2_adapter_content="SQL*Net server"
If you are unsure about whether or not a product requires a custom installation, try installing the package using the response file generator. If the dialog asks for your input, you will need a response file. Enter in the responses and the response file is generated for you. Then you can modify it if you want.
Oracle File Packager allows you to group files into installable units that can be installed/distributed via Oracle Installer, Oracle Client Software Manager, and Oracle Software Manager.
The Oracle File Packager Wizard guides you through creating a staging area and it generates the required installations scripts. These stage areas can be used by Oracle Software Manager to create Releases and Packages that can be distributed via Oracle Software Manager.
Please refer to the Oracle File Packager online help for more information.
The Oracle Enterprise Manager/Oracle Software Manager network is made up of one or more Oracle Enterprise Manager/Oracle Software Manager installations, each administering host servers that contain Oracle Intelligent Agents.
Assuming that all machines have the required software installed and configured, communication is established in the network.
The Oracle Enterprise Manager/Oracle Software Manager application looks for and registers host(s). It initiates actions and the Intelligent Agent is responsible for executing them.
During installation of the Oracle Enterprise Manager/Oracle Software Manager application, configuration information about each host is stored in the Oracle Enterprise Manager repository database.
The application operator sets Oracle Enterprise Manager to regularly query the Intelligent Agents to determine status. The application then registers the host, which appears in the Navigator window.
See the Oracle Enterprise Manager Configuration Guide for more information about registering hosts.
The Oracle Enterprise Manager/Oracle Software Manager application initiates actions and the Intelligent Agent is responsible for executing them.
The process works as follows:
Oracle Software Manager uses a lightweight store-and-forward messaging system that keeps network traffic to a minimum. In the event of network problems, any message that is waiting to be sent, either from the application or the agent, is held until the network is back online. Communications between the application and agents are not resource intensive; they require only one connection per agent. If a host becomes unavailable, the connection is freed.
|
Copyright © 1997 Oracle Corporation. All Rights Reserved. |
|