Assignment Goals
The primary goals of this assignment are:
- Extend the core Unreal Engine code.
- Create a new Unreal Engine material node.
- Get experience with the strategy of finding and replicating an example, then changing it to suit your needs.
For this assignment, you'll be creating an new MaterialExpression node for the Unreal Engine material editor. Material editor nodes are part of the "Engine" module, and adding a new one requires editing the code in that module. You do not need to add your new node to any plugins that directly access the material system functions.
You will create a native material editor node implementing the random texture tiling described in a chapter of GPU Gems 2, and in slides from the Graphics Hardware Conference. As is typical of real-life instances when you want to implement an existing technique into an engine, though these sources do have some snippets of shader code that you can use, you will need to modify them to make them work within the Unreal Engine. You will also have to look to examples within the engine for how to do it in a material node.
Details
The basic idea of the tiling algorithm is to break your input UV coordinate into an integer tile index and fractional position within the tile. You use the tile mapping algorithm to figure out which tile to use from the source texture, then build a new UV from the selected source tile and the fractional position. The tile mapping algorithm uses a hash derived from the integer edge position to decide which variation (or "color") to use for each edge. Since the hash is based on the edge position, both tiles that share the edge will make the same choice of color for the edge.
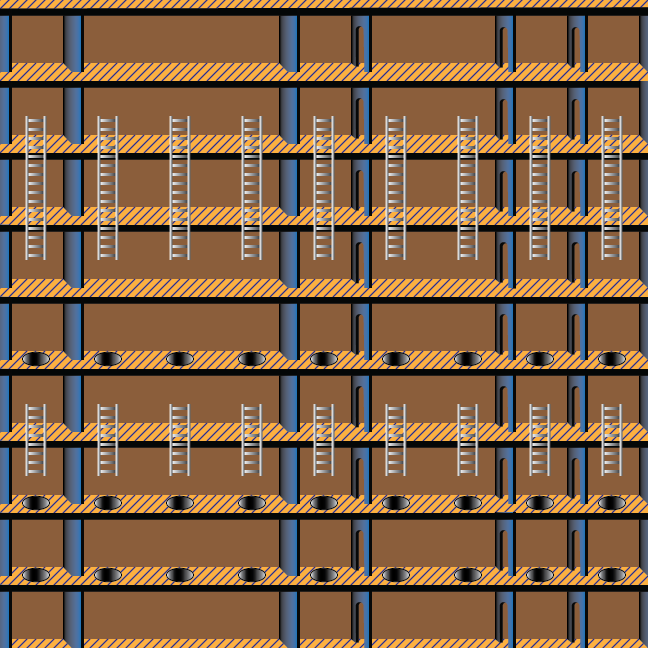
Test your project using the following two source textures
 |
 |
|
| tile1.png (2 edge colors) | tile2.png (3 edge colors) |
Creating results that will look something like this:
 |
 |
Create a project
- Create a a Blank C++ project with no starter content called assn6.
- As usual, put the project at the top level of your git repository.
Create a new material node
- Find a reasonably uniquely named material node. Replicate its code with a new name.
- Since the Engine module is widely used, recompiles for minor edits take a little longer than compiling stand-alone plugin code. It claims about 800 build steps, but most are just relinking other dependent modules, so the total time is 3-5 minutes for a single cpp change on my laptop. You can usually recompile implementation (not header) changes to the Engine module in the running editor without having to quit and restart, which will at least reduce waiting for the engine startup time.
- Modify your node to implement the texture tiling method.
- You should have one UV input pin, and integer parameters in the detail panel for the number of edge "colors" in X and Y.
- Output the tiled UV to plug into a TextureSample node.
- The shader code you emit for your node should mostly just call a shader function. Put your shader function in Common.ush and do most of your shader development there.
- Edits to a widely-used shader file like Common.ush will result in rebuilding almost all of the shaders when you restart the editor. This is actually slower than the rebuild after an Engine module change. You should avoid restarting the editor too often during your shader development and debugging. You can recompile just the shaders for your one test material after each change to Common.ush (by making a minor change, even just moving a node, then hitting "Apply"). It may be helpful to set the r.ShaderDevelopmentMode console variable to 1 during shader development to get the full error messages (with shader line numbers) from the shader compiler.
- Rather than using a texture for the edge hashing as described in the article, use the Rand3DPCG16 hash function from Random.ush to convert integer x/y edge position to a random edge color.
Test your node
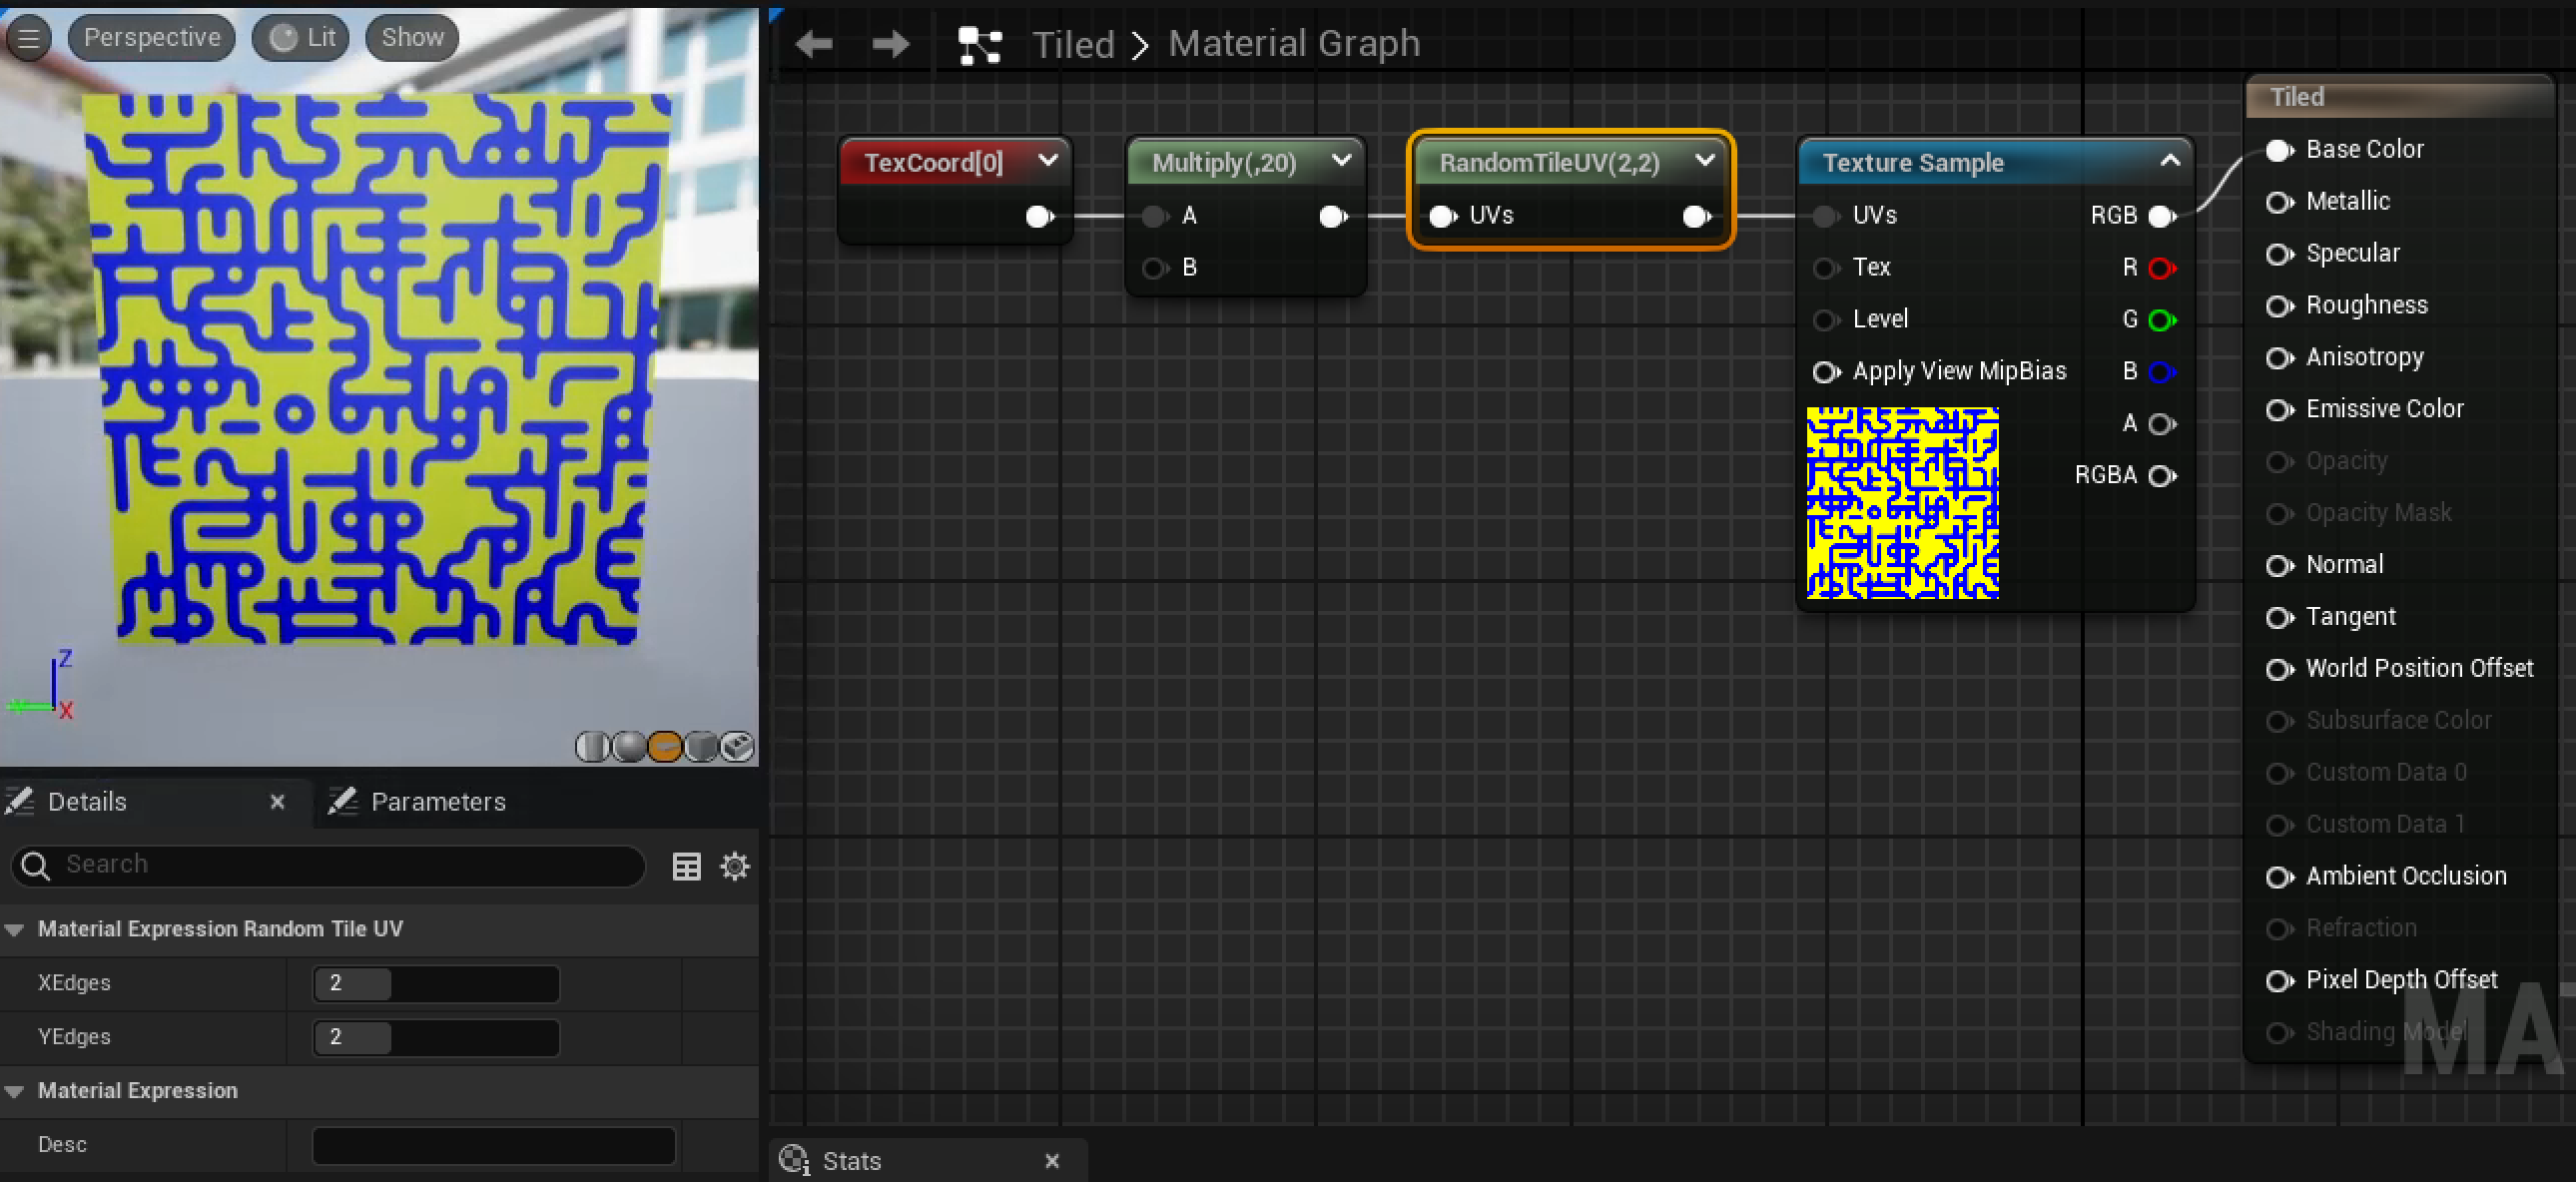
- Create a test material using tile1.png with 2 for both x and y edge "colors".
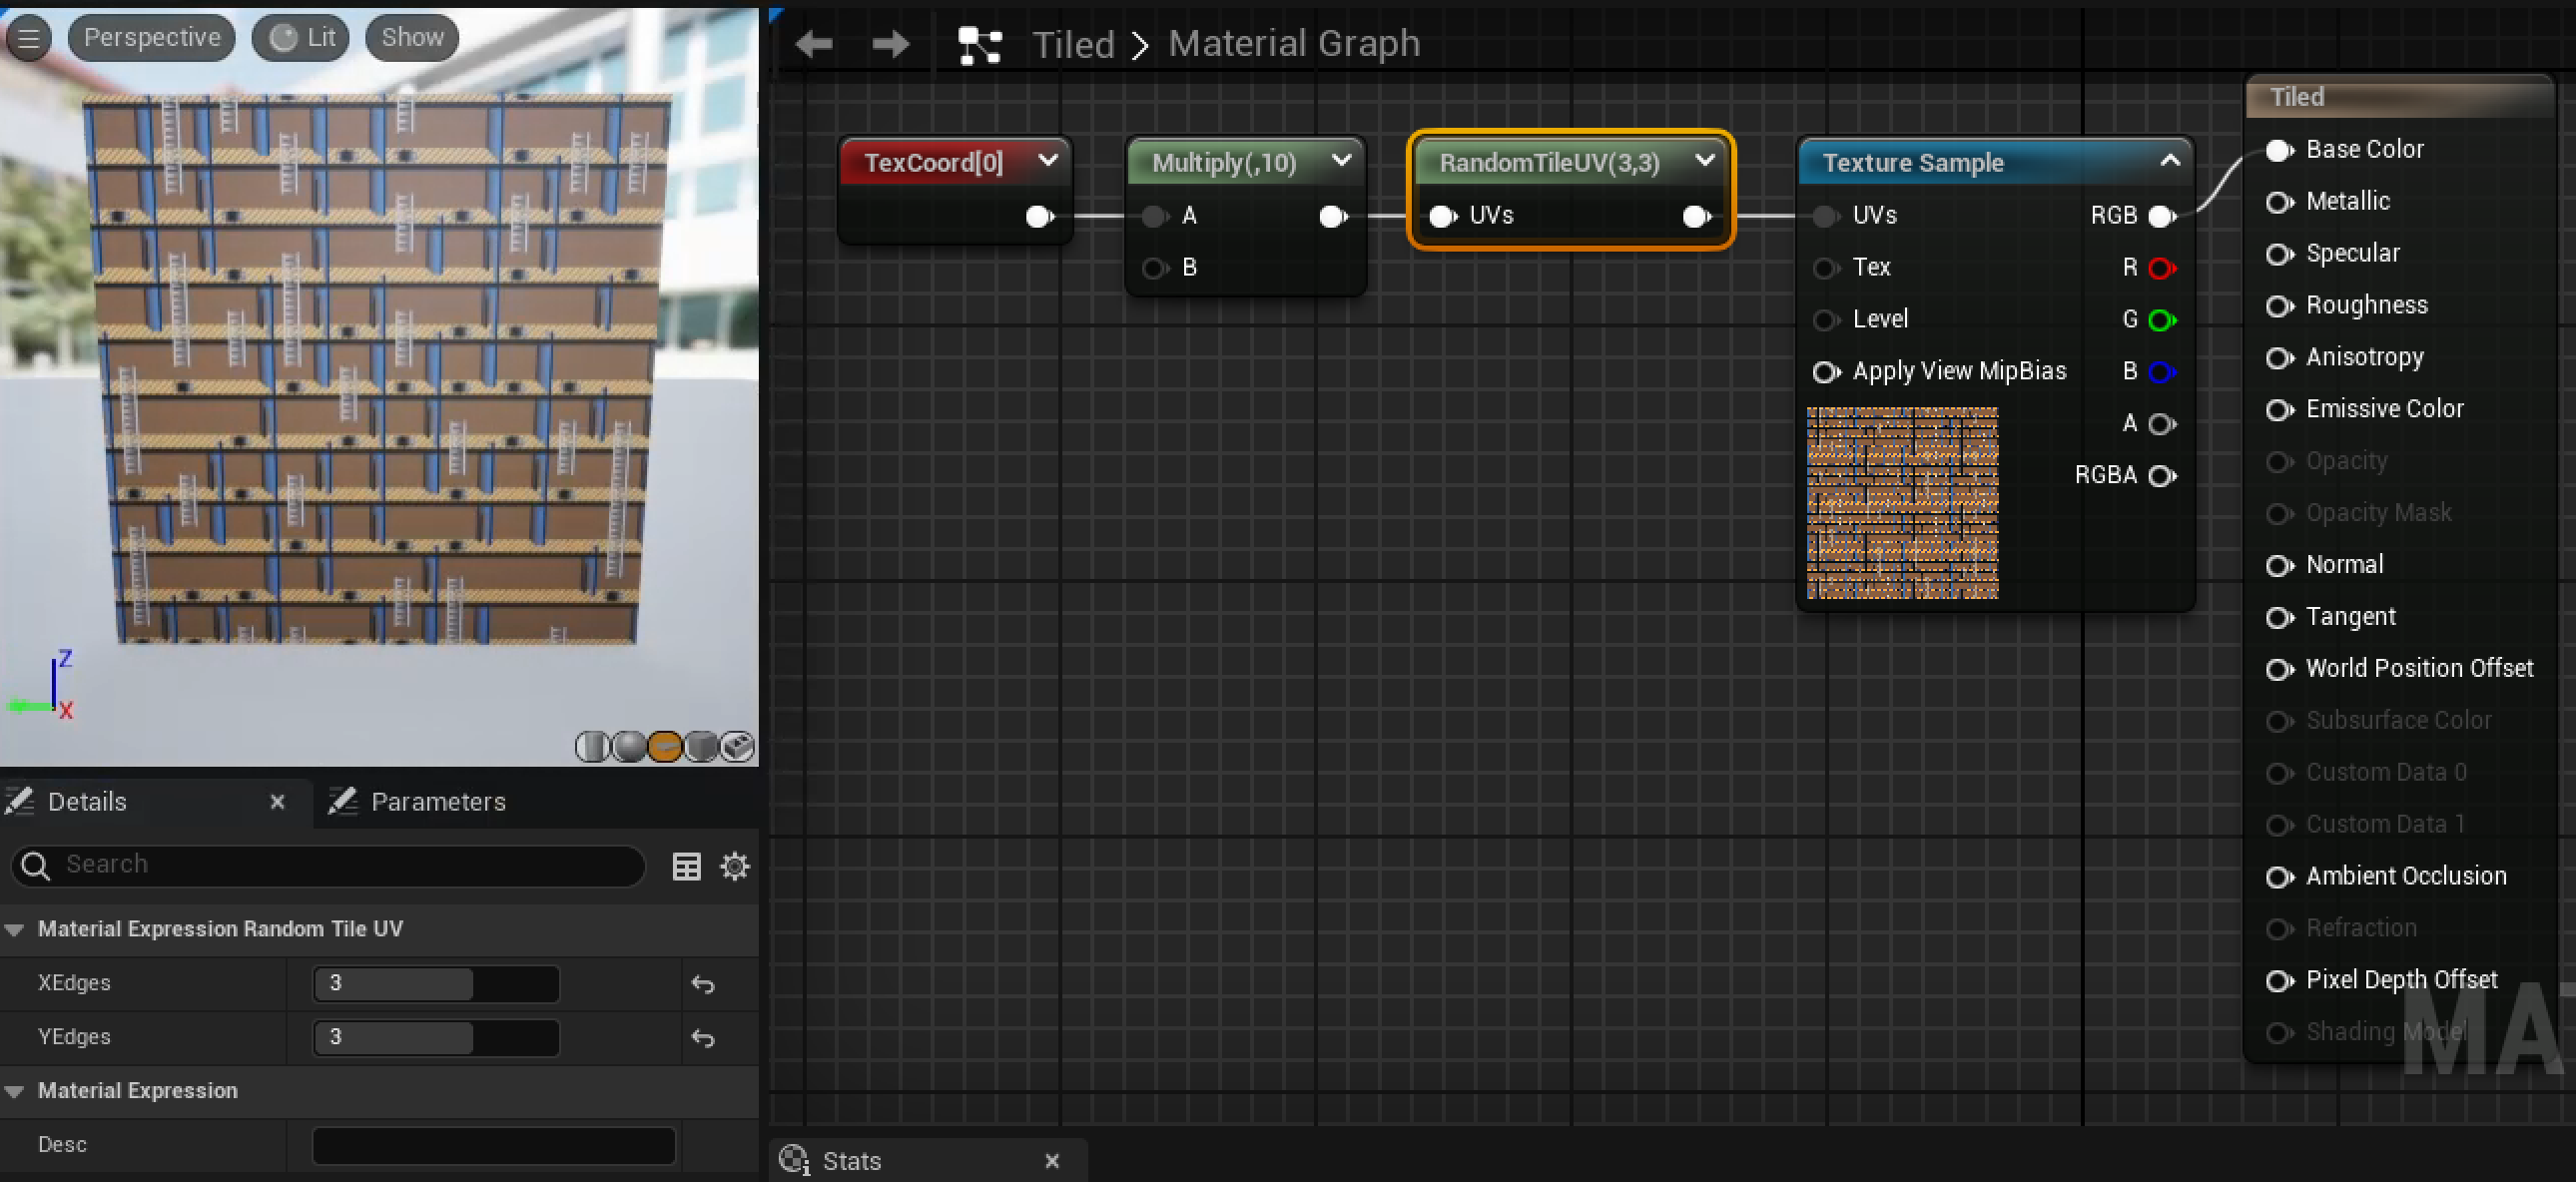
- Create a second test material using tile2.png, with 3 for x and y edge "colors".
- To avoid blending across tiles, the texture sample node in your tests should use the absolute mip level setting, with "Const Mip Value" set to 0.
Grad
There is no extra grad component for this assignment.
Extra credit
For up to 5 points each:
- Show the number of X and Y edge colors in the title of the node (as seen in the screenshots above).
- Include an additional input pin for a seed. Use a default seed value if nothing is connected to that pin
- Include the texture lookup as part of your node, with texture selection in the detail panel and color output.
- Default to the object texture coordinates if nothing is hooked up to the UV pin. You'll have to make sure that the texture coordinates will be generated for the material.
Submission
For full credit, you must commit multiple times during your development.
Add an assn6.txt. Tell us what works and what doesn't, and anything else you think we should know for grading. Be sure to tell us about any extra credit you attempted that you want us to grade. Extra credit will not be graded if it is not mentioned in the assn6.txt file.
Include a screen shot of the material editor for each of your two test materials, with the new material node selected so we can see what is set in the detail panel. You can use the OS screen shot tools, or capture a screen shot of the full material editor window with the "EditorScreenShot" console command (By default, EditorScreenShot captures the main editor window to the Saved/Screenshots directory. Dock the material editor window with the main UE window, or use "EditorScreenShot Name=window-name" to capture an image of the material editor). Scale the coordinate input to your node so we can see the randomized tiling in the material editor preview window in those screen shots.
Push to your repository, and tag your final commit with an assn6 tag.