Assignment Goals
The primary goals of this assignment are:
- Learn to use the shader and C++ scripting built into UE4.
- Create 3D materials
- Start getting experience hunting down information in a large codebase.
Details
Shader code
- Create a new level,
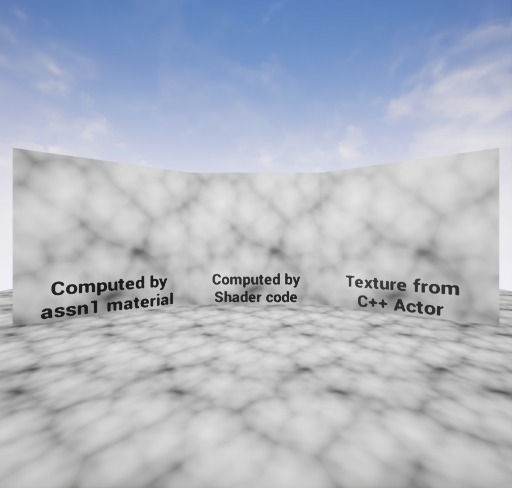
Maps/assn2 - Make a new material and reimplement your first, computed, material from assignment 1 in shader code as a single "Custom" node taking TexCoord[0] as input
- You have to give the input pin a name to be able to access it in your shader code.
- The internal editor for custom nodes sucks. It is easiest to edit somewhere else then paste it into the "Code" box.
- You are writing an HLSL function body. It can be multiple lines as long as it ends with a return statement.
- HLSL is a C-like language with operators, data types, and functions for graphics. Microsofts reference pages can be a useful resource for HLSL
- You can see the HLSL code generated by any material graph from the "HLSL Code" window or by setting r.DumpShaderDebugInfo to 1 before compling the shader.
- But your code should look like a human wrote it, since the point is to get you ready to write more complicated shader code. You will not get credit if you just cut-and-paste the machine generated code.
- If you add a wierd and unique constant, it'll make it easier to search for the generated code.
- The HLSL Code window gives a version of MaterialTemplate.ush with the template parts filled in, but still has some #includes to other files and some that are actually auto-generated on the fly during final compilation.
- r.DumpShaderDubugInfo puts the actual final shaders into Saved/ShaderDebugInfo. This includes many variants that are all compiled from the single material.
- Use base the noise functions from the engine, found in
Shaders/Private/Random.ush.- These are called in the auto-generated code using functions in
Common.ush. BothCommon.ushandRandom.ushare included in every material and available for use.
- These are called in the auto-generated code using functions in
- Stick this material on a labeled plane somewhere in your scene next to another labeled plane using the original material-node based material (to show they match).
Baking from C++
- C++ code has to be attached to an actor. Create a dummy actor and add a C++ actor component to it.
- This will give you two C++ files with some boilerplate code filled in. The actual baking code will go in the
TickComponentfunction on the first tick.- We use
TickComponentrather thanBeginPlaybecause, though graphics is initialized in the editor whenBeginPlayruns, it is not yet initialized in a standalone game until later. - You can hit the UE4 "Compile" button to compile and hot-load any changes within the UE4 editor.
- Debugging actor code
- To enable debugging of your actor code, just run your project from Visual Studio if you are using Windows or Xcode if you are using Mac
- Even without the debugger, you can print from your actor. Either send it to the log window with
UE_LOG, or to the screen withGEngine->AddOnScreenDebugMessage
- In general, your job will be to find C++ functions, add their #includes to the .cpp, and figure out how to get the inputs you need to feed them.
- This page gives examples of adding both internal and editor-visible state to a C++ component.
- You'll want the texture and material to be editor-visible so you can set and/or change them without recompiling
- This one has loads a texture from CPU-side data, so shows how to get at some of the other data you might need.
- This tutorial is way overkill, but gives samples of much more complex C++ behavior.
- Finally, it should be super-helpful to know that Blueprint nodes are C++ functions!
- You can make new ones by adding the right macros in front of any C++ function in the engine. The Blueprint node name is constructed by adding spaces to the function name (so "MyFunction" in C++ becomes a "My Function" blueprint node).
- You can call any of these from regular C++ code.
- There are also mechansims to call blueprint networks from C++ code (look for function and function_implementation in some of those samples)
- Search the engine source to find the C++ name and parameters for blueprint nodes.
- Even the binary build of UE4 includes the engine and editor source. It's mostly missing build files, external programs, and third party software
- Even so, it's 18K files and almost 2M lines of C++ code and 72K lines of shader code. Search is your friend!
- We use
 3D Material
691 students


 to
to 

Submission
Add an "assn2.txt" to describe your test computer (at least OS and CPU) and engine version (e.g. 4.17.0, 4.17.1, etc.). Document where/how you found any C++ functions you used. Report the timings for both unbaked and baked 2D materials. For 691, also report timings for your unbaked and baked 3D materials.
For full credit, you must commit multiple times during development. We'll be looking for your development process, so make sure the commit messages are somewhat meaningful. Also, by the due date, you'll also need to do at least one push ("git push") of your changes to your repository on github so we can see your work.